This article is part of a series.
View all 7 parts
- Part 1 – Installing Arch Linux on Raspberry Pi with Immediate WiFi Access
- Part 2 – Setup i2c on Raspberry Pi Zero W using Arch Linux
- Part 3 – Setup NodeJS Project Space on Raspberry Pi Zero W
- Part 4 – Porting DRV8830 I2C Motor Driver Code to NodeJS
- Part 5 – Editing Raspberry Pi Code Remotely from Visual Studio Code
- Part 6 – This Article
- Part 7 – Google Vision API using Raspberry Pi and Node

Not too long ago there was a post on Hackaday about a little four-wheeled bot made with a Raspberry Pi and some eBay motor drivers.
Raspberry Pi Zero Drives Tiny RC Truck
I really liked the little chassis, ordered one, and was happy to find it was delivered with the motors already mounted. (As I become an aged hacker, it's the little time savers which are genuinely appreciated.)
On buying the chassis I'd already decided to use one of my Raspberry Pi Zero W's (rp0w) to control the bot. I really like Arch Linux on the rp0w. It's light weight and the packages are well curated. Again, it's the little time savers. I liked the combination even more since I found a way to set the rp0w headlessly, which meant I could go from SD card to SSH'ing into little Linux board.
Coincidentally, I purchased several DRV8830 modules from eBay. This is a sad story -- I've played with the DRV8830 chip a long time ago:
Because Sparkfun did a great job of documenting the IC and creating an Arduino library to go with it. I was disheartened to find Sparkfun and EOL'ed the boards.
Probably because buttholes like me kept buying them off eBay. I've got some mixed feelings here -- one of them is guilt.
I've had some thermal paste lying about for years--it works nicely as an adhesive. Also, I was hoping to use the chassis to heatsink the motor drivers.


A bit of a tangent. At work one of the skills which is useful for our team is being able to work with APIs. For awhile I've wanted to learn NodeJS, since it seems to be the goto framework for solid back-end business applications. It doesn't hurt StackOverflow's Developer Survey for the last few years has shown JavaScript is a solid language to stay sharp on. Specifically, being able to work within the NodeJS framework makes one pretty darn marketable.
Ok, for these reasons I decided to build this bot using NodeJS. I've written a separate article on setting up NodeJS, working with i2c-bus, and porting the DRV8830 Sparkfun library to NodeJS.
- Not yet written (shesh, been busy. Judge much? :P)

I drove the motor shown using two series Li-Ion batteries connecting to a buck converter set to output ~5.0v. The motor spun nicely and pulled around 200mA. However, the real test would be connecting to two geared motors per DRV8830.
'use strict';
var i2c = require('i2c-bus'), i2c1 = i2c.openSync(1);
var sleep = require('sleep');
var drv8830 = require('./drv8830');

const motorAddressOne = 0x61;
const motorAddressTwo = 0x67;

var motor1 = new drv8830(motorAddressOne, i2c1);
var motor2 = new drv8830(motorAddressTwo, i2c1);

motor1.drive(50);
motor2.drive(50)
sleep.msleep(3500);
motor1.drive(-50);
motor2.drive(50);
motor1.stop()
motor2.stop()

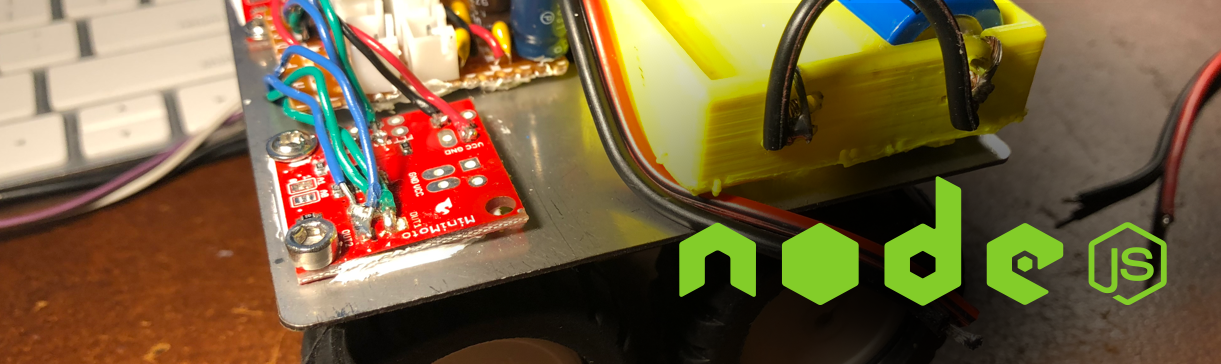
It was time to wire up the chassis motors and create a test of the system. The wire used was some eBay single core aluminum wire (the cheap stuff). Wiring was pretty straightforward.
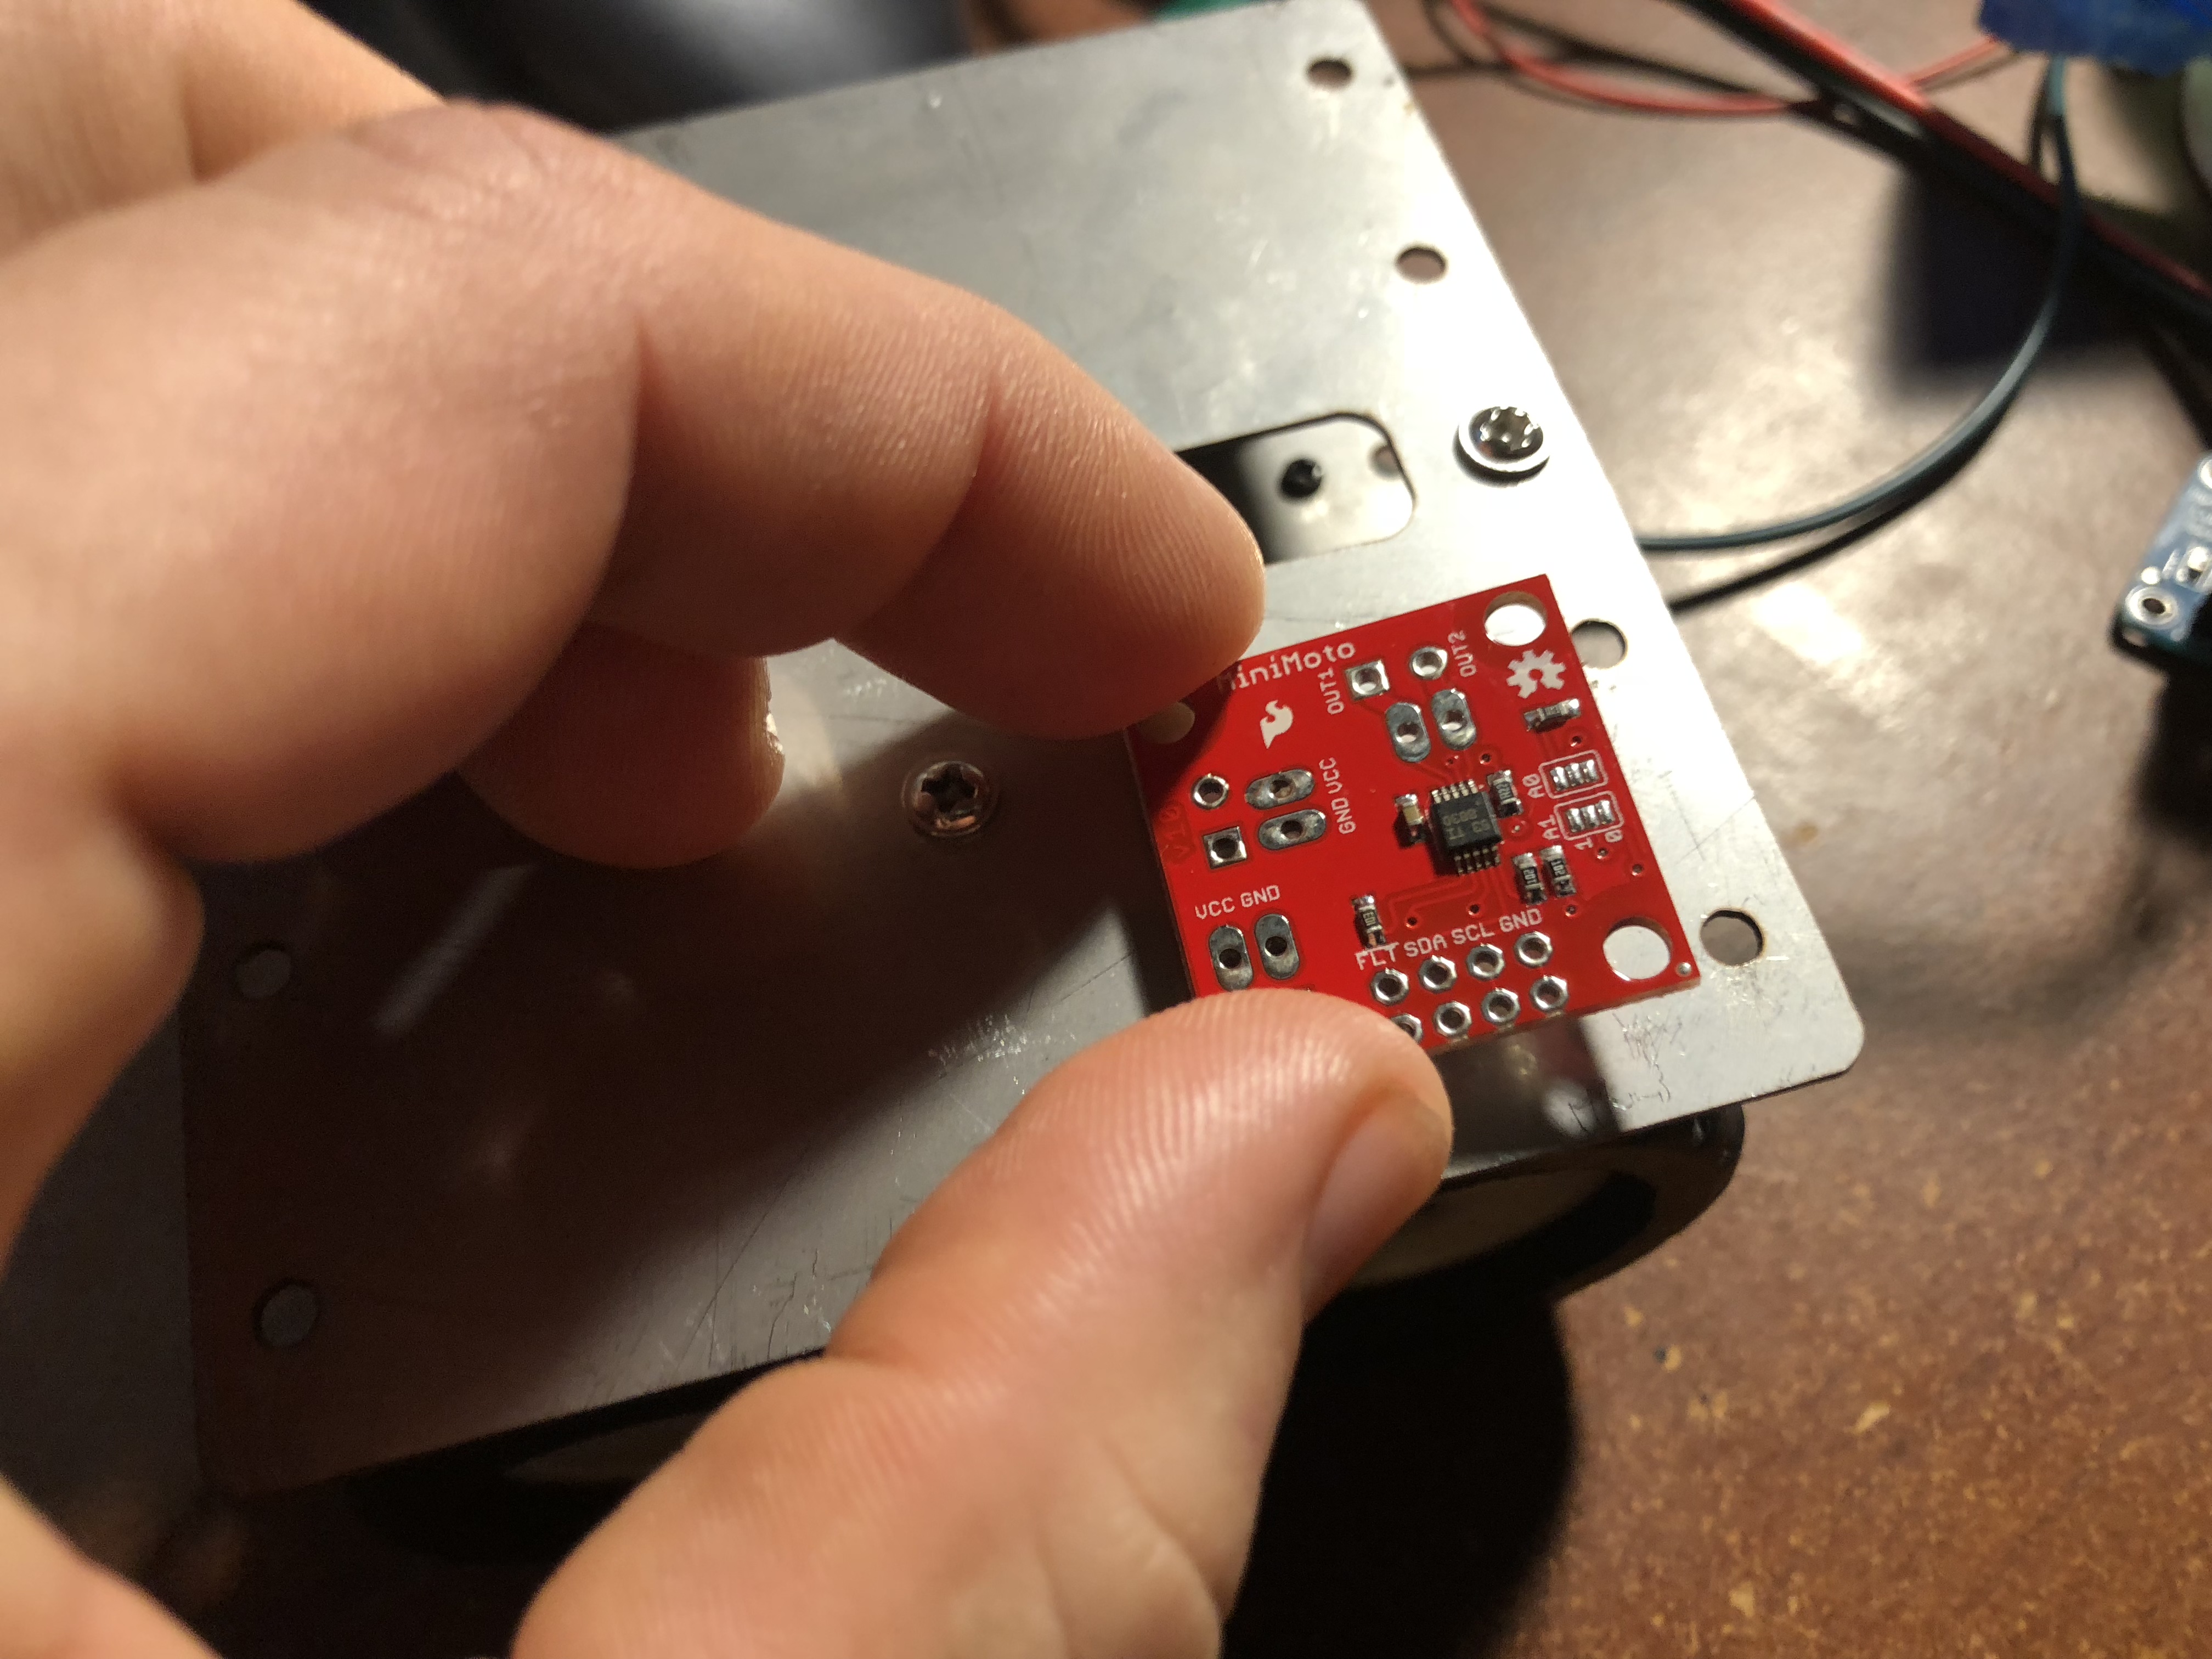
However, I did make a little i2c bus board from perfboard and JST connectors. Adding both ceramic and electrolytic decoupling capacitors for smoothing and to aid peak discharge.
Note the heaping amount of heatsink goop on the underside of the perfboard, this was a hacker's solution to galvanically isolating the perfboard from the steel chassis.


One-B-One Schematic
+--------------+                    +------------------+           +------------------+
|              |                    |                  |           |                  |
|              +--+LEAD1+----+OUT1+-+                  |VCC----+5V-+                  |
|              |                    |                  |           |                  |
| Motor 1      +--+LEAD2+----+OUT2+-+   DRV8830+A      +----GND----+  Buck Regulator  |
|              |                    |                  |           |                  |
|              |                    |                  |           |                  |
|              |                    |                  |           |                  |
+--------------+                    +-----+---+--------+           +--+--+------------+
                                          |   |                       |  |
                                      SDA1|   | SCL1               5V |  | GND
                                          |   |                       |  |
                                          |   |                       |  |
                                          |   |                       |  |
                                          |   |                       |  |
                                     +----+---+--------+              |  |
                                     |                 |              |  |
                                     |                 |              |  |
                        +----+VCC2+--+  ADUM1250ARZ    ++VCC1+--------+  |
                        |            |                 |                 |
                        |   ++GND2+--+                 ++GND1+-----------+
                        |   |        |                 |
                        |   |        +----+--+---------+
                        |   |             |  |
                        |   |         SDA1|  | SCL2
                        |   |             |  |
                        |   |             |  |
                        |   |             |  |
                  +-----+---+-------------+--+-------+

                            Raspberry Pi Zero W

The ADUM1250ARZ is a bi-directional galvanic isolator for digital communication up to 1mbs. It's the first chip I ever designed a PCB for and it's still my favorite. Essentially, the ADUM1250 seperates the rp0w from the noisy motors -- and more importantly, if I screw something up on the motor side, won't kill my rp0w. The ADUM1250 is not necessary for most people, just me

The last bit I had to figure out was the the Raspberry Pi's power. I attempted to use a single Li-Ion battery and a boost regulator to power it, but the regulator's I bought were DOA.
Then I remembered the load-sharing and boost converter circuit salvaged from a battery bank. The charge circuit was built for Li-Po chemistry and the only Li-Po I had lying about was a 350mA. I wired it up and was surprised the whole thing worked, with the added benefit of being able to charge the rp0w battery without disconnecting it. Booyah!
The last bit I did for the video. I pulled the
npm
package keypress and wrote this little program.
'use strict';
var i2c = require('i2c-bus'), i2c1 = i2c.openSync(1);
var sleep = require('sleep');
var drv8830 = require('./drv8830');
var keypress = require('keypress');

const motorAddressOne = 0x61;
const motorAddressTwo = 0x67;

var motor1 = new drv8830(motorAddressOne, i2c1);
var motor2 = new drv8830(motorAddressTwo, i2c1);

// var speed = 63;
var turnSpeed = 33;
var driverSideSpeed = 63;
var passangerSideSpeed = 63;

// make `process.stdin` begin emitting "keypress" events
keypress(process.stdin);

// listen for the "keypress" event
process.stdin.on('keypress', function (ch, key) {
  if (key && key.ctrl && key.name == 'c') {
    process.stdin.pause();
  }
  switch(key.name) {

    case 'w':
        motor1.drive(driverSideSpeed);
        motor2.drive(passangerSideSpeed);
        break;
    case 's':
        var motors = [motor1, motor2];
        setDriveWithAcceleration(motors, driverSideSpeed, 10);
        break;
    case 'd':
        motor1.drive(turnSpeed);
        motor2.drive(turnSpeed*-1);
        break;
    case 'a':
        motor1.drive(turnSpeed*-1);
        motor2.drive(turnSpeed);
        break;
    default:
        motor1.stop();
        motor2.stop();
  }

});
process.stdin.setRawMode(true);
process.stdin.resume();

var setDriveWithAcceleration = function(motors, desiredSpeed, accelTimeMilliSec) {
    for(var i = 0; i < desiredSpeed; i++){
        motors[0].drive(i);
        motors[1].drive(i);
        sleep.msleep(accelTimeMilliSec);
    }
}
Then, I shot the following video and called it donesies.