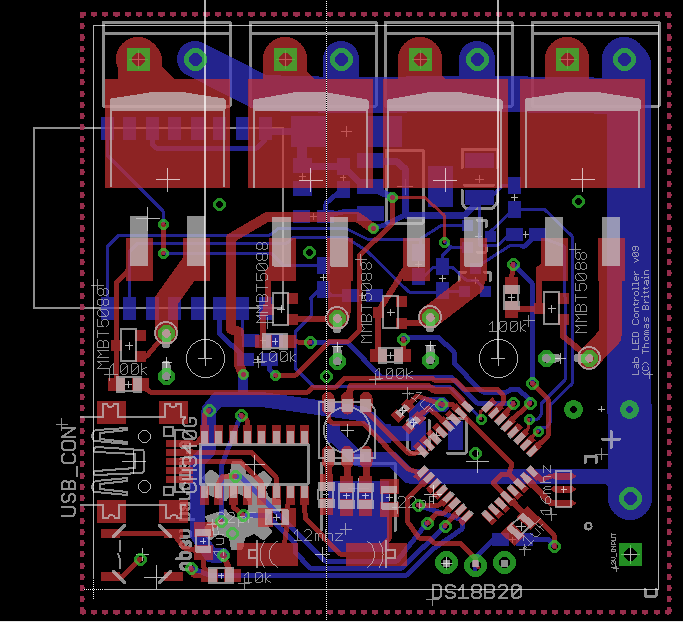
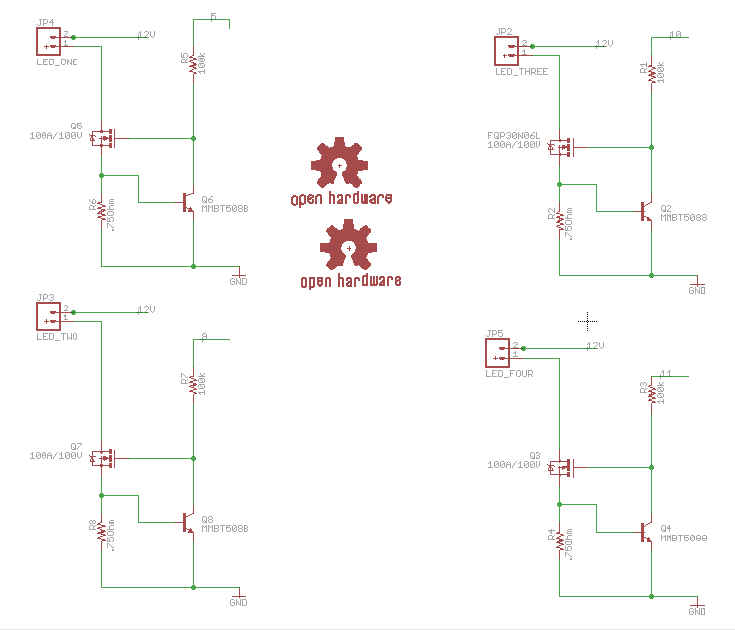
This is an extension of previous work. I had finished a LED driver for the lab, hooked it up, and found it was a fire hazard. For the amount of lumen I wanted out of them I was having to set the current resistor to .47ohm. This was pushing nearly 2amps of current through the little FQP40N06L. The LEDs were bright, but immediately the TO-220 became too hot to touch. Two choices, either redesign or use less current, resulting in dimmer LEDs. Easy choice, redesign.
The first thing I realized was I need a heat-sink. Ironically, I had gone with TO-220s, a through-hole package, because I felt they would do better handling the heat. Ended up using the BS103AL, which is in an TO-263 package. This is an SMD package that lies on its belly exposing its back for heatsink placement.
This heatsink looked beefy enough and had the correct dimensions (5CM).
The notch on the heatsink will lie against the array of TO-263s, hopefully, drawing all excessive heat. However, the contingency is to place a fan on the back of the heatsink.
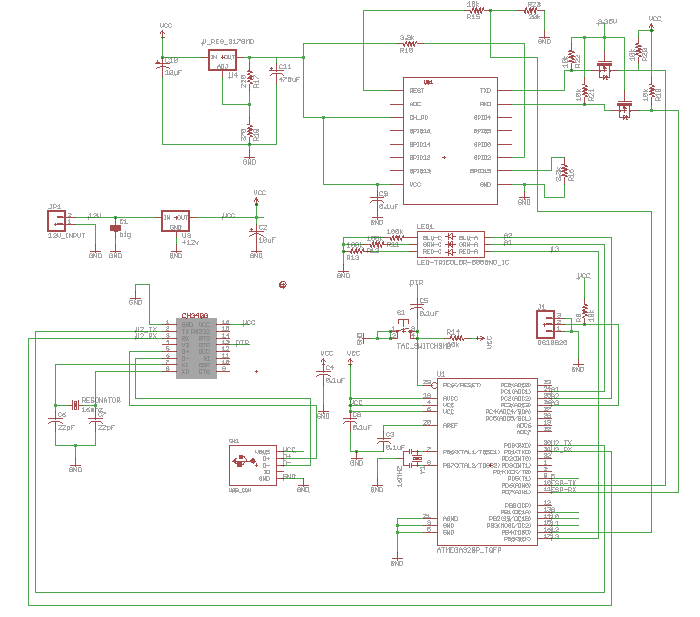
There is also an ESP8266 on the board. I decided it was a better option for controlling the LEDs, since they wouldn’t be used outside the house and would always be connected to mains. Of course, I’ve never turned on an ESP8266, so I’m hoping I strung it correctly. It does have level conversion for TX, RX, and RESET lines.
I have also added a CH340G for USB-to-UART. The CH340G SOIC chips were ordered awhile back, but before I put them into this board I threw it on an ATTiny84 breakout and tested it. I didn’t hold much hope for it, but it worked like a charm. Huh.
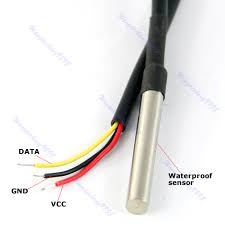
The last piece of interest added to this board was a DS18B20. This is a one wire temperature probe, which I plan to thermal-paste on the heatsink as an auto-shutdown measure. Or perhaps, to reduce the amount of time a fan makes noise by kicking it on-and-off.
I wanted to take a a moment and write out how I plan to document future Swift projectss.
Step One: Install
I found Jazzy. It’s a command line utility for documenting Xcode projectss. Nifty thing is, it is one of the few which works with Swift 2+. Anyway, it is pretty painless to get up and going.
The one catch I found was Swift is changing versions often, so you may have to wait a bit for the developers to catch up. However, when the updates are released it is pretty easy to get things working again, simply run, sudo gem update in the terminal.
Step Two: Running
To run Jazzy you simply open a terminal window on your Mac, navigate to the top folder of your Xcode projects, and run jazzy. You should get something like the following,
Running xcodebuild
Parsing ViewController.swift (1/3)
Parsing bleTableViewController.swift (2/3)
Parsing AppDelegate.swift (3/3)
building site
jam out ♪♫ to your fresh new docs in `docs`
One super important note here. By default Jazzy only documents public methods. Therefore, you must pass Jazzy the flag
jazzy --min-acl internal private
This is the only way you will get everything. If not, you will end up with an empty projects, most likely. Had to find this out the hard way. Reference to the solution.
If jazzy parsed everything correctly you will have a docs folder in your projects folder. This docs folder is a pseudo-website build.
Step Three: Push to Pages
To get your documentation online, copy the docs folder to your an appropriate directory in your Jekyll site map. Commit and push. Now your projects’s documentation is apparent of the global singleton known as human knowledge. To get a link to the index of your documentation add the following,
I wont rehash Jazzy instructions. In short, you can put Markdown in your comments within the code and the parser will pick up the comments and associate them with the methods etc they are close.
It should look like above, “–exclude” (not the double dash) followed by the absolute path of the file to be excluded. Then a comma (“,”), no space, and then the absolute path of the second file you wish to exclude. It’s pretty easy to make this into a script by doing the following.
1. From the terminal type: nano my_jazzy_script
2. Paste the finished command, such as the one listed above.
3. "Write-Out" the changes.
4. Exit nano.
5. At the terminal type: chmod +x my_jazzy_script (this makes the file executable).
6. To run the script type: ./my_jazzy_script
Well, I’ve had the urge to hack. It’s been strong for awhile now, sadly, with a more than fullt-time job and Bek in graduate school, I’ve just had no time. Until now! The new job I have (HMIS Database Manager) has actual vacation time. I’ve had almost two weeks off (combined with the Christmas holiday). The first few days were obviously spent working…But! After turning my phone and email I was able to…catch up on family time. Sigh. Then, clean house. Then, get bored. But with a few days left I actually got some hacking in.
I downloaded Visual Studio Express on my work computer a few months ago. (Shh. Don’t tell the boss.) But I’ve not had time to write a single line of code. This holiday was a good time to learn C#!
Two weeks later I had this monster,
It is meant to be a GUI for the HM-10, HM-11, and HM-15 modules. The highlights,
It uses threads to prevent any “Sleeping.” Keeps the UI healthy.
IO.SerialPorts should allow a lot of USB-to-UART chips to work.
Basic Terminal App features (view as ASCII, HEC, Decimal, etc.) like RealTerm and the others. BUT! With one feature I’ve longed for in a terminal app for so damn long. The ability to save your settings on exit. No more selecting 9600 baud for the billionth time.
I’ve put a lot of command validity checks in the system. For example, if you were to type “AT+CON0123S6789012” Would not be a valid command normally, but terminal will convert the “S” to “F.”
I have also imbued it with a bit my understanding of the HM-1X datasheets. This is probably the greatest selling point of the program, sadly.
C# is my new favorite. Don’t judge me :P.
I thought I would take some time to go into the code involved in the little terminal, not for posterity, merely for my own reference.
Quick reminder, for anyone unfamiliar with my posts:I am not a profesionnal. These writings are not great. They are simply my journal towards understanding what the hell I’m doing
Object Oriented Programming
I have not posted as much lately. It is a combination of losing LMR and not having time since Bek started school. But I have definitely been writing code. The focus has been on learning OOP design. This this C# program was probably my first real object-oriented program. But I have also been writing in Swift for iOS, which is an OOP language as well.
Arlight, so what’s the difference between OOP and the other thing? And why learn OOP? I thought robots used microcontollers which are much too small to handle OOP? Well, I’m learning every robot builder is already an object oriented programmer.
Difference between OOP and Procedural programming
I wont butcher others’ explanations by rephrasing them. Instead, I’m going to list what helped me understand.
I believe every roboticist is both an object oriented programmer and a procedural programmer. They create objects with specific functions (PCBs, STLs, etc.), holding on to the plans so copies can be made. They instantiate those objects (print the STL, send the PCB file to OSHPark, etc). Each of these objects created usually has a specific purpose. The design of the object, a motor-controller for instance, is often only accessible by a specific input such as UART connection. Its outputs are controlled by how the inputs are digested by the motor-controller itself. The robot-builder may decide to add an accelerometer to the motor-controller by copying the design files and adding the needed accelerometer circuit (inheritance). And so forth.
It seems like a lot of the the concepts are supported by this metaphor,
Objects are great. Especially when they are walking, talking, grasping robotic sort of objects. However, each roboticist must line the insides of objects with procedures that move data through in a predictable manner. This means, at some granularity, objects are filled with small runs of procedural programming. Ultimately, it takes both for roboticists, object oriented programming and procedural programming. And I argue, whether aware or not, the roboticist practices both continuously.
Moving away from the hippy-dippy stuff; for my personal development as a robot builder I will be taking time to learn both, regardless of my possibly metaphor of convenience, as they both appear as roots of computational-thinking
In application, I want to know procedural programming to be effective. Microcontrollers often have small memory sets and the code needs to move from input to output with little overhead (hmm, procedural programming is a linear style and a line is the shortest distance between two points, there’s gotta be something there). But I want to know how to connect my robot to large systems, such as a Raspberry Pi, PC, or the whooooole Internet. To do this effectively I need to be able to pass data between procedural and object based programs.
Avoiding Sleep
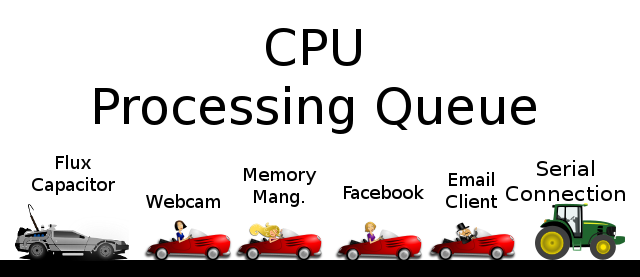
My program is walking between the microcontroller world and the big-boy-PC world. As I stated above, at some point the HM-1X module would need to pass its data to the PC. Here in lies a dilemma best explained by a picture,
For the HM-1X Aid the data is passed through the Serial connection. Of course, as I stated above, I am using the Systems.IO.Ports.SerialPorts framework to handle the incoming serial data. A nifty little aspect of IO.Ports is it actually has the DataReceivedEvent on a separate thread (more on threads in a moment). This event is triggered by an RX interrupt on whatever USB-to-UART chip, which allows data to be handled as it is coming in.
Now, I mentioned methods for handling data probably go from procedural to object-oriented when moving upstream from a microcontroller to a PC. A USB-to-UART bridge is a perfect example. Receiving UART data for a microntroller looks like this,
intincomingByte=0;// for incoming serial datavoidsetup(){Serial.begin(9600);// opens serial port, sets data rate to 9600 bps}voidloop(){// send data only when you receive data:if(Serial.available()>0){// read the incoming byte:incomingByte=Serial.read();// say what you got:Serial.print("I received: ");Serial.println(incomingByte,DEC);}}
Here, the microcontroller is looping over a if-statement to see if there is any data available in the RX buffer. Whenever the loop() finds there are data available, then it will run through some procedures on handling those data. This method works OK, your microcontroller’s program is only dealing with serial data. But what happens if is supposed to handle other tasks and your microcontroller has a never-ending stream of data? Whatever code is after the if(Serial.available() > 0) will not execute, since the available serial data will never be less than 0. This is referred to as using a “blocking” serial data method. Not sure how this term was derived, but I’m guessing “blocking” comes from how the method prevents the program from doing anything else
Hmm, wouldn’t be better to handle serial data “immediately” when it comes in? That’s where interrupts come in.
The Serial.onReceive() is an interrupt vector which fires every time the serial data is received. The interrupt vector calls a method which copies the data received from the serial buffer into the string_buffer.
voidMyFunction(){inti;intlength=Serial.available();intstring_buffer[32];//copy data out of the receive bufferfor(i=0;i<length;i++){string_buffer[i]=Serial.read();}//run a string compare function, or otherwise parse the received dataif(MySpecialStingCompare(string_buffer,"Hello Arduino")){Serial.println("Hello World");}}voidsetup(){Serial.begin(9600);Serial.onReceive(MyFunction);}voidloop(){//do nothing}
This is a non-blocking method of handling serial data. It takes advantage of a hardware level peripheral on the Atmel chips known as an interrupt vector. This particular interrupt is fired any time the RX pin receives a series of LOWs which resemble incoming data.
This method has the advantage of freeing the microcontroller to do other things in the main loop and handle data only when new data is received. This saves program from having to make a comparison every clock cycle. Also, and more importantly, it allows the microcontroller to immediately update data important to the purpose of the main process; this is critical in processes which are time sensitive, such as remote control on a quadcopter.
For example, if we wrote a radio controller for our quadcopter using a Bluetooth device which talks to an Arduino Pro Mini. If we used the blocking method the Arduino receives any data from the radio controller, like, oh I don’t know, “Don’t run into that tree!” the main process on the Arduino would not have this information until it gets back to the Serial.available() > 0. Not cool if milliseconds matter.
However, if you were to write the same radio controller using non-blocking, interrupt based serial communication, then whenever you send the signal to the Bluetooth device, and that device sends it serially to the Arduino, the Arduino will basically bookmark its place in the main process and handle any data regarding its immediate crash.
Another example, what happens if your Arduino has an LCD which is meant to display the output of a temperature sensor. Yet, the temperature sensor and display are a small portion of what the Arduino is doing. If the temperature changes using the blocking methods, then the LCD will not be updated until the Arduino finishes whatever tasks and makes it back around to the if(Serial.available() > 0). This will make your LCD’s responsiveness be clunky.
Contrast this with the non-blocking method (see what I did there?). Setting up an interrupt on the temperature sensor to update the LCD whenever the temperature changes will make LCD appear responsive to temperature changes. This is how a 3D Printer handles the thousands of tasks it must complete and still keep its LCD responsive.
Good stuff.
Alright, so that’s how a microcontroller handles things–even with interrupts it’s still processing tasks one at a time. We can avoid the appearance of slowing the microcontroller with processing intensive tasks, like waiting on serial data to be received, but ultimately, the microcontroller is handling the tasks one at a time. So what does this have to do with my C# program?
Let’s take a look at C#’s version of ‘Serial.onReceive()’
stringInputData="";// Read Data.privatevoidDataReceivedHandler(objectsender,SerialDataReceivedEventArgse){// Gets incoming data from open port and passes it to a handler.InputData=ComPort.ReadExisting();data="";data=InputData;}
This is probably the simplest version of a DataReceivedHandler() using C#. In short, it fires whenever data is received; so it’s non-blocking. The method, as I have it written, simply grabs the data from the interrupt buffer using ComPort.ReadExisting() and shoves it into the inputData. Pretty simple, right? Being candid, I believe it is one reason so many poo-poo using IO.Ports.SerialPort framework. But how is IO.Ports.SerialPorts different than the Arduino HALSerial.onReceive()? Hmm, perhaps I should have used a more credible comparison.
But coming back to the complex command. What if a computer sends a command to the microcontroller and expects a response? It’s going to take some time for the microcontroller to reply. In the meantime, what does the PC do? It could run off to do other tasks and wait for the onReceive to fire. But, what if one of those tasks requires some information from microcontroller. In short, the microcontroller is holding up the show and little can be done but wait.
We know the PC is going to need to wait. Coming back to the blocking and non-blocking methods we looked at on microntroller, the only option really available in C# is the non-blocking, which is good because it’s our favorite. But is it really enough?
If our PC program is serial-data centric, meaning the PC’s processes are dependent on the microcontrollers data and vice-versa, then simply using the non-blocking helps us little. The PC could move from waiting on serial data to painting a label on the UI, but what if the text in that label is meant to be data from the microcontroller? Regardless of how we look at at it, it seems like it would be best for the sake of our program to throttle the PC to the microcontroller.
But exactly how much slower would our program go?
Let’s say you have the following:
Device
Speed
Arduino Uno (Atmega328P)
16mhz
PC
2.2ghz
UART-to-USB
9600bps
Let’s find the common denominator and compare.
Arduino:
16mhz = 16 * 1,000,000 = 16,000,000
1 to 2 clock cycles for each instruction
1 to 2 / 16,000,000 = 62.5 to 125 nano-seconds
(Who said Arduinos were slow? Pfft)
PC:
2.2ghz = 2.2 * 11,000,000,000 = 2,200,000,000
1 to 2 clock cycles for each instruction
1 to 2 / 2,200,000,000 = .45456 to .90900 nano-seconds
(Oh, I guess it's slow to the PC.)
UART-to-USB:
bytes x bits_per_character / bits_per_second
1 byte x 10 / 9600
10 / 9600 = 10416666.66 nano-seconds (~10 milliseconds)
Remember, this is for one byte, so if we send the string, “Mario, your princess is in another castle” (41 x chars) it will take approximately half a second (41 x 10 = 410 milliseconds = ~0.5 second), which will definitely be noticeable if it is meant to be displayed. Hmm, I guess we identified the hold up, eh? This means even if we were limited to the Arduino speed we would probably still get a smooth UI–without it appearing clunky. But, limited to the UART-to-USB; well, crap. This affirms my speculation, we will need to throttle the PC, the UI, the microcontroller, pretty much to the whole system to be respective of the sluggishness of the UART-to-USB.
Alright, if I’ve sold you on the program we are ready to ask, “What’s the best way to throttle the program?” Let me jump how I did this in C#.
The main difference between C# and Arduino’s data receive methods is the C# method takes place on a separate thread. Now days most PCs have multiple cores and in object oriented programming these are harnessed through threading. Most microcontrollers have one core (yes, yes, except the Parrallax), so threading is not common on a microcontroller.
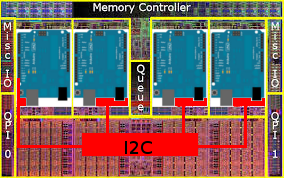
Now, I’m going to dare to oversimplify what little understanding I have regarding threads. Since I came from the hardware side the way I think of threading is having two Arduinos connected by I2C. One of the Arduinos is the master and the other the slave. Whenever the master Arduino gets data from the USB-to-UART there is code on the master which sends half the data to the slave Arduino via I2C, with some instructions it should do some particular tasks with the data and send the results back to the master Arduino. While the slave works on its half of the data, the master is working on the other half. If the slave gets done first (there is nothing dictating which order they finish in; they are asynchronous) the master has an interrupt on the I2C, it sees the slave is done, and tells him to wait to send its results. After the master finishes, it sends a request for the completed data from the slave. Lastly, if the master finishes first, then it waits with a dirty-look only 8-bit ICs can give while the slave finishes its crunching. Ultimately, when all the data is crunched the main processor does something with it. Each Arduino here would be a processor and the tasks running on them would be a thread.
Inside the PC we have something similar going on, but instead of two Arduninos you would have two processors on the same die.
I like to think of a thread as a separate process within our system. Of course, we can’t call the second process, “main process.” We’ve already got one of those. And computers don’t like ambiguity. Instead, let’s get creative and call the second process something wild, fun, and bizarre! Like…“second process.”
Let me to try and explain how this is different than the Arduino HAL. In C# the second process is pretty much like the main process. With one grand honking exception: The user interface (UI) runs on the main process and cannot be updated by any other process. This makes perfect sense; you wouldn’t want half a button to show on your UI, right? Instead, a protocol saving data in a space both processes can access it and a flag to look in the shared space when updated. This is like the old snail-mail mailbox where the flag is raised when you want the post-person to look for an epistel.
Bringing it back to my code. The HM-1X’s serial DataReceivedEvent is on one process and my UI is on another. This means, when my program gets data serially then it puts that data in the shared space and lets the main process know data has been received.
Those of you who are probably sharper than me will notice an issue similar to the Arduino and its LCD. If the data coming in and the UI are working out of sync what happens if a user does something like continually hit the Send on a command without waiting for a serial response to be received. The best case scenario is we got an “OK” for every time the command was sent. However, if it is a more complicated command which requires a back-and-forth between the microcontroller and the PC, well, big problems. It would be like a sloth and a rabbit trying to have a conversation. Those of you from the Arduino world know the common (however, I’ll argue poor) answer to this dilemma: delay().
The delay() in the Arduino basically tells the microcontroller to do nothing for however long you tell it. After waiting the Arduino can then check to see if there is an answer waiting for it. There are two main reasons this isn’t diserable. But let’s take a look at this delay setup in C#.
The above code will write data to the serialport and will sleep for 5 seconds after. This System.Threading.Thread.Sleep() call will actually puts the main thread to sleep. This means all of the UI will become non-responsive and anything which might happen on the main thread will be blocked. This is very similar to our first Arduino code set, but instead of receiving data, we are writing it.
The intention of this solution is to send a command to the UART-to-USB and wait for a response. A couple of problems,
The main thread is shut down while waiting.
Response time must be predetermined.
Now, the response time can be taken care of with better code handling it. However, the “frozen” UI posed an issue. I tried to keep it pretty simple by removing the System.Threading.Thread.Sleep().
With this code the WriteMethod() is called all most of the non-critical UI elements are disabled. This gives the user the impression he or she needs to wait, without making the program appear frozen. This worked great. Not only was my RX method interrupt driven, it was on a whole different thread. There were no worries about losing important data received from the USB-to-UART. Oh, but wait, the UI never was re-enabled. Hmm.
No problem. I added a method to our DataReceivedHandler() to re-enable the UI
stringInputData="";// Read Data.privatevoidDataReceivedHandler(objectsender,SerialDataReceivedEventArgse){// Gets incoming data from open port and passes it to a handler.InputData=ComPort.ReadExisting();data="";data=InputData;enableUI();}
This worked great! Oh, but wait, if there was a problem and a response was never received then the UI was never re-enabled. No worries, let’s add a timeout feature.
//Write DatapublicvoidWriteData(stringdataToWrite){ComPort.Write(dataToWrite);DisableUI();setResponseTimeout(500);}// Read Data.privatevoidDataReceivedHandler(objectsender,SerialDataReceivedEventArgse){// Gets incoming data from open port and passes it to a handler.InputData=ComPort.ReadExisting();data="";data=InputData;enableUI();// Let's disable the timer since we didn't use it.HM1Xtimer.Enabled=false;}// The consumer interface for the response timer.publicvoidsetResponseTimeout(intresponseTime){responseTimeout=responseTime;}// Creates the response timers and attaches the elapse method.privatevoidHM1XCallbackSetTimer(intmilliseconds){// Create a timerHM1Xtimer=newSystem.Timers.Timer(milliseconds);// Hook up the Elapsed event for the timer.HM1Xtimer.Elapsed+=hm1xCommandTimedCallback;HM1Xtimer.AutoReset=false;HM1Xtimer.Enabled=true;}// This event is fired if the response timer elapses.privatevoidhm1xCommandTimedCallback(Objectsource,EventArgse){if(data==""){waitingOn=hm1xConstants.hm1xEnumCommands.ERROR;}}
Yay! That code is darn clever, right? Let’s compile, run it, and celeb…son-of-a-B! It wouldn’t compile.
The problem is with the enableUI() call in the DataReceivedHandler() method. It seems the DataReceivedHandler() is actually taking place on a separate thread from the main thread, and the main thread is where the UI is being maintained. This is where the good-ole-Ghostbusters adage is important to recall: Don’t cross the streams! EVER! Staying away from explaining what I don’t understand, I’ll simply say: Don’t cross thread. One thread should not be updating what another thread is working on. Instead, information from one thread should be set down and the other thread notified it is ready.
These metaphors are nice and all, but how do we implement a thread friendly solution?
//Write DatapublicvoidWriteData(stringdataToWrite){ComPort.Write(dataToWrite);DisableUI();setResponseTimeout(500);}// Read Data.privatevoidDataReceivedHandler(objectsender,SerialDataReceivedEventArgse){// Gets incoming data from open port and passes it to a handler.InputData=ComPort.ReadExisting();data="";data=InputData;enableUI();// Let's disable the timer since we didn't use it.HM1Xtimer.Enabled=false;// Pass data to main thread.gotData(sender,data)}....// RX event handler triggered by SerialPort. Hands off data quick. // If you try to update UI from this method, threads tangel.publicvoidgotData(objectsender,stringdata){// Incoming data is on another thread UI cannot be updated without crashing.this.BeginInvoke(newSetTextCallback(SetText),newobject[]{data});}// This method happens on main thread.publicvoid(stringtext){txbMainDisplay.Text=text;}
This is pretty complex and I poorly understand it. In fact, I wrote this whole article with the hope it would help me understand this part. Here’s what I think is going on:
We create an event which will fire every time the USB-to-UART, DataReceivedHandler() in this method there is a call to gotData(). In the gotData() call we use the BeginInvoke method. The BeginInvoke then executes SetText() method on the main thread. We know ‘SetText’ is being called from the main thread because of the word this in the command. This is a place holders for the object of origination. It looks complicated, but really, the thread controlling the UART-to-USB is simply calling a method on the main thread whenever it has received data, and passing it the data it received.
And that’s it. Using this method we can enable and disable the UI every time data is sent or received.
A few more notes,
This method doesn’t need to be used for disabling the UI. The WriteData() is actually executed on the main thread. It is the DataReceivedEvent() which is executed on a different thread.
This process gets a little more complicated when you are dealing with multiple objects, which is what I did. In my code SerialPortsExtended object handles all the data receiving and sending of data, so delegates are used to pass data back-and-forth between threads and objects.
That’s about it. Let me know what questions I can try to answer.
It’s strange, since they have some great hardware and some excellent software. But alas, trying to get a robot to connect to any iOS product is like asking Steve Jobs to come to dinner; you’ll get your hopes up, but, alas, he’s dead. So, short of a necromancy and some Frebreeze, it’s not going to happen.
But, I’ve found the backdoor to getting your iOS device to help your robot, and my friend, I’m going to give you the key.
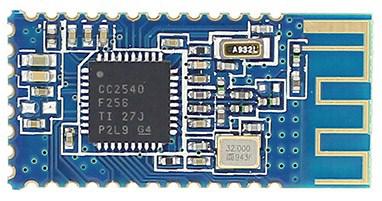
Those little HM-10 Bluetooth Low Energy PCBs that I’ve written about for so long. Those combined with a iOS developer license ($99 a year) and you can get your robot to do all sorts of neat tricks using your iOS device for higher functions.
Ok. Now, for the purpose of this post. I have created some breakout boards that’ll let you interface your microcontroller with Bluetooth, which will let you access your iOS device from your robot, but, not easily.
The CoreBluetooth API is a little abstract and cumbersome. I’ve found myself writing the same code over-and-over as I try to get my robot to do cool tricks. I think the closest I’ve come to something neat has been using my iOS device (iPhone 4S) as a robot radio controller. Well, I decided I needed to start using the DRY method when I programmed. It’s funny. I think I’ve been writing in Swift since the first day you could compile in it, but I have been treating my writing as procedural programming. It was mainly out of ignorance, since I’ve always programmed procedurally, and when I started in languages which were meant to be written as object-oriented (OO) languages I never took the time to learn the differences, nor how I should write. It has made me very frustrated.
But after some advice form Mr. Bdk6 I took some time to try and understand the purpose of OOP. Really, all I did was watch this video:
It was seriously enlightening. Maybe I was primed for a thought-shift (for you 90’s kids, “A paradigm shift.”) But the concepts of a encapsulation and message-passing were are forcefully explicit to a robot rebel. A robot is self-contained system. It has internal and external behaviors. It has some information it shares with others; the same as message passing. But other parts of its memory reserved for the robot only. Object-oriented programming is something roboticist cannot help but do.
All right, to the point of this article.
I am writing a CoreBluetooth handling class in Swift. It is meant to take care of a lot of the boring responsibilities when communicating to a serial BLE device from an iOS device. Things discovering services or characteristics, setting up buffers, handling autoreconnect on disconnect, or perhaps mapping the -20 to 127 RSSI on to a green to red color. In short, all the boring stuff you must do to get your HM-10/11 to talk to an iOS and help a robot brother out, well, I hope this class will make it easy. It should be noted, this Class is written in Swit 2.0, tested on an iPhone 6 with iOS 9.0.2 and 9.1.
The projects is an app meant for a iPhone. It is simple. It has one View which is blank, but has a “Scan” button which will provide a table list of all BLE devices in range.
Here we create an immutable instance of the bleSerialManager, we call it hm10serialManager. This initializes a lot of properties you will need to handle the BLE devices discovered. It _also _starts searching for advertising BLE devices.
Also, notice I initialized this instance before any other classes. This is on purpose. I want my hm10serialManager instance to be visible to all other Swift files in the projects. And a benefit of Swift design is such a declaration will do that, make your instance visible to all files. After my bleSerialManager instance is initialized then our ViewController class is initialized. Notice, any Class which is meant to access the instance should include the bleSerialDelegate. This requires the ViewController class to conform to the protocol of our instance. Currently, there are no required methods, but there are several optional methods, which I will detail later, but for now they are named:
After you initialize your bleSerialManager instance you must set the delegate in every class that will be receiving data from CoreBluetooth. This should be accomplished in the viewWillAppear, not viewDidLoad. This will assure everytime the view is visible it is ready for the data coming from the Bluetooth device.
class ViewController: UIViewController, bleSerialDelegate {

    override func viewDidLoad() {
        super.viewDidLoad()
        // Do any additional setup after loading the view, typically from a nib.
    }

    override func viewWillAppear(animated: Bool) {
        hm10serialManager.delegate = self
    }
Define Device Behavior
In all honesty, a lot of what has been done before is baked into the CoreBluetooth API, but here is where I start bringing added value.
This allows you to set whether you want your iOS device (usually the acting as the Master / Central) to automatically reconnect to the laster peripheral it was connected. It takes three parameters. The first, on: Bool, sets whether you want a reconnect behavior. Then, tries: Int tells the instance how many times you want to try to reconnect to the last peripheral before it gives up. And timeBetweenTries: Double is the amount of time in seconds you would like wait before your iOS devices tries to reconnect.
Much like the afore stated function, this function defines what actions will be taken if your Central device is unable to connect to a device you tell it to connect. To be specific, this function would execute if you tell your Central (iOS device) to connect to a peripheral, it begins to the steps intended for establishing connection, but is disrupted sometime before it establishes solid connection.
setMutipleConnections(numberOfDevices: Int)
Here, you tell the iOS device to limit its number of connected devices. It should be noted, this function does not look as how many connections are possible, but rather, how many connection you would like to limit your program to attempt.
I found this function helpful since I had several HM-10 devices I was trying to connect. Strangely, the HM-10 when in peripheral role can connect to a central role which has other connections established, but if the HM-10 is in central role it can only handle one connection. Regardless, this is to prevent you program from wasting time attempting establishing a connection which is not needed.
A few notes, none of these behavior functions are required to be called. The bleSerialManager will work proper without the calls; it defaults to the following,
After we have setup it’s time to find some devices.
// Begin search automatically.
hm10serialManager.search(1.0)
This manually initiates the Central Manager search for peripherals. If it discovers a peripheral it logs its information (mostly) in a Swift dictionary. Each dictionary’s values are keyed by the NSUUID discovered for a respective device. Here are the types of data collected by the Central Manager,
// Dictionaries for device details on discovered devices.
private var discoveredDeviceList: Dictionary<NSUUID, CBPeripheral>
private var discoveredDeviceListRSSI: Dictionary<NSUUID, NSNumber>
private var discoveredDeviceListUUIDString: Dictionary<NSUUID, String>
private var discoveredDeviceListNameString: Dictionary<NSUUID, String>
private var discoveredDeviceListAdvertisementData: Dictionary<NSUUID, [String : AnyObject]>
Notice, these fields are all private (i.e., none are made into properties). This is purposeful and doesn’t necessarily comply with suggested Swift design. I chose to follow the strict OOP design pattern of only exposing fields through methods. That is, each of the properties other instances will have access to will be done so through a getter method.
Optional Call Back Method #1
Included in the bleSerialManager are several optional methods meant to serve as callbacks in your main instance. The searchTimerExpired() method is called when the amount of search time passed to the search() has expired. Note, the method is only called if it is unwrapped, which means you must declare the method in your main class for it to fire. These methods are only attached if you include the bleSerialDelegate.
Again, if the searchTimerExpired method is not declared and you have not conformed to the bleSerialManager protocol by attaching the bleSerialDelegate this method will never fire.
Get Discovered Devices’ Information
Let’s go over the info which has been collected on our discovered devices.
This field contains dictionary items for each device discovered. The items are a CBPeripheral instance. Each instance contains most of the info you would like to know about the device. In fact, the following dictionaries are simply this info broken out into separate dictionaries for ease of handling.
As I stated earlier, you cannot access bleSerialManager properties directly. Instead, there is a getter method which will allow you get at the stored list.
let myDiscoveredPeripheralDictioanry = hm10serialManager.getdiscoveredDeviceDictionary()
This will retrieve a dictionary in the form of Dictionary<NSUUID, CBPeripheral>. It really isn’t my intention for this to be used often. In fact, if you find yourself using it, please email me. It means I didn’t do a good job at making this class as versatile and easy as intended. Nevertheless, it’s there just in case.
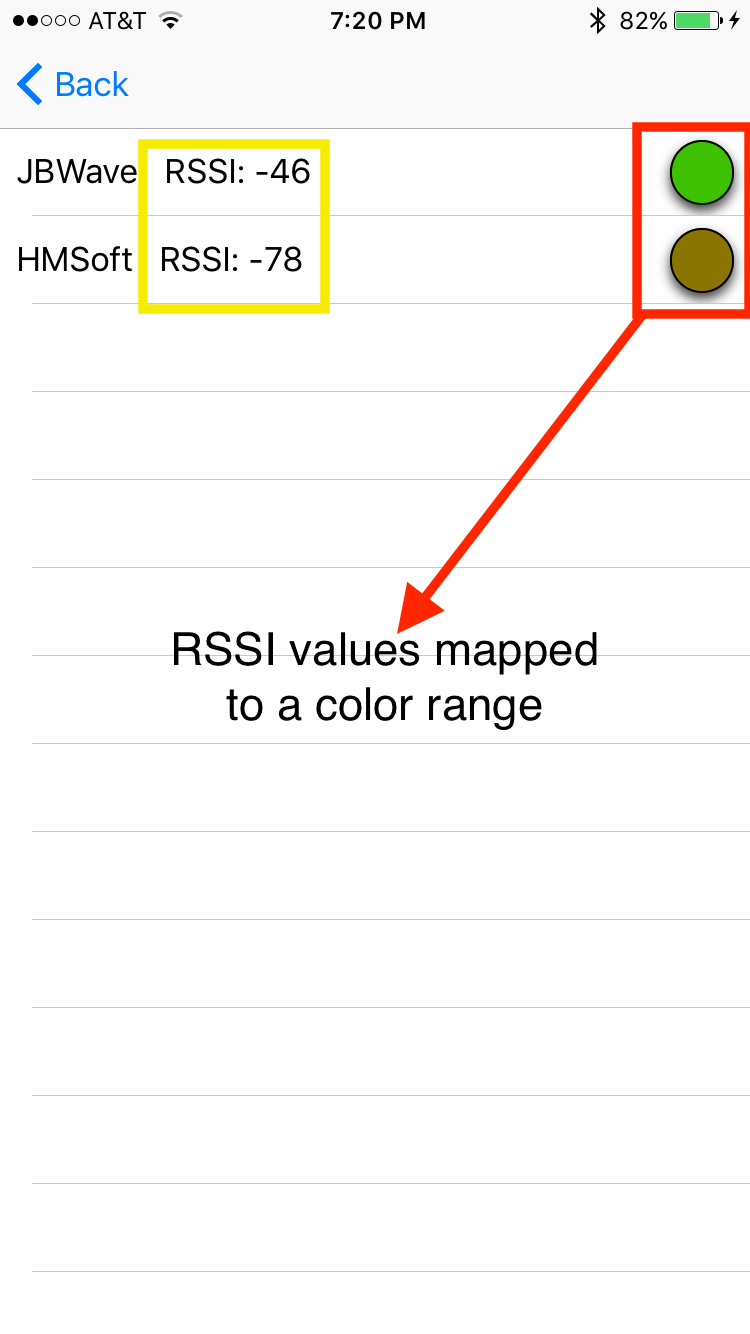
This is one of my favorite attributes of BLE, the radio signal strength indicator. It can be used for all sorts of neat tricks, especially for robots. For example, let’s say you put an HM-10 on a quadcopter and another on a controller. You’ve got a quadcopter controlled through Bluetooth. But you start flying it away from you at high-speeds, yanno, to test it out. Well, all of a sudden your HM-10s lose connection due to distance and your quadcopter flies off to oblivion, right? Nope! You have the quadcopter checking the RSSI as part of its flight procedures and if the RSSI is too great, then it will simply stop its existing flight and lower itself gently to the ground. Cool, right?
Of course, there are two different points which you can access the RSSI, when the device has been discovered but not connected, and then when the device is connected. How current the RSSI for discovered devices is dependent on several factors, but primarily, how often your central device is scanning for advertised packages and how often a peripheral is advertising. It is usually somewhere between 200ms and 1500ms.
This one feature allows you to do neat stuff like this,
This method takes a NSUUID object as a key, looks through the discovered device list, and returns the RSSI indicator as an integer. It should be called something like this,
let myDeviceRSSI = hm10serialManager.getDeviceRSSI(myDeviceNSUUID)
Note, the RSSI value is updated every time the search method is called.
This function takes no variables and returns two objects. One is is an array of discovered NSUUIDs in ascending order of their RSSI (i.e., the closer they are the closer they are to 0-indexed). The other is an array of NSNumbers representing the RSSI values of the corresponding NSUUID in the NSUUID array.
This method is meant for you to do neat things like shown in the image. Here, I used an range mapping function to map the RSSI values onto a simple color scheme (red = -127 and green = -20).
Eventually, I will write a function to take the RSSI and return a UIColor value.
When connectoToDevice() is called it takes one argument, the NSUUID of the discovered device you want to connect. It will return true if the method is able to connect to the chosen device. It will return false if you are already connected to that particular device, or if you have reached the maximum number of connected devices, or if the device was not found.
connectToDevice() Example:
if(hm10serialManager.connectToDevice(myDeviceNSUUID)){
    print("Connected!")
} else {
    print("Was unable to connect")
}
This should attempt to connect to whatever device myDeviceNSUUID corresponds. Aftere connecting to your device the bleSerialManager takes care of discovering the device’s services, characteristics, and characteristics descriptors. This can then be accessed with the following method calls.
Huh, haven't written these methods yet
Optional Call Back Method #2
optional func connectedToDevice()
The connectedToDevice() method is a call-back method which is part of the bleSerialManager protocol. It is called whenever the bleSerialManager has successfully connected to a device. Note, the method is only called if it is unwrapped, which means you must declare the method in your main class. You must also conform to the bleSerialManager protocol. This method is meant to update an UI with connection status. Or do any house-cleaning after connection has been confirmed.
10-05-16: Ok. Got tired. I’ll write some more tomorrow.


 Now, I’m going to dare to oversimplify what little understanding I have regarding threads. Since I came from the hardware side the way I think of threading is having two Arduinos connected by I2C. One of the Arduinos is the master and the other the slave. Whenever the master Arduino gets data from the USB-to-UART there is code on the master which sends half the data to the slave Arduino via I2C, with some instructions it should do some particular tasks with the data and send the results back to the master Arduino. While the slave works on its half of the data, the master is working on the other half. If the slave gets done first (there is nothing dictating which order they finish in; they are asynchronous) the master has an interrupt on the I2C, it sees the slave is done, and tells him to wait to send its results. After the master finishes, it sends a request for the completed data from the slave. Lastly, if the master finishes first, then it waits with a dirty-look only 8-bit ICs can give while the slave finishes its crunching. Ultimately, when all the data is crunched the main processor does something with it. Each Arduino here would be a processor and the tasks running on them would be a thread.
 Inside the PC we have something similar going on, but instead of two Arduninos you would have two processors on the same die.