This article is part of a series.
View all 6 parts
- Part 1 – A LEGO Classifier -- CNN and Elbow Grease
- Part 2 – Training a CNN to Classify LEGOs
- Part 3 – Generating LEGO Images for Training a CNN
- Part 4 – Install Tensorflow and OpenCV on Raspberry Pi
- Part 5 – Programming Arduino from Raspberry Pi Command Line
- Part 6 – This Article
This article is part of a series documenting an attempt to create a LEGO sorting machine. This portion covers the Arduino Mega2560 firmware I've written to control a RAMPS 1.4 stepper motor board.
A big thanks to William Cooke, his wisdom was key to this project. Thank you, sir!
Goal
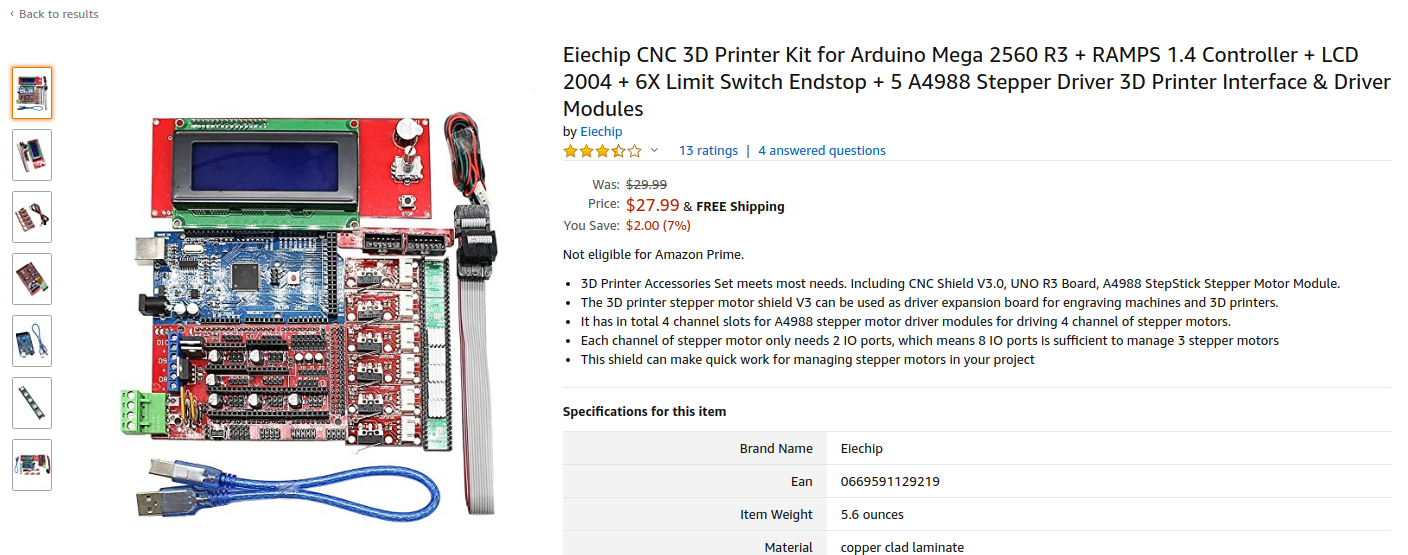
To move forward with the LEGO sorting machine I needed a way to drive a conveyor belt. Stepper motors were a fairly obvious choice. They provide plenty of torque and finite control. This was great, as several other parts of the LEGO classifier system would need steppers motors as well-e.g.,turn table and dispensing hopper. Of course, one of the overall goals of this project is to keep the tools accessible. After some research I decided to meet both goals by purchasing an Ardunio / RAMPs combo package intended for 3D printers.

At the time of the build, these kits were around $28-35 and included: * Arduino Mega2560 * 4 x Endstops * 5 x Stepers Drivers (A4988) * RAMPSs 1.4 board * Display * Cables & wires
Seemed like a good deal. I bought a couple of them.
I would eventually need: * 3 x NEMA17 stepper motors * 12v, 10A Power Supply Unit (PSU)
Luckily, I had the PSU and a few stepper motors lying about the house.
Physical Adjustments
Wiring everything up wasn't too bad. You follow about any RAMPs wiring diagram. However, I did need to make two adjustments before starting on the firmware.
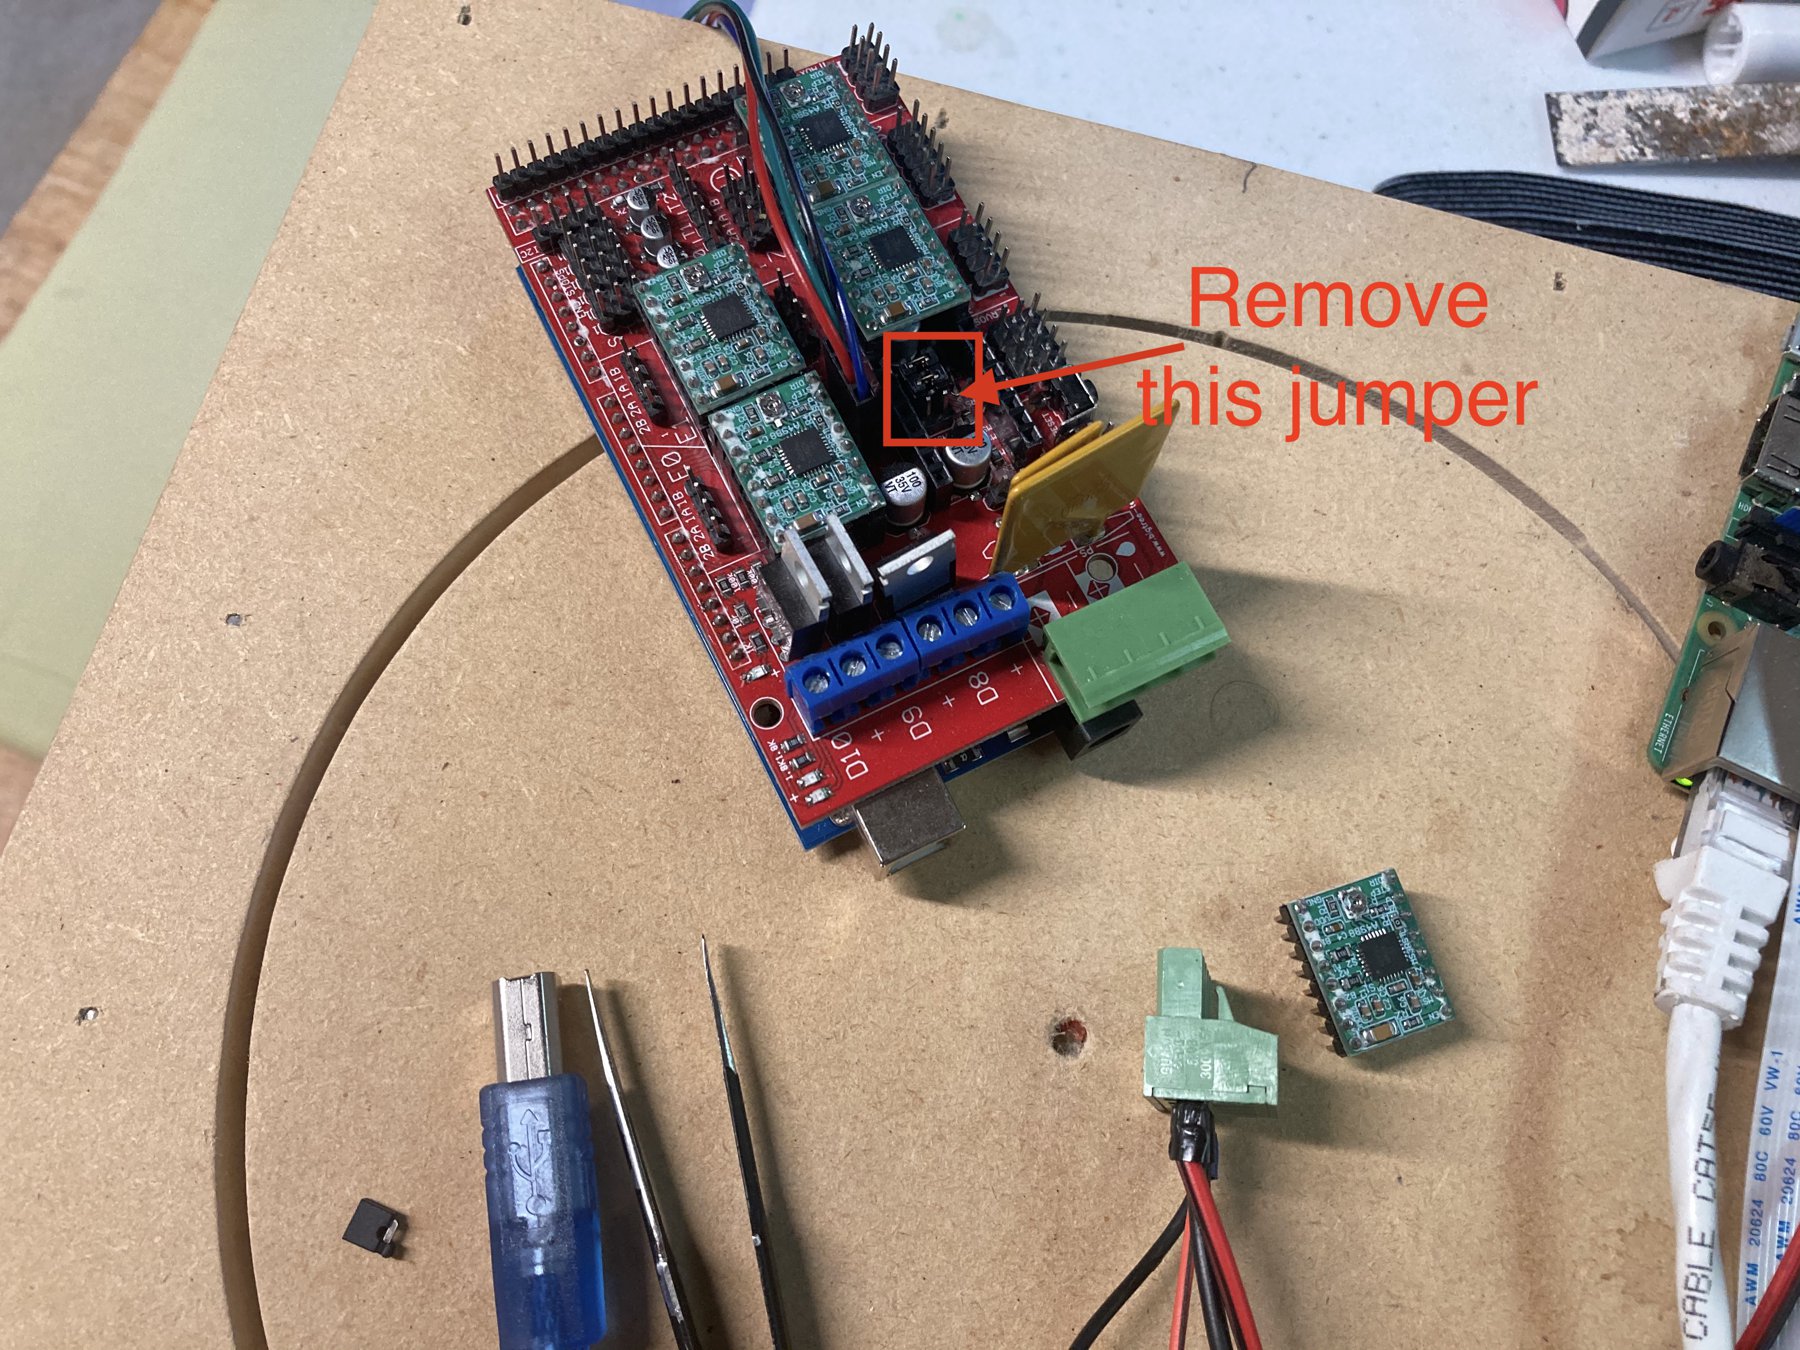
First, underneath each of the stepper drivers there are three drivers for setting the microsteps of the respective driver. Having all three jumpers enables maximum microsteps, but would cause the speed of the motor to be limited by the clock cycles of the Arduino--more on that soon.

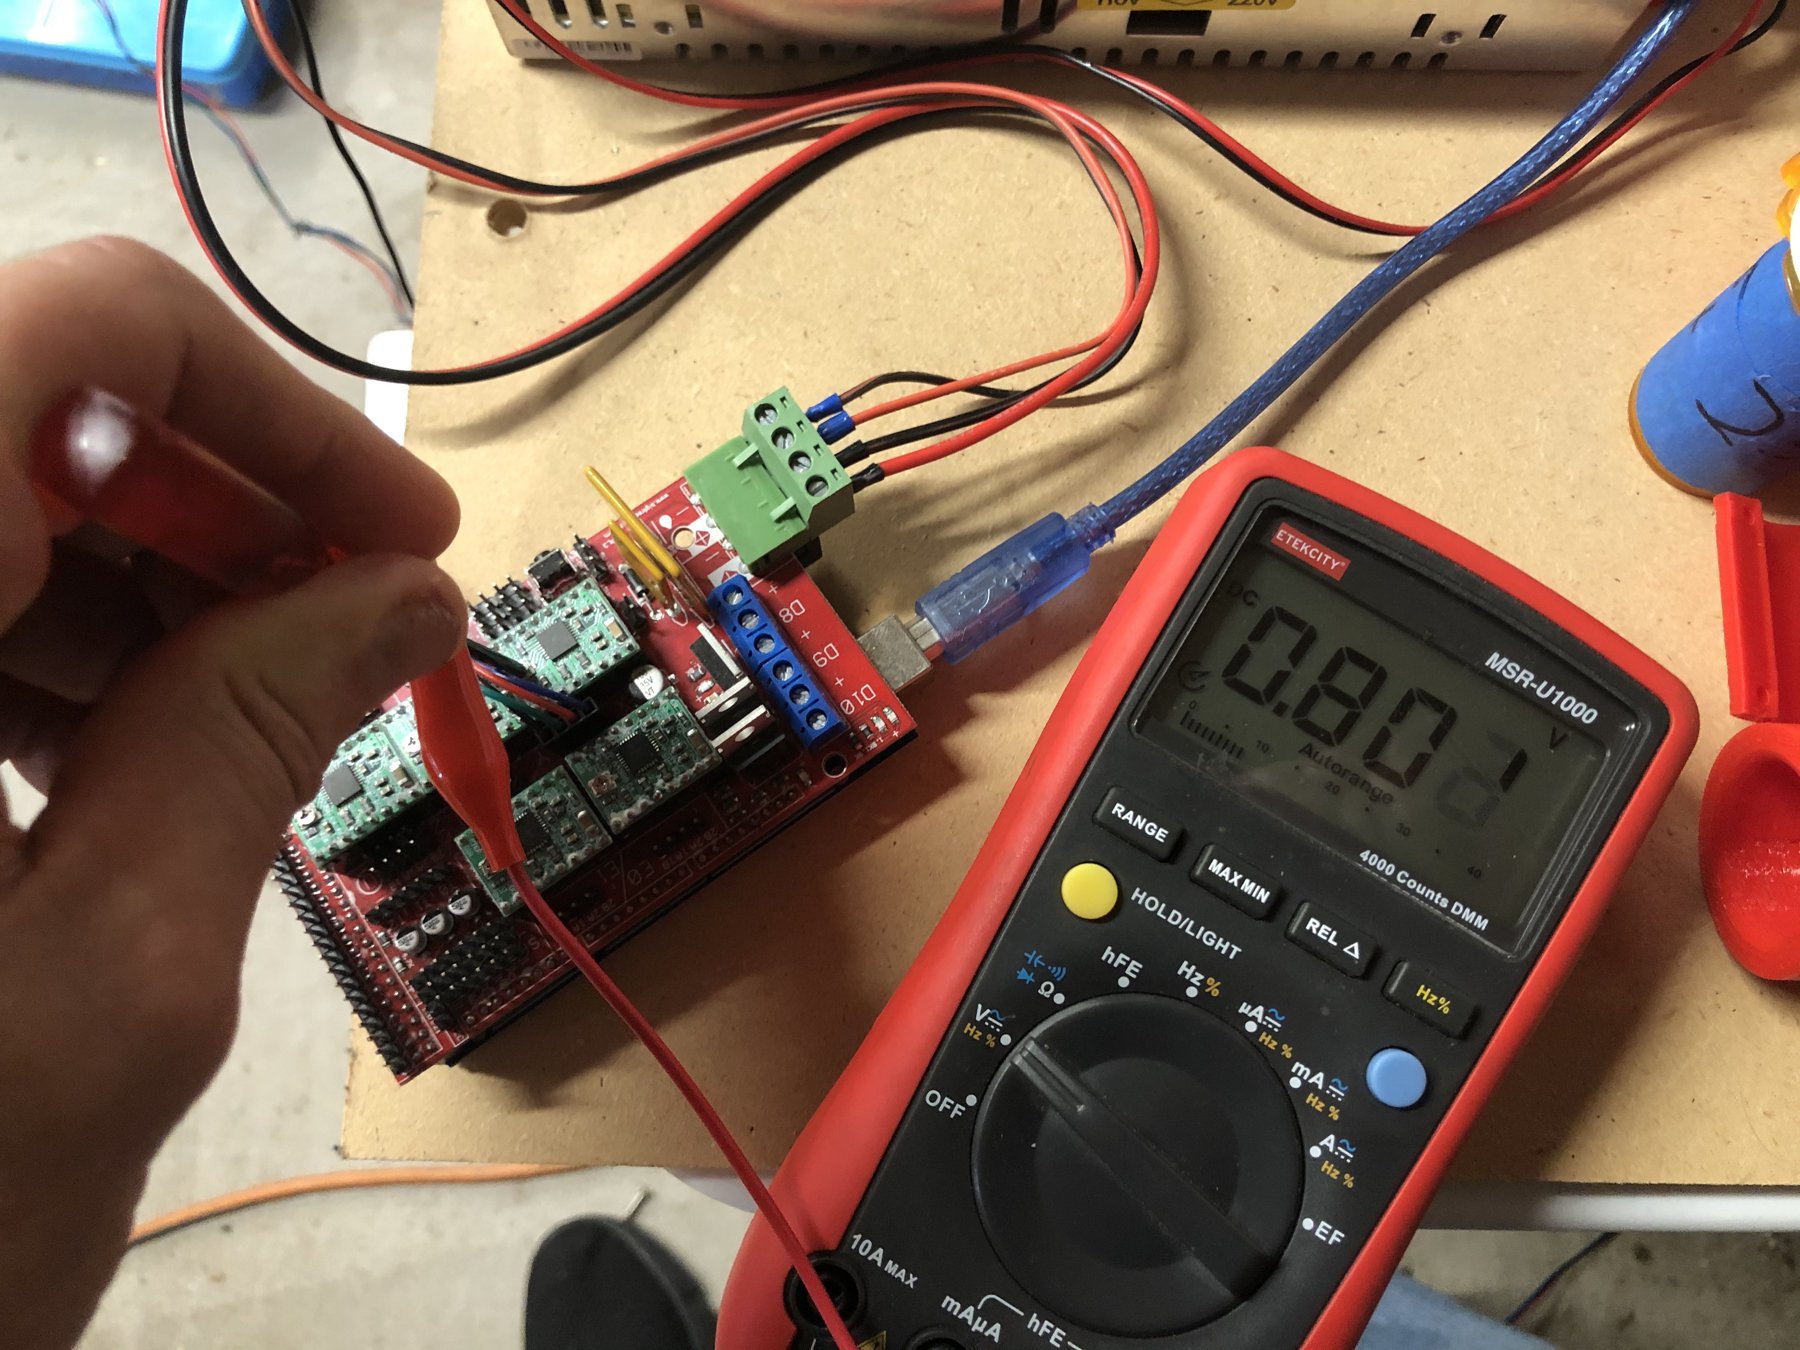
I've also increased the amperage to the stepper. This allowed me to drive the entire belt from one NEMA17.
To set the amperage, get a small phillips screwdriver, two alligator clips, and a multimeter. Power on your RAMPs board
and carefully
attach the negative probe to the RAMPs
GND
. Attach the positive probe to an alligator clip and attach the other end to the shaft of your screwdriver. Use the screwdriver to turn the tiny potentiometer on the stepper driver. Watch the voltage on the multimeter--we want to use the lowest amperage which effectively drives the conveyor belt. We are watching the voltage, as it is related to the amperage we are feeding the motors.
current_limit = Vref x 2.5
Anyway, I found the lowest point for my motor, without skipping steps, was around ~
0.801v
.
current_limit = 0.801 x 2.5
current_limit = 2.0025
The your
current_limit
will vary depending on the drag of your conveyor belt and the quality of your stepper motor. To ensure a long-life of your motor,
do not set the amperage higher than needed to do the job.

Arduino Code
When I bought the RAMPs board I started thinking, "I should see if we could re-purpose Marlin to drive the conveyor belt easily." I took one look at the source and said, "Oh hell no." Learning how to hack Marlin to drive a conveyor belt seemed like learning heart surgery to hack your heart into a gas pump. So, I decided roll my own RAMPs firmware.
My design goals were simple: * Motors operate independently * Controlled with small packets via UART * Include four commands: motor select, direction, speed, duration
That's it. I prefer to keep stuff as simple as possible, unless absolutely necessary.
I should point out, this project builds on a previous attempt at firmware:
But that code was flawed. It was not written with concurrent and independent motor operation in mind. The result, only one motor could be controlled at a time.
Ok, on to the new code.
Main
The firmware follows this procedure:
- Check if a new movement packet has been received.
- Decode the packet
- Load direction, steps, and delay (speed) into the appropriate motor struct.
- Check if a motor has steps to take and the timing window for the next step is open.
- If a motor has steps waiting to be taken, move the motor one step and decrement the respective motor's step counter.
- Repeat forever.
/* Main */
void loop()
{
  if (rxBuffer.packet_complete) {
    // If packet is packet_complete
    handleCompletePacket(rxBuffer);
    // Clear the buffer for the next packet.
    resetBuffer(&rxBuffer);
  }

  // Start the motor
  pollMotor();
}
serialEvent
Some code not in the main loop is the the UART RX handler. It is activated by an RX interrupt. If the interrupt fires, the new data is quickly loaded into the
rxBuffer
. If the incoming data contains a
0x03
character, this signals the packet is complete and ready to be decoded.
Here's the packet template:
MOTOR_PACKET = CMD_TYPE MOTOR_NUM DIR STEPS_1 STEPS_2 MILLI_BETWEEN 0x03
Each motor movement packet consists of seven bytes and five values:
1.
CMD_TYPE
= drive or halt
2.
MOTOR_NUM
= the motor selected X, Y, Z, E0, E1
3.
DIR
= direction of the motor
4.
STEPS_1
= the high 6-bits of of steps to take
5.
STEPS_2
= the low 6-bits of steps to take
6.
MILLI_BETWEEN
= number of milliseconds between each step (speed control)
7.
0x03
= this signals the end of the packet (
ETX
)
Each of these bytes are encoded by left-shifting the bits by two. This means each of the bytes in the packet can only represent 64 values (
2^6 = 64
).
Why add this complication? Well, we want to be able to send commands to control the firmware, rather than the motors. The most critical is knowing when the end of a packet is reached. I'm using the
ETX
char,
0x03
to signal the end of a packet. If we didn't reserve the
0x03
byte then what happens if we send command to the firmware to move the motor 3 steps? Nothing good.
Here's the flow of a processed command:
1. CMD_TYPE       = DRIVE (0x01)
2. MOTOR_NUM      = X     (0x01)
3. DIR            = CW    (0x01)
4. STEPS          = 4095  (0x0FFF)
5. MILLI_BETWEEN  = 5ms   (0x05)
6. ETX            = End   (0x03)
Note, the maximum value of the
STEPS
byte is greater than 8-bits. To handle this, we break it into two bytes of 6-bits.
1. CMD_TYPE       = DRIVE (0x01)
2. MOTOR_NUM      = X     (0x01)
3. DIR            = CW    (0x01)
4. STEPS_1        = 3F
5. STEPS_2        = 3F
5. MILLI_BETWEEN  = 5     (0x05)
6. ETX            = End   (0x03)
Here's a sample motor packet before encoding:
uint8_t packet[7] = {0x01, 0x01, 0x01, 0x3F, 0x3F, 0x05, 0x03}
Now, we have to shift all of the bytes left by two bits, this will ensure
0x00
through
0x03
are reserved for meta-communication.
This process is a bit easier to see in binary:
Before shift:
1. CMD_TYPE       = 0000 0001
2. MOTOR_NUM      = 0000 0001
3. DIR            = 0000 0001
4. STEPS_1        = 0011 1111
5. STEPS_2        = 0011 1111
5. MILLI_BETWEEN  = 0000 0101
6. ETX            = 0000 0011
After shift:
1. CMD_TYPE       = 0000 0100
2. MOTOR_NUM      = 0000 0100
3. DIR            = 0000 0100
4. STEPS_1        = 1111 1100
5. STEPS_2        = 1111 1100
5. MILLI_BETWEEN  = 0001 0100
6. ETX            = 0000 0011
And back to hex:
1. CMD_TYPE       = 0x04
2. MOTOR_NUM      = 0x04
3. DIR            = 0x04
4. STEPS_1        = 0xFC
5. STEPS_2        = 0xFC
5. MILLI_BETWEEN  = 0x14
6. ETX            = 0x03
And after encoding:
uint8_t packet[7] = {0x04, 0x04, 0x04, 0xFC, 0xFC, 0x14, 0x03}
Notice the last byte is not encoded, as this is a reserved command character.
Here are the
decode
and
encode
functions. Fairly straightforward bitwise operations.
uint8_t decode(uint8_t value) {
  return (value >> 2) & 0x3F;
}

uint8_t encode(uint8_t value) {
  return (value << 2) & 0xFC;
}
And the serial handling as a whole:
void serialEvent() {

  // Get all the data.
  while (Serial.available()) {

    // Read a byte
    uint8_t inByte = (uint8_t)Serial.read();

    if (inByte == END_TX) {
      rxBuffer.packet_complete = true;
    } else {
      // Store the byte in the buffer.
      inByte = decodePacket(inByte);
      rxBuffer.data[rxBuffer.index] = inByte;
      rxBuffer.index++;
    }
  }
}
handleCompletePacket
When a packet is waiting to be decoded, the
handleCompletePacket()
will be executed. The first thing the method does is check the
packet_type
. Keeping it simple, there are only two and one is not implemented yet (
HALT_CMD
)
#define DRIVE_CMD       (char)0x01
#define HALT_CMD        (char)0x02
Code is simple. It unloads the data from the packet. Each byte in the incoming packet represents different portions of the the motor move command. Each byte's value is loaded into local a variable.
The only note worth item is the
steps
bytes, as the steps consistent of a 12-bit value, which is contained in the 6 lower bits of two bytes. The the upper 6-bits are left-shifted by 6 and we
OR
them with lower 6-bits.
uint16_t steps = ((uint8_t)rxBuffer.data[3] << 6) | (uint8_t)rxBuffer.data[4];
If the packet actually contains steps to move we call the
setMotorState()
, passing all of the freshly unpacked values as arguments. This function will store those values until the processor has time to process the move command.
Lastly, the
handleCompletePacket()
sends an acknowledgment byte (
0x02
).
void handleCompletePacket(BUFFER rxBuffer) {

    uint8_t packet_type = rxBuffer.data[0];

    switch (packet_type) {
      case DRIVE_CMD:

          // Unpack the command.
          uint8_t motorNumber =  rxBuffer.data[1];
          uint8_t direction =  rxBuffer.data[2];
          uint16_t steps = ((uint8_t)rxBuffer.data[3] << 6)  | (uint8_t)rxBuffer.data[4];
          uint16_t microSecondsDelay = rxBuffer.data[5] * 1000; // Delay comes in as milliseconds.

          if (microSecondsDelay < MINIMUM_STEPPER_DELAY) { microSecondsDelay = MINIMUM_STEPPER_DELAY; }

          // Should we move this motor.
          if (steps > 0) {
            // Set motor state.
            setMotorState(motorNumber, direction, steps, microSecondsDelay);
          }

          // Let the master know command is in process.
          sendAck();
        break;
      default:
        sendNack();
        break;
    }
}
setMotorState
Each motor has a
struct MOTOR_STATE
representing its current state.
struct MOTOR_STATE {
  uint8_t direction;
  uint16_t steps;
  unsigned long step_delay;
  unsigned long next_step_at;
  bool enabled;
};
There are five motor
MOTOR_STATE
s which are initialized a program start, one for each motor (X, Y, Z, E0, E1).
MOTOR_STATE motor_n_state = { DIR_CC, 0, 0, SENTINEL, false };
And whenever a valid move packet is processed, as we saw above, the
setMotorState()
is responsible for updating the respective
MOTOR_STATE
struct.
Everything in this function is intuitive, but the critical part for understanding how the entire program comes together to ensure the motors are able to move around at different speeds, directions, all simultaneously is:
motorState->next_step_at = micros() + microSecondsDelay;
micros()
is built into the Arduino ecosystem. It returns the number of microseconds since hte program started.
- micros()
The
next_step_at
is set for
when
we want the this specific motor to take its next step. We get this number as the number of seconds from the programs start up, plus the delay we want between each step. This may be a bit hard to understand, however, like stated, it's key to the entire program working well. Later, we will update
motorState->next_step_at
with when this motor should take its
next
step. This "time to take the next step" threshold allows us to avoid creating a blocking loop on each motor.
For example, the wrong way may look like:
void main_loop() {

  // motor_x
  for(int i = 0; i < motor_x_steps; i++) {
    digitalWrite(motor.step_pin, HIGH);
    delayMicroseconds(motor.pulse_width_micros);
    digitalWrite(motor.step_pin, LOW);
  }

  // motor_y
  for(int i = 0; i < motor_y_steps; i++) {
    digitalWrite(motor.step_pin, HIGH);
    delayMicroseconds(motor.pulse_width_micros);
    digitalWrite(motor.step_pin, LOW);
  }

  // Etc
}
As you might have noticed, the
motor_y
would not start moving until
motor_x
took
all
of its steps. That's no good.
Anyway, keep this in mind as we start looking at the motor movement function--coming up next.
void setMotorState(uint8_t motorNumber, uint8_t direction, uint16_t steps, unsigned long microSecondsDelay) {

    // Get reference to motor state.
    MOTOR_STATE* motorState = getMotorState(motorNumber);

    ...

    // Update with target states.
    motorState->direction = direction;
    motorState->steps = steps;
    motorState->step_delay = microSecondsDelay;
    motorState->next_step_at = micros() + microSecondsDelay;
}
pollMotor
Getting to the action. Inside the main loop there is a call to
pollMotor()
, which loops all of the motors, checking if the
motorState
has steps to take. If it does, it takes one step and sets when it should take its next step:
motorState->next_step_at += motorState->step_delay;
This is key to all motors running together. By setting when each motor should take its next step, it frees microcontroller to do other work. And the microcontroller is quick, it can do its other work fast and come back and check if each motor needs to take its next step several hundred times before any motor needs to move again. Of course, it all depends on how fast you want your motors to go. For this project, it works like a charm.
/* Write to MOTOR */
void pollMotor() {
    unsigned long current_micros = micros();
    // Loop over all motors.
    for (int i = 0; i < int(sizeof(all_motors)/sizeof(int)); i++)
    {
      // Get motor and motorState for this motor.
      MOTOR motor = getMotor(all_motors[i]);
      MOTOR_STATE* motorState = getMotorState(all_motors[i]);

      // Check if motor needs to move.
      if (motorState->steps > 0) {

        // Initial step timer.
        if (motorState->next_step_at == SENTINEL) {
          motorState->next_step_at = micros() + motorState->step_delay;
        }

        // Enable motor.
        if (motorState->enabled == false) {
          enableMotor(motor, motorState);
        }

        // Set motor direction.
        setDirection(motor, motorState->direction);

        unsigned long window = motorState->step_delay;  // we should be within this time frame

        if(current_micros - motorState->next_step_at < window) {
            writeMotor(motor);
            motorState->steps -= 1;
            motorState->next_step_at += motorState->step_delay;
        }
      }

      // If steps are finished, disable motor and reset state.
      if (motorState->steps == 0 && motorState->enabled == true ) {
        disableMotor(motor, motorState);
        resetMotorState(motorState);
      }
    }
}
Summary
We have the motor driver working. We now can control five stepper motors' speed and number steps, all independent of one another. And the serial communication protocol allows us to send small packets to each specific motor, telling how many steps to take and how quickly.
Next, we need a controller on the other side of the UART--a master device. This master device will coordinate higher level functions with the motor movements. I've already started work on this project, it will be a asynchronous Python package. Wish me luck.
