This article is part of a series.
View all 5 parts
- Part 1 – Arduino to RPi -- Galvanically Isolated I2C
- Part 2 – Blueberry Pi -- How I Setup My Raspberry Pi as a Robot Base
- Part 3 – Pi Power -- How I Made a Battery Powered USB Hub
- Part 4 – This Article
- Part 5 – Setup Headless WiFi on Re4son's Kali Pi
Originally posted on www.letsmakerobots.com
No longer afeared of frying my Pi, I've moved on to trying to implement some of my bot goals. Like many, I want my bot to be able to interact with people, but I didn't realize that I'd stumble on this ability.
I've looked at many visual processing boards like the CMUcam v4 , but I'm not paying $100 for any board. I looked into making one, it looks possible, but not much cheaper. So, I got curious as to what alternatives there are. I stumbled on Hack-a-Day's recommended article: OpenCV on Raspberry Pi .
Anyway, he provided instructions on setting up OpenCV (open source computer vision) on Raspberry Pi. Of course, it was about 20 minutes later I had the code working on my Pi.
I had been skeptical of the Pi's ability to run any computer vision software, and morever, it's usefulness given the Pi's processing constraints. But once I had it up and running, I noticed it actually ran smoother than I had hoped. Don't get me wrong, I think it is less than 10FPS, but I could tell it would work for many robot applications More than that, if the Raspberry Pi was used only for the computer vision, then it would still be cheaper than many other hardware driven CV boards.
Basic Raspberry Pi and WiFi Dongle
- WiFi Dongle: $6.17
- Raspberry Pi: $35.00
- SD Card (4g): $2.50
- Web cam: $8.00
- Total for Basic RPi: $51.67
Therefore, I went to work on hacking his code.
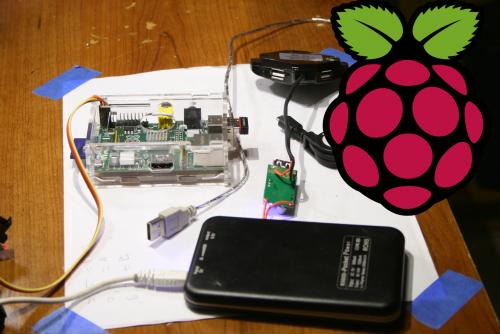
Many hours later, I ended up with a _very crude _ Raspberry Pi, Ardy, Camera, and Servo orchestration to track my face. Mind you, this is a proof of concept, nothing more at this point. But I hope to eventually have my bot wandering around looking for faces.
Image of Pi VNC. The box outline is being written through i2c .
![]()
Pulling apart a little $8 eBay camera.

To Setup the Raspberry Pi:
If you're setting it up from sratch, start with these instructions .
But if you're already setup, I think all you need is OpenCV.
$ sudo apt-get install python-opencv
The Code:
The Arduino code reads bytes from the i2c, converts them to characters, then places the characters into an integer array. The Pi is sending 4 numbers, 2 coordinates, x1, y1, x2, y2.
The Python code is "facetracker.py" by Roman Stanchak and James Bowman, I've merely added lines 101-105, which load the coordinates of the box around your face into a a string, converts that to a string array. I also added function txrx_i2c(). This function converts the string array into bytes and sends it to the i2c bus.
To change this setup from i2c to UART, focus on the txrx_i2c() in the Python code and the onRead() in the Arduino code. I assure you, UART would be much easier.
If anyone has any questions hollar at me. Oh! And if someone can tell me ways I could optimize this code, I'm all ears
#include <Wire.h>
#define SLAVE_ADDRESS 0x2A
#include <Servo.h>

Servo CamServoX; //Attach the pan servo.
Servo CamServoY; //Attach the tilt servo.

int ServoTimer = 250; // Change to adjust how quickly the servos respond.

int SmallXJump = 3; //Sets the movement amount for small pan jumps
int LargeXJump = 7; //Sets the movement amount for large pan jumps


int SmallYJump = 1; //Sets the movement amount for small pan jumps
int LargeYJump = 2; //Sets the movement amount for large pan jumps

//How close your face is to the edge to trigger a jump.
int SmallYLimit = 40;
int LargeYLimit = 20;

int SmallXLimit = 40;
int LargeXLimit = 20;

//Set servos to initial position.
int posX = 90; //Servo position.
int posY = 90; //Servo position.

int x1; int y1;int x2; int y2; //Holders for frame dimesions.

// Indexes for getting i2c bytes, then, converting them to integers.
int i = 0;
int varI = 0;

//Sets flag to trigger ServoWrite() from the main loop.
//I tried to put this under 'onRequest' call, but the Raspberry Pi kept giving me errors.
//This flagging was a work around.
int NoServoData = 0;

int dim[12]; //Char array for char[] ---> int conversion.
char d[8]; // Char holder array for byte-->char conversion.

void setup() {
    // initialize i2c as slave
    Wire.begin(SLAVE_ADDRESS);
    Wire.onRequest(sendData);
    Wire.onReceive(readData);
    Serial.begin(9600);

    //Attach servos
    CamServoX.attach(10); //Tilt (Y)
    CamServoY.attach(9); //Pan (X)

    //Write initial servo position.
    CamServoX.write(posX);
    CamServoY.write(posY);
}

void loop() {

//Again, this is the work around.  The flag "NoServoData" is set under the i2c onReceive.
if (NoServoData==1){
  ServoWrite();
}

}

//This is just to show the RPi can be written to.
//Replace with stuff you want to write to the Pi.
char data[] = "Pasta";
int index = 0;

// callback for sending data
void sendData() {
    Wire.write(data[index]);
    ++index;
    if (index >= 5) {
         index = 0;
    }
 }

// callback for receiving data.
void readData(int numbytes) {

//Holds the chars
int c;

if (Wire.available() > 0){
  while(Wire.available())    // slave may send less than requested
    c = Wire.read();
}
  //Add each integer to a char array.
  //Skip commas ',' and keep adding the integers until char '\0' is received.
  //Then print out the complete string.

  if (c != ','){
    if(c != '\0'){
      d[i] = d[i] + c;  //Appends the characters to an array.
      i++;
    }
  }
  else{
    i=0; //Reset the d char array index.
    if(varI < 7){  //We only want to get integers until we get all four numbers (x1, y1, x2, y2) plus
      dim[varI]=atoi(d); //Convert the d int into ASCII and store it in the dim array.
      d[0]=0;d[1]=0;d[2]=0;d[3]=0;d[4]=0;d[5]=0; //Clear the d array (i2c doesn't like for loops in this function
      varI++; //Increase dim index.
    }
    else{
      //We now have all four numbers, load them into the variables.
      x1=int(dim[4]);
      y1=int(dim[1]);
      x2=int(dim[2]);
      y2=int(dim[3]);

      NoServoData = 1;  //Set the WriteServo() call flag.
      varI=0; //Reset the dim index to prepare for next set of numbers.
      }
   i=0; //Reset some
  }
}

void ServoWrite(){
  int x3 = 160 - x2; // Calculate the distance from the right edge of the screen
  int y3 = 120 - y2; // Calcualte the distance


  //For X Axis
  if(x1 < SmallXLimit ){  //Only do small jumps, since not too far away from the edge.
        if(posX>1){ //If the pan servo is at its edge, do nothing.
          for (int i = 0; i < LargeXJump; i++){
            posX++;  // Set the new position
            CamServoX.write(posX); //Make the adjustment.
            delay(ServoTimer); //Delay between servo increments.
          }
      }
  }

  if(x3 < SmallXLimit){
      if(posX<180){
          for (int i = 0; i < LargeXJump; i++){
            posX--;
            CamServoX.write(posX);
            Serial.println(posX);
            delay(ServoTimer);
          }
      }
  }


  if(x1 < LargeXLimit){
        if(posX>1){
          for (int i = 0; i < SmallXJump; i++){
            posX++;
            CamServoX.write(posX);
            Serial.println(posX);
            delay(ServoTimer);
          }
      }
  }

  if(x3 < LargeXLimit){
      if(posX<180){
        for (int i = 0; i < SmallXJump; i++){
            posX--;
            CamServoX.write(posX);
            Serial.println(posX);
            delay(ServoTimer);
        }
     }
  }


  //For Y Axis
  if(y1 < SmallYLimit ){
        if(posY>1){
          for (int i = 0; i < SmallYJump; i++){
            posY--;
            CamServoY.write(posY);
            Serial.println(posY);
            delay(ServoTimer);
          }
        }
  }

  if(y3 < SmallYLimit){
      if(posY<180){
        for (int i = 0; i < SmallYJump; i++){
          posY++;
          CamServoY.write(posY);
          Serial.println(posY);
          delay(ServoTimer);
        }
     }
  }


  if(y1 < LargeYLimit){
        if(posY>1){
          for (int i = 0; i < LargeYJump; i++){
            posY--;
            Serial.println(posY);
            CamServoY.write(posY);
            delay(ServoTimer);
          }
      }
  }

  if(y3 < LargeYLimit){
      if(posY<180){
        for (int i = 0; i < LargeYJump; i++){
          posY++;
          CamServoY.write(posY);
          Serial.println(posY);
          delay(ServoTimer);
        }
      }
  }

//Reset servo write flag.
NoServoData=0;
}
Now for the Python Code:
#!/usr/bin/python
"""
Have to execute using "sudo python facedetect.py --cascade=face.xml 0"
(Normal build sudo python "%f")
This program is demonstration for face and object detection using haar-like features.
The program finds faces in a camera image or video stream and displays a red box around them.

Original C implementation by:  ?
Python implementation by: Roman Stanchak, James Bowman
"""
import sys
import cv2.cv as cv
from optparse import OptionParser
import time
import threading
import readline
import pygame
from pygame.locals import *
import sys
import smbus

# Parameters for haar detection
# From the API:
# The default parameters (scale_factor=2, min_neighbors=3, flags=0) are tuned
# for accurate yet slow object detection. For a faster operation on real video
# images the settings are:
# scale_factor=1.2, min_neighbors=2, flags=CV_HAAR_DO_CANNY_PRUNING,
# min_size=<minimum possible face size

min_size = (20, 20)
image_scale = 2
haar_scale = 1.2
min_neighbors = 2
haar_flags = 0

"""i2c Code"""
bus = smbus.SMBus(1) # Open up a i@C bus.
address = 0x2a # Setup Arduino address

sendstring = "" # This will be my send variable (RPI-to-Arduino)
bytearraytowrite = [] #Actual array for holding bytes after conversion from string.

#This function actually does the writing to the I2C bus.
def toWrite(a):
    global sendstring
    global bytearraytowrite
    bytearraytowrite = map(ord, sendstring) #This rewrites the string as bytes.
    for i in a:
        bus.write_byte(address, i)

def txrx_i2c():
    global sendstring
    #while True:
    sdata = ""
    rdata = ""
    for i in range(0, 5):
            rdata += chr(bus.read_byte(address));
    #print rdata
    #print bytearraytowrite
    #print "".join(map(chr, bytearraytowrite)) #Will convert bytearray to string.

    #Writes the key commands to the i2c bus.
    toWrite(bytearraytowrite)


    #time.sleep(.6);

def detect_and_draw(img, cascade):
    global sendstring

    # allocate temporary images
    gray = cv.CreateImage((img.width,img.height), 8, 1)
    small_img = cv.CreateImage((cv.Round(img.width / image_scale),
                   cv.Round (img.height / image_scale)), 8, 1)

    # convert color input image to grayscale
    cv.CvtColor(img, gray, cv.CV_BGR2GRAY)

    # scale input image for faster processing
    cv.Resize(gray, small_img, cv.CV_INTER_LINEAR)

    cv.EqualizeHist(small_img, small_img)

    if(cascade):
        t = cv.GetTickCount()
        faces = cv.HaarDetectObjects(small_img, cascade, cv.CreateMemStorage(0),
                                     haar_scale, min_neighbors, haar_flags, min_size)
        t = cv.GetTickCount() - t
        print "detection time = %gms" % (t/(cv.GetTickFrequency()*1000.))
        if faces:
            for ((x, y, w, h), n) in faces:
                # the input to cv.HaarDetectObjects was resized, so scale the
                # bounding box of each face and convert it to two CvPoints
                pt1 = (int(x * image_scale), int(y * image_scale))
                pt2 = (int((x + w) * image_scale), int((y + h) * image_scale))
                cv.Rectangle(img, pt1, pt2, cv.RGB(255, 0, 0), 3, 8, 0)
                x1 = int(x * image_scale)
                y1 = int(y * image_scale)
                x2 = int((x + w) * image_scale)
                y2 = int((y + h) * image_scale)
                sendstring = str(x1) + "," + str(y1) + "," + str(x2) + "," + str(y2) + ","
                sendstring = sendstring.translate(None, '() ')
                print sendstring
                txrx_i2c()
                sendstring = ""
    cv.ShowImage("result", img)

if __name__ == '__main__':

    parser = OptionParser(usage = "usage: %prog [options] [filename|camera_index]")
    parser.add_option("-c", "--cascade", action="store", dest="cascade", type="str", help="Haar cascade file, default %default", default = "../data/haarcascades/haarcascade_frontalface_alt.xml")
    (options, args) = parser.parse_args()

    cascade = cv.Load(options.cascade)

    if len(args) != 1:
        parser.print_help()
        sys.exit(1)

    input_name = args[0]
    if input_name.isdigit():
        #Where the image is actually captured from camera. "capture" is the variable holding image.
        capture = cv.CreateCameraCapture(int(input_name))
    else:
        capture = None

    cv.NamedWindow("result", 1)

    width = 160 #leave None for auto-detection
    height = 120 #leave None for auto-detection

    if width is None:
        width = int(cv.GetCaptureProperty(capture, cv.CV_CAP_PROP_FRAME_WIDTH)) #Gets the width of the image.
    else:
        cv.SetCaptureProperty(capture,cv.CV_CAP_PROP_FRAME_WIDTH,width) #Gets the width of the image.

    if height is None:
    height = int(cv.GetCaptureProperty(capture, cv.CV_CAP_PROP_FRAME_HEIGHT))
    else:
    cv.SetCaptureProperty(capture,cv.CV_CAP_PROP_FRAME_HEIGHT,height)

    if capture: #If "capture" actually got an image.
        frame_copy = None
        while True:

            frame = cv.QueryFrame(capture)
            if not frame:
                cv.WaitKey(0)
                break
            if not frame_copy:
                frame_copy = cv.CreateImage((frame.width,frame.height),
                                            cv.IPL_DEPTH_8U, frame.nChannels)

#                frame_copy = cv.CreateImage((frame.width,frame.height),
#                                            cv.IPL_DEPTH_8U, frame.nChannels)

            if frame.origin == cv.IPL_ORIGIN_TL:
                cv.Copy(frame, frame_copy)
            else:
                cv.Flip(frame, frame_copy, 0)

            detect_and_draw(frame_copy, cascade)

            if cv.WaitKey(10) >= 0:
                break
    else:
        image = cv.LoadImage(input_name, 1)
        detect_and_draw(image, cascade)
        cv.WaitKey(0)

    cv.DestroyWindow("result")