
This article is part of a series.
View all 3 parts
- Part 1 – Beginning MySQL for Data Analysts
- Part 2 – This Article
- Part 3 – Setup a Local MySQL Database
Welcome back! Alright, now we know how to connect to a remote server from within MySQL Workbench, let's start writing some queries.
Here's a common SQL query:
    SELECT e.emp_no,
           e.last_name,
           t.title
      FROM employees AS e
 LEFT JOIN titles    AS t
        ON e.emp_no = t.emp_no
     WHERE e.hire_date > '1999-12-31'
  ORDER BY e.last_name DESC;
This query produces the following table when run on our
employees
database.
| row_num | emp_no | last_name | title |
|---|---|---|---|
| 0 | 47291 | Flexer | Staff |
| 1 | 60134 | Rathonyi | Staff |
| 2 | 72329 | Luit | Staff |
| 3 | 108201 | Boreale | Senior Engineer |
| 4 | 205048 | Alblas | Senior Staff |
| 5 | 222965 | Perko | Senior Staff |
| 6 | 226633 | Benzmuller | Staff |
| 7 | 227544 | Demeyer | Senior Staff |
| 8 | 422990 | Verspoor | Engineer |
| 9 | 424445 | Boreale | Engineer |
| 10 | 428377 | Gerlach | Engineer |
| 11 | 463807 | Covnot | Engineer |
| 12 | 499553 | Delgrande | Engineer |
When the data are presented like this, it appear similar to our traditional Excel spreadsheet, right?
Let's compare the SQL query and a spreadsheet.

Now, here in a few weeks when you are SQL-writing-machine you'll notice this analogy between Excel and a SQL query breaks down. But for now, let the above image comfort you in knowing the core functions of SQL are similar to those of a spreadsheet. And you know these spreadsheet functions well .
- Selecting columns
- Filtering columns and rows
- Ordering rows
- Combining data sets
However, SQL has a lot of superpowers an Excel spreadsheets doesn't. Of course, the tradeoff is you must leave behind the comfort of a graphical user interface. But don't let it scare you off--it only takes a 3-4 months to get used to, but then you'll realize how much those graphical interfaces have been chaining you down.
Alright, back to the queries. Let's take a look at the different parts of the query above.
SELECT
The
SELECT
statement is how you choose what turns up in the results section. If don't put something in the
SELECT
area, then you will not get anything. It is often used to retrieve data, called fields, from one or more tables within a database.
Select Area
You may ask, what is the "SELECT area." It is everything between the word
SELECT
until
FROM
.
SELECT -------------------------------
       -- ALL THIS IS THE SELECT AREA
       -------------------------------
FROM
Select Fields
There are two different ways to
SELECT
fields you want to get results from. You can use the
*
, which means "everything." Or you can list the field names you want returned. Each item you put in the
SELECT
area should be followed by a comma, unless it is the last item.
For example:
    SELECT  emp_no,
            last_name,
            title
...
The code above requests three different fields be returned in the result set:
emp_no
,
last_name
, and
title
.
Or
    SELECT  *
...
Returns every field, in every table listed.
I should point out, if you forget a comma it can get messy. Often, the SQL server will send an error message, but not always . As we will see in a moment.
Select Calculations
The
SELECT
does more than retrieve data from tables within a database. It can also perform on-the-fly calculations, such as
SELECT 1 + 1,
       2 *25,
       55 / 75,
This should return the following:
| 1 + 1 | 2 *25 | 55 / 75 | |
|---|---|---|---|
| 0 | 2 | 50 | 0.7333 |
FIELD
A field in SQL is similar to the column in a spreadsheet. It contains data of the same type on every row (more on datatypes later). Fields may be referenced throughout a SQL query, but for them to show in the query results they must be included in the
SELECT
area--as we went over in the "SELECT" section above.
SELECT emp_no,
       first_name,
       last_name
FROM employees
Ambiguous Field List
The above query works. However, try running the following query, which includes two tables.
SELECT emp_no,
       first_name,
       last_name
FROM employees
LEFT JOIN titles
    ON employees.emp_no = titles.emp_no
You get any results? Me either. Only an error message from the database stating:
Error Code: 1052. Column 'emp_no' in field list is ambiguous
This is because both the
employees
and
titles
table have a field named
emp_no
and the SQL program can't figure out which you want.
To solve this, we add the table name plus
.
to the front of each field name. This will tell the SQL program from which tables we would like to field to come from--leaving no ambiguity. Computers
hate
ambiguity.
Let's run the query again with table names.
SELECT employees.emp_no,
       employees.first_name,
       employees.last_name
FROM employees
LEFT JOIN titles
    ON employees.emp_no = titles.emp_no
This time we get the results we expected, without error.
Building on this, a good SQL coder will always prepend the table name to the front of the query, whether it's required or not. This prevents future mistakes.
For example, let's say you wrote this code:
SELECT emp_no,
       salary
FROM salaries
And your code was put into production (a term meaning put to use by your business) then a year later another coder added a second table to the query without critically looking at the query as a whole (something a bad SQL coder forgets to do).
The new query looks like this:
SELECT emp_no,
       salary,
       first_name,
       last_name

FROM salaries
LEFT JOIN employees
    ON salaries.emp_no = employees.emp_no;
Try to run this query. You will find the same
field list is ambiguous
error as we saw earlier.
The deeper lesson here is: A good coder is like a defensive driver; they code in a way it expects others to be reckless.
Back to the example above, if we include the table in the field names, then it doesn't matter if a reckless coworker adds another table.
SELECT salaries.emp_no,
       salaries.salary,
       employees.first_name,
       employees.last_name

FROM salaries
LEFT JOIN employees
    ON salaries.emp_no = employees.emp_no;
Field Aliases
Often you will want to export your results into a CSV to send to someone. You may have noticed when you execute a query SQL returns the results in a neat spreadsheet. I don't know if I've mentioned it, but you can export these results in a CSV by hitting the little disk button above the results.

However, you may not like the machine formatted column names. I mean, don't get us wrong, we're nerds! We read machine friendly words fine, but our bosses don't.
Well, MySQL has a built in command allowing you to rename fields (and more) on the fly. This command is
AS
and is seen in the query below written to rename the column names.
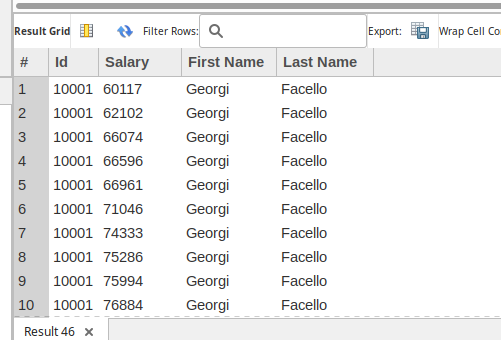
SELECT salaries.emp_no      AS Id,
       salaries.salary      AS Salary,
       employees.first_name AS "First Name",
       employees.last_name  AS "Last Name"

FROM salaries
LEFT JOIN employees
    ON salaries.emp_no = employees.emp_no;
Now the column headers have "boss-friendly" names.
You've probably noticed the first two aliases are written without quotation marks and the second two are surrounded by them. The SQL program can get confused by spaces, so we wrap the new name in
"
marks. When the SQL program sees these marks, it says to itself, "Oh, I bet the user is going to have one of those fancy human names, I'm going to assume everything between the first quotation mark and the next one I find is all one fancy human word. Silly humans."
A more technical term for someone inside quotations marks is a literal constant. However, programmers know them as "strings." It's probably b
Don't Lose Your AS
Go ahead and try to run this query:
SELECT emp_no
       first_name,
       employees.last_name
FROM employees;
Did you run it? Anything jump out as weird? You don't really run it did you? Go run it, I'll wait.
Ok, you'll see something like this:
| first_name | last_name |
|:-----------|:----------|
| 10001 | Facello |
| 10002 | Simmel |
| 10003 | Bamford |
| ... | ... |
Super weird right? There are only two columns and it seems like the column names are jumbled up. That's exactly what's happened. It's due to a missing
,
right after the
emp_no
. This is a result of something in SQL I think is silly--you can omit the
AS
keyword between a field and its alias.
Meaning, we could rewrite the query from earlier where we showed alias use like this:
SELECT salaries.emp_no      Id,
       salaries.salary      Salary,
       employees.first_name "First Name",
       employees.last_name  "Last Name"

FROM salaries
LEFT JOIN employees
    ON salaries.emp_no = employees.emp_no;
But, the first time you miss a comma you'll be asking, "Why!? Why does MySQL allow this!" I'm not sure, but we have to deal with it. This is why I ask you
always
include the
AS
keyword. Again, you are helping prevent bugs before they happen.
FROM
As you've already seen, the
FROM
command tells SQL where on the database it should look for data. If you don't specify a table in the
FROM
clause, then the SQL program acts if it doesn't exist, and will not be able to find the fields you request.
SELECT *
FROM employees
LEFT JOIN departments
    ON employees.emp_no = departments.emp_no
In the next article we are going to talk about
JOINS
, they are an extension to the
FROM
clause of a query, but, they deserve their own article. Right now, look at the
LEFT JOIN
as an extension of the
FROM
clause. A join tells the SQL program, "First look in the employees table, then, check in the departments table,
if
there is a relationship with the employees table."
Like I said, we will review
JOINS
thoroughly in the next article.
Table Aliases
Like we could give fields nicknames, called aliases, we can do the same with table names. However, this is usually done for a different reason: To save on typing.
One of the primary reason bad coders don't write out the table names (not you , you're going to be a good coder) is it adds a lot more to type. You may say, "Well, that's just lazy." It is, but it's smart-lazy--also know as efficient. And efficiency is something you want to strive for in your code and coding .
Let's look at an example from earlier.
SELECT salaries.emp_no      AS Id,
       salaries.salary      AS Salary,
       employees.first_name AS "First Name",
       employees.last_name  AS "Last Name"

FROM salaries
LEFT JOIN employees
    ON salaries.emp_no = employees.emp_no;
This query could be rewritten by using table aliases and save a lot of typing. It's probably best to show you.
SELECT s.emp_no     AS Id,
       s.salary     AS Salary,
       e.first_name AS "First Name",
       e.last_name  AS "Last Name"

FROM salaries       AS s
LEFT JOIN employees AS e
    ON s.emp_no = e.emp_no;
Execute this query and compare its results to the query without table aliases. You will find the results are exactly the same. Moreover, this rewrite has saved 45 keystrokes. You may think, "Eh, not much." Well, this is a small query. Imagine writing queries twice this size all day long. Your savings are worth it--may the time for an extra cup of coffee (or pot, in my case).
It is also easier for the human brain to comprehend--at least, once you've been reading SQL for awhile. Your brain will understand
e
and
employees
the same, but it doesn't have to work as hard to understand
e
.
In short, good coders use table aliases.
ORDER BY
In spreadsheets there will usually be a way to sort your data. Often your options will be based on a column's contextual order. If the data are numbers it will be low-to-high, or high-to-low, respectively. If it's text then your choice will probably be alphabetical, either A-Z to Z-A. And if it's a date, then it will be first-to-last, or last-to-first. Each of these order types share a commonality, they value either goes to a low-values to high-values, or high-values to low-values. These types of ordering are known as ascending and descending, respectively.
In SQL, there are two types of
ORDER BY
s,
ASC
and
DESC
, for ascending and descending. They operate a bit different than most spreadsheet applications. They still order data by low-to-high or high-to-low, however, when you apply an
ORDER BY
it affects the entire result set. When a field is targeted by an
ORDER BY
all other fields on the same row are ordered along with the targeted field.
Enough words. Let's take a look at some examples:
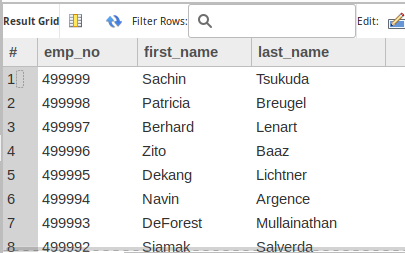
DESC
SELECT employees.emp_no,
       employees.first_name,
       employees.last_name
FROM employees
ORDER BY employees.emp_no DESC
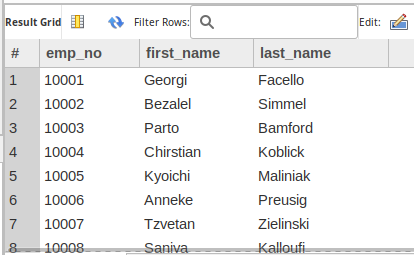
ASC
SELECT employees.emp_no,
       employees.first_name,
       employees.last_name
FROM employees
ORDER BY employees.emp_no ASC
One note about
ASC
, if you do not specifcy what type of
ORDER BY
then it will default to
ASC
.
For example, this query will provide the exact same results as the one above:
SELECT employees.emp_no,
       employees.first_name,
       employees.last_name
FROM employees
ORDER BY employees.emp_no
Most of
ORDER BY
is used for humans, making it easier to find whether your data were returned correctly. However, there are instances where
ORDER BY
will actually change the results of your queries, but it will be awhile before we get into those sorts of queries.
Later, we're going to start working on making our queries efficient and fast, but now I'll state:
Make sure you need your results ordered before you
ORDER BY
.
It can be hard work for SQL program to order your results, which translates to longer execution times. Something you will want to avoid if you are trying to write a query for speed (which you will when writing code for production software).
Multiple Column Sort
SQL can also do multiple-field sorts. This works by sorting by the first field in the
ORDER BY
and where there are ties, then sort by the second field.
For example:
SELECT employees.emp_no,
employees.first_name,
employees.last_name
FROM employees
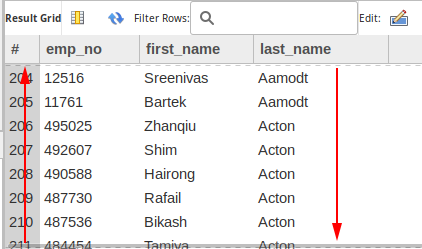
ORDER BY employees.last_name ASC, employees.emp_no DESC
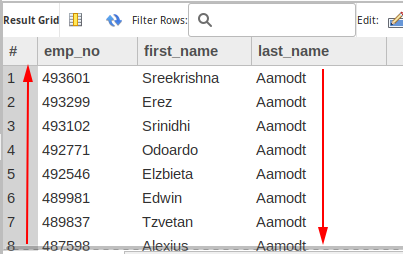
"Aamodt" is the first employee in the
last_name
field when the
ORDER BY
is set to
ASC
, however, there are many "Aamodt"s in this table. This is where the second
ORDER BY
comes in. The second
ORDER BY
is set on the
emp_no
field and is
DESC
, this is why all the numbers start at the highest values and move towards the lowest. Of course, when the the
last_name
value changes the
emp_no
order will restart, still moving from highest to lowest.
Alright, let's move on. Just remember,
ORDER BY
is extremely useful for humans, but it makes it slower for computers to process. Therefore, when you write a query, consider your audience.
WHERE
The
WHERE
clause of a SQL query is a filter. Simple as that. It further limits your results. And it is probably the second most important portion of a query, next to the
FROM
clause. Reducing your results not only help you find what you need, it also makes it easier on the computer to find the results.
Though, before we get into more detail let's take a look at an example:
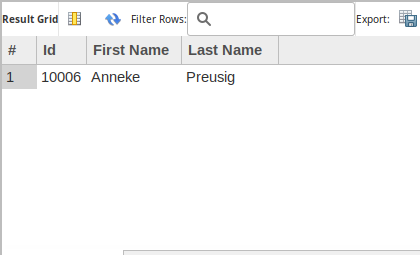
SELECT employees.emp_no         AS Id,
       employees.first_name     AS "First Name",
       employees.last_name      AS "Last Name"
FROM employees
WHERE employees.emp_no = 10006
ORDER BY employees.emp_no, employees.first_name
This returns a single record, which makes sense. We told the SQL program we want
emp_no
,
first_name
,
last_name
from the
employees
table where the
emp_no
is equal to
10006
.
But, let's also look at the
Database Message
| Time | Action | Message | Duration / Fetch |
|---|---|---|---|
| 07:35:17 | SELECT employees.emp_no, employees.first_name, employees.last_name FROM employees ORDER BY employees.last_name ASC, employees.emp_no DESC LIMIT 0, 1000 | 1000 row(s) returned | 0.152 sec / 0.0035 sec |
| 07:48:56 | SELECT employees.emp_no AS Id, employees.first_name AS "First Name", employees.last_name AS "Last Name" FROM employees WHERE employees.emp_no = 10006 ORDER BY employees.emp_no, employees.first_name LIMIT 0, 1000 | 1 row(s) returned | 0.0036 sec / 0.0000072 sec |
Notice how our query for one result took
much
less time than the query for a 1,000 results? I'll cover this more later, but felt it was import to point out now. Using the
WHERE
clause to limit the data to only what you need will greatly increase the efficiency of your query.
Ever been to a cheap buffet with the sign posted on the sneeze-guard reading: "Take only what you will eat!!!" Well, imagine your SQL database has the same sign--you choose what you need with the
WHERE
clause.
Ok, enough on efficiency for now, let's focus on how the
WHERE
clause will allow you to get the results you are after.
In queries we've written earlier, we've received every row on the database, from every table included in the
FROM
clause. Now, we are narrowing the results down to those of interest.
This can also be done with strings (text inside of
"
marks).
SELECT employees.emp_no         AS Id,
       employees.first_name     AS "First Name",
       employees.last_name      AS "Last Name"
FROM employees
WHERE employees.first_name = "Ramzi"
ORDER BY employees.emp_no, employees.first_name

But what if we want to include multiple different employees, but not all? That's where
IN
comes...in.
IN
The
WHERE
clause can be followed by the
IN
keyword, which is immediately followed by a set of parentheses; inside the parentheses you may put list of values you want to filter on. Each value must be separated by a comma.
For example:
SELECT employees.emp_no         AS Id,
       employees.first_name     AS "First Name",
       employees.last_name      AS "Last Name"
FROM employees
WHERE employees.last_name IN ("Bamford", "Casley", "Benveniste")
ORDER BY employees.last_name ASC, employees.first_name ASC;

This can also be done with numbers
SELECT employees.emp_no         AS Id,
       employees.first_name     AS "First Name",
       employees.last_name      AS "Last Name"
FROM employees
WHERE employees.emp_no IN (422990, 428377)
ORDER BY employees.last_name ASC, employees.first_name ASC;
Greater and Less Than
If the field you are using is numeric data, then you can also use the
>
,
<
,
<=
, and
>=
comparisons.
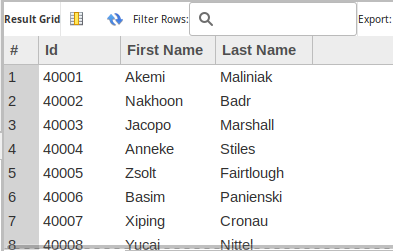
SELECT employees.emp_no         AS Id,
       employees.first_name     AS "First Name",
       employees.last_name      AS "Last Name"
FROM employees
WHERE employees.emp_no > 40000
ORDER BY employees.emp_no, employees.first_name;
If you aren't familiar with the equalities, here's a breakdown.
- "> 5000" will find all values which come after 5000, but does not include 5000 itself
- "< 5000" will find all values which come before 5000, but does not include 5000 itself
- ">= 5000" will find all values which come after 5000 including 5000 itself
- "<= 5000" will find all values which come before 5000 including 5000 itself
Closing
Whew, these are the basic of a SQL query, but, it's just the beginning. There are many more parts to SQL queries, such as
AND
,
OR
,
<>
,
!=
,
JOIN
, functions,
UNION
,
DISTINCT
--we've got a lot more to do. But! No worries, you've totally got this.
Don't believe me? Don't worry, I'm going to let you prove it to yourself. Let's do some homework! :)
Homework #1
The following homework will have you take the query provided and modify it to return the described result. Once all queries are completed, fill free to email the queries to me and I'll "grade" them for you.
For questions #1-6 use the following query:
SELECT *
FROM employees
LEFT JOIN dept_emp
    ON employees.emp_no = dept_emp.emp_no
LEFT JOIN departments
    ON dept_emp.dept_no = departments.dept_no
LEFT JOIN titles
    ON employees.emp_no = titles.emp_no
LEFT JOIN salaries
    ON employees.emp_no = salaries.emp_no;
- Question #1 -- Modify the above query to use table aliases instead of full table names.
-
Question #2 -- Modify resulting query to
only return results for
emp_no,first_name,last_name,dept_name,salary. - Question #3 --Modify resulting query to *rename the fields to the following "Employee #", "First Name", "Last Name", "Department #", and "Salary".
- Question #4 --Modify resulting query to list employees by their salaries; order them lowest salary to the highest.
- Question #5 --While keeping the lowest-to-highest salary order, modify resulting query to list the employees in alphabetical order by their last name where their salaries are tied.
- Question #6 -- Modify resulting query to only provide clients who have make over 50,000
For questions #7-10 use the following query:
SELECT *
FROM employees          AS e
LEFT JOIN dept_emp      AS de
    ON e.emp_no = de.emp_no
LEFT JOIN departments   AS d
    ON de.dept_no = d.dept_no
LEFT JOIN titles        AS t
    ON e.emp_no = t.emp_no
LEFT JOIN salaries      AS s
    ON e.emp_no = s.emp_no
- Question #7 -- Modify the above query to only return results for those with the first name "Yishay", "Huan", or "Otmar"
-
Question #8 -- Modify resulting query to
to also show only their
first_name,last_name, andsalary. - Question #9 -- Modify resulting query to to also show what departments they work in .
- Question #10 -- Modify resulting query to also show their hire date .