
This article is part of a series.
View all 3 parts
- Part 1 – Metallurgy 101 - AVR Lesson Journal
- Part 2 – Metallurgy 101 - AVR PWM
- Part 3 – This Article
This is a continuation of my Robot Metallurgy 101 -- AVR Lesson Journal
I started looking through Newbie Hack's tutorials on AVR trying to work up the energy to tackle First LCD Program . Many don't know this, but I despise workings with LCDs. I think it is two parts, one, I live in a world with high-resolution screens embedded in everything from coffee-machines to toilets . Trying to settle with an old school LCD doesn't cut it for me. Furthermore, wiring a non-serial interface LCD is a ever loving pain.
But looking at the rest of the Newbie Hack tutorials I knew I would need some way to display information from the ATtiny1634. I thought about it and compromised: I'd focus on UART next. That way I could display information on my desktop screen.
I began reading about UART on AVR; here are some of the good ones I found,
- Newbie Hack's One Way Communication
- Newbie Hack's Two way Communication
- maxEmbedded's USART
After reading the articles I opened up the ATtiny1634 datasheet and decided I would start by trying to output "ALABTU" to a serial-port into Real Term .
It took me maybe an hour or two to get something working; here is what I learned along the way.
1. AVR UART is Easy.
The following code sets the baud rate on the ATtiny 1634 using the UBBR chart from the datasheet, then, transmits the letter "A."
UART Code v01
//
// UART Example on the ATtiny1634 using UART0.
// C. Thomas Brittain
// letsmakerobots.com

#define F_CPU 8000000    // AVR clock frequency in Hz, used by util/delay.h
#include <avr/io.h>
#include <util/delay.h>
// define some macros
#define UBBR 51 // 9600, .02%

// function to initialize UART
void uart_init (void)
{
    /* Set baud rate */
    UBRR0H = (unsigned char)(UBBR>>8);
    UBRR0L = (unsigned char)UBBR;
    /* Enable receiver and transmitter */
    UCSR0B = (1<<RXEN0)|(1<<TXEN0);
    /* Set frame format: 8data, 1stop bit */
    UCSR0C = (1<<USBS0)|(1<<UCSZ00)|(1<<UCSZ01);   // 8bit data format
}

void USART_Transmit( unsigned char data )
{
    /* Wait for empty transmit buffer */
    while ( !( UCSR0A & (1<<UDRE0)) );

    /* Put data into buffer, sends the data */
    UDR0 = data;
}

int main()
{
    uart_init();

    while(1){

        USART_Transmit(0x41);
    }
}
-
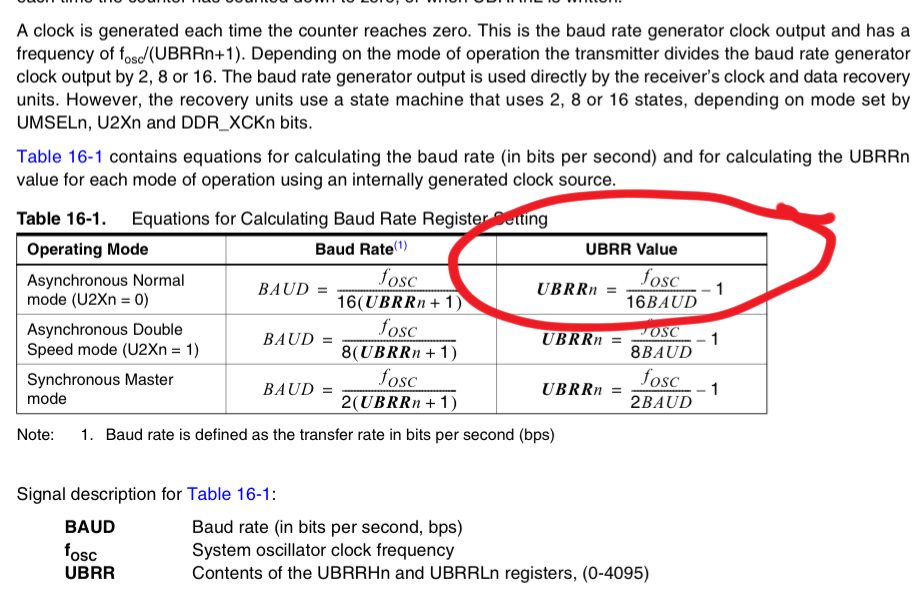
Line 10: This creates a macro for the UART Baud Rate Register (UBBR). This number can be calculated using the formula on page 148 of the datasheet . It should be: UBBR = ((CPU_SPEED)/16 DESIRED_BAUD)-1. For me, I wanted to set my rate to 9600, therefore: UBBR = (8,000,000/16 9600)-1; Or: UBBR = (8,000,000/153,600)-1 = 51.083. It can have a slight margin of error, and since we can't use a float, I rounded to 51.
-
We then setup of function to initialize the UART connection. Lines 16-17 load our calculated baud rate into a register that will actually set the speed we decided upon. This is done by using four bits from the UBBR0L and UBBR0H registers. If the >> is unfamiliar to you, it is the right-shift operator and works much like the left-shift, but yanno, in the other direction.
-
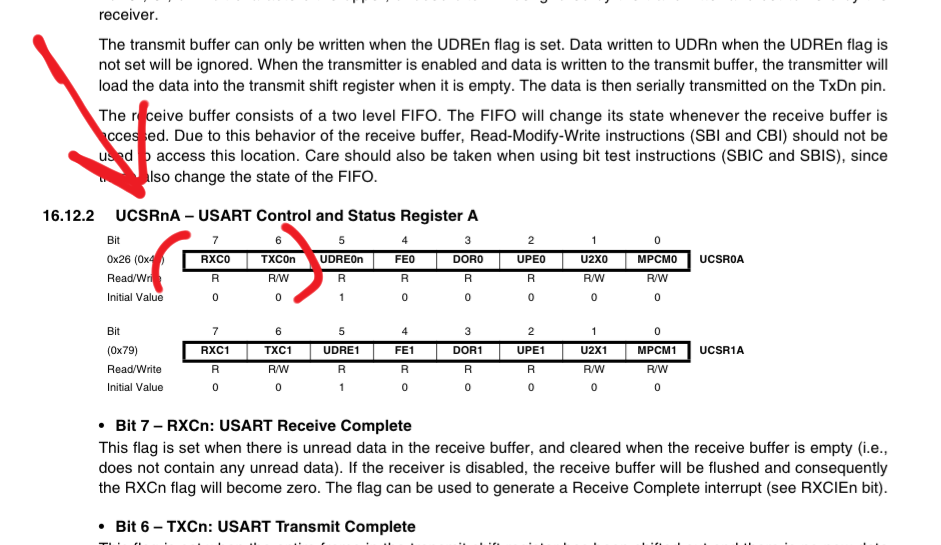
Still in initialization, line 19 enables both the RX0 and the TX0 pins (PA7 and PB0 respectively). I'm not using the TX0 pin yet, but I figured I might as well enable it since I'll use it later.
-
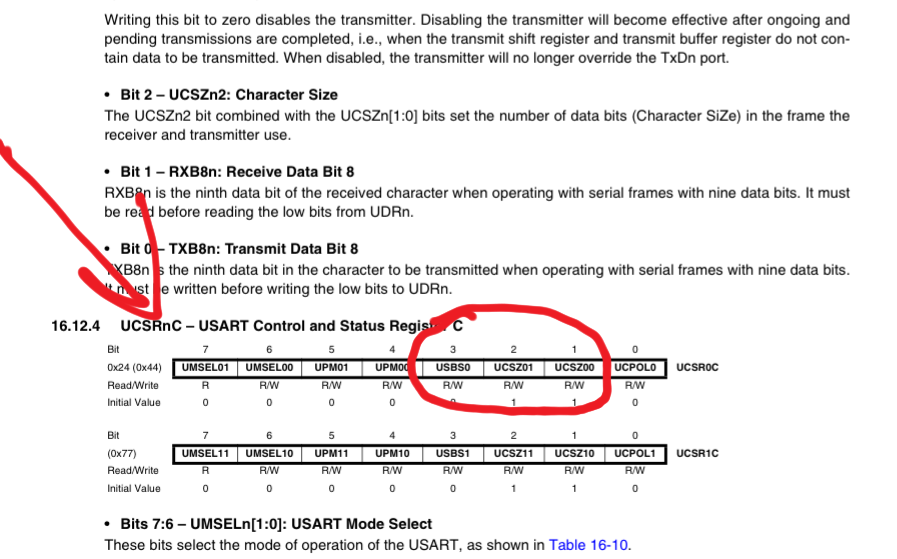
Line 21 sets the bits to tell the Tiny1634 what sort of communication we want. We want 8 bit, non-parity, 1 stop bit. Enabling USBS0, UCSZ00 and UCSZ01 give us these values.
-
Line 24 is the beginning of the function that'll transmit our data. Line 27 checks to see if the ATtiny1634 is finished transmitting before giving it more to transmit. The UDRE0 is a bit on the UCSR0A register that is only clear when the transmit buffer is clear. So, the while ( !(UCSR0A & (1<<UDRE0)); checks the bit, if it is not clear, it checks it again, and again, until it is. This is a fancy pause, which is dependent on the transmit buffer being clear. Line 30 is where the magic happens. The UDR0 is the transmit register, whatever is placed in the register gets shot out the TX line. Here, we are passing the data that was given to the USART_Transmit function when it is called.
-
Line 39 is passing the hex value for the character "A" to the transmit function.


This was a bit easier than expected.
Here was the output from Code v01.

After a little more tweaking and watching Newbie Hack's video on sending strings to an LCD , I adapted NH's code to be used by my UART_Transmit() function I ended with a full string of "ALABTU!" on the serial monitor.
I did this by creating a function called Serial_Print, which is passed a character array (string). StringOfCharacters is a pointer and will be passing each character to the UART transmission. Pointers are simply variables that point to the contents of other variables. They are highly useful when you are looking at the information contained in a variable rather than changing variables' data. Newbie Hack did an excellent job explaining pointers .
Now, whenever the Serial_Print function is called it starts the loop contained. The loop ( line 60, code v02 ) continues to point out each value contained in the string until it comes across a "0" at which point it exits the loop, and subsequently, the function call.
The above code provided the following output in the serial monitor. (ALABTU!)

At this point my simple mind was quite pleased with its trite accomplishments and I saw building a library out of my code being pretty easy. But a few problems I had to solve first:
A. Dynamic baud rate initialization.
In Arduino C Serial.begin(9600) initializes the serial connection and sets the baud rate. This is dynamic regardless of running an Arduino Uno at 1mhz or Arduino Mega at 16mhz. I wanted the same functionality; being able to set the baud rate by passing it to the intialization function, uart_init() .
I solved this by adding the formula in the uart_init() function (see lines 21 and 38 of code v03 ). In short, the F_CPU macro contains whatever speed the microcontroller is set, in my case 8mhz, and the user knows what baud rate he wants the code set, so I had all the pieces for to solve the UBBR equation. I made F_CPU part of the calculation and allowed the uart_init() to pass the desired baud rate to the formula. This allowed me to set the baud rate simply by passing the uart_init() function whatever baud rate I wanted. e.g., uart_init(9600);
B. Carriage-return and line-feed at end-of-transmission (EOT).
In Arduino C every time you send serial data, Serial.print("What's up mother blinkers!?") , there are two characters added. If you are as new to the world of microcontrollers as me, you may have had headaches finding where these extra characters came from whenever you printed something serially. Arduino C's Serial.Print() function automatically adds the carriage-return and line-feed characters. In ASCII that's, "13" and "10" and in hex, "0x0A" and "0x0D" respectively. Arduino C does this, I believe, as a protocol flagging the end of a transmission. This is helpful for the serial receiver to parse the data.
To solve this I simply created two functions CR() and LF() that would transmit the hex code for the line-feed character and the carriage-return. I went this route because not every serial devices excepts them, for instance, the HM-10 that I'm in a love-hate with excepts no characters following the AT commands you send it. I wanted an easy way to send these characters, but not so embedded I had to pull my hair out trying not to send them.
The following code is what I ended with,
The above code provided the following output. Notice my serial monitor automatically recognized the CR and LF character, which is why "ALABTU!" is one per line, and always left-justified. Booyah!

Ok. I'm not done yet, here is what I'll be working on in the evening over the next few days,
Receiving data is a little more complex... a little.
2. RX is less easy
I started by reviewing Newbie Hack's code One Way Communication from Chip-to-Chip , more specifically, his code about the receiving chip. I skipped the part about intilization, since I'd already done that and went straight to his receiving code,
include <avr/io.h>
int main(void)
{
    DDRB |= (1 << PINB0);

    //Communication UART specifications (Parity, stop bits, data bit length)
    int UBRR_Value = 25; //This is for 2400 baud
    UBRR0H = (unsigned char) (UBRR_Value >> 8);
    UBRR0L = (unsigned char) UBRR_Value;
    UCSR0B = (1 << RXEN0) | (1 << TXEN0);
    UCSR0C = (1 << USBS0) | (3 << UCSZ00);

    unsigned char receiveData;
    while (1)
    {
        while (! (UCSR0A & (1 << RXC0)) );

        receiveData = UDR0;

        if (receiveData == 0b11110000) PORTB ^= (1 << PINB0);
    }
}
This code receives data and turns on/off a LED if anything was received. It doesn't concern itself with the values received, just whether something was received.
I was able to replicate this code and get the LED to switch states, but I quickly noticed a problem. The While loop on line 16 is stuck in checking to see if anything has been received, continuously. The problem is apparent; this freezes the microcontroller from doing anything else. Damnit.
Alright, need a different solution; sadly, the solution was something I'd been avoiding for a year, the use of interrupts .
I'm not the sharpest when it comes to electronics, before July 2012 all I'd ever done with electronics was turned'em on and checked Facebook. (By the way, up yours Facebook. ) Since my hardware education began I've avoided learning about interrupts because they've intimidated me.
I won't go into interrupts here, since I'm just learning about them. But I'll mention there are two types, internal and external .
Internal interrupts are generated by the internal hardware of a microcontroller and are called software interrupts, because they are genereated by the CPU as a result of how it is coded. External interrupts are voltages delivered to a pin on the microcontroller. Also, interrupts essentially cause the CPU to put a bookmark in the code it was reading, run over and take care of whatever, then when finished, come back to the bookmarked code and continues reading.
That stated, I'd refer you to Newbie Hack's tutorials on AVR interrupts . It's excellent. Also, Abcminiuser over at AVR Freaks provided an excellent tutorial on AVR interrupts.
Ok. Back to my problem.
So, I dug in the ATtiny1634 datasheet (pg 168) and found the ATtiny1634 has an interrupt that will fire whenever the RX data buffer is full. To activate this interrupt we have to do two things, enable global interrupts and set the RXCIE0 bit on the UCSR0B register. This seemed pretty straight forward, but I found a AVR Freaks tutorial that helped explain it anyway.
Caveat
, I'm learning to re-read which register a bit is found. Occasionally, I'm finding myself frustrated a piece of code is not working, only to realize I'm initializing a bit on an incorrect port. For example,
UCSR0D |= (1<<RXCIE0)
will compile fine, but it would actually be enabling the bit RXSEI, which is the bit you set to enable an interrupt at the
start
of a serial data receive. This happens because the names of registers and bits are part of the AVR Core library, but they are simply macros for numbers. In the case of RXCIE0, it actually represents 7, so coding
UCSR0D |= (1<<RXCIE0)
is simply setting the 7th bit on the
wrong register
. Not that I did that or something.
Alright, I now have the interrupt setup for when the ATtiny1634 is done receiving a byte.
Of course, I didn't add a character to character array conversion, yet. I'm not sure if I want to add this to current function. I personally would rather handle my received characters on a project specific basis. But it should really be as simple as adding character array, then a function to add each character received to the array until it is full. Then, decide what to do when the character array is full.
But Code v04 gave me the following output:

Each time the letter "A" is sent from the serial terminal a RX interrupt event occurs. The interrupt transfers the byte to a variable that is then sent right back out by the Serial_Print() function. Thus, echoing the data you send it.
3. Fully Interrupted
Ok, so, interrupts are a little tricky. Well, one trick. When you are using an interrupt that modifies a variable anywhere else your main that modifies the same variable, you'll need to disable the interrupt before the modification. It prevents corrupt or incomplete data.
Also, I am using a poor man's buffer. It's a simple buffer that overwrites itself and requires an end-of-transmission character, in my case, a "." from the transmitter to know where to cap the buffer. Still, I believe this will work for a lot of what I'd like to use it.
I do foresee a problem when I enable the second UART on the Tiny1634, since really, only one RX interrupt can run the show. We'll see. I'm a little tired to detail things here, but here is the code I ended with and I tried to comment the hell out of it.
One of the other things I did was enable the sleep mode on the Tiny1634. It is setup on line 39 and part of the main loop. It wakes on receiving serial data. I've not tested the power consumption, but this is supposed to make the chip drop down to ~5uA.
Nifty right? :)
Ok, code for the second UART.

I was surprised. The interrupts didn't seem to trip each other up. Of course, I only did a simple test of sending data from one terminal into the ATtiny1634 and having it come out on the other terminal. This would be: Data-->RX0--->TX1 and Data-->RX1-->TX0
So, there really shouldn't be any reason the code would trip out, since the RX0 and RX1 interrupts aren't firing at the same time. I'll create a library from this code, and as I start using the library in applications I'll do more debugging and improvement. Also, if anyone is bored and wants to critique the code, I've got my big boy pants on, I'd appreciate the criticism.
4. All Together!
It only took me 30 minutes or so to convert the UART code to a library. Here it is, a UART library consisting of 12 functions.
- USART_init0()
- USART_init1()
- USART_Transmit0()
- USART_Transmit1()
- Serial_Print0()
- Serial_Print1()
- ClearBuffer0();
- ClearBuffer1();
- LF0()
- LF1()
- CR0()
- CR1()
Functions numbered 0 relate to serial lines 0, which are pins PA7 (Rx0) and PB0 (Tx0). The functions numbered 1 are serial lines 1, which are pins PB1 (Rx1) and PB2 (Tx1).
USART_init
- Initializes a serial lines. Enables TX and RX pins, assigns the baud rate, and enables RX interrupt on receive. It also sets the communication as 8 bit, 1 stop-bit, and non-parity.
USART_Transmit
- Will transmit a single character.
Serial_Print
- Prints a string.
ClearBuffer
- Empties the receiving buffer.
LF and CR
- Transmit a line-feed or carriage-return character.
This is the library code: 1634_UART.h
#ifndef UART_1634
#define UART_1634

#include <avr/interrupt.h>  //Add the interrupt library; int. used for RX.

//Buffers for UART0 and UART1
//USART0
char ReceivedData0[32]; //Character array for Rx data.
int ReceivedDataIndex0; //Character array index.
int rxFlag0;            //Boolean flag to show character has be retrieved from RX.

//USART1
char ReceivedData1[32]; //Character array for Rx data.
int ReceivedDataIndex1; //Character array index.
int rxFlag1;            //Boolean flag to show character has be retrieved from RX.

//Preprocessing of functions.  This allows us to initialize functions
//without having to put them before the main.
void USART_init0(int BUADRATE);
void USART_Transmit0( unsigned char data);
void Serial_Print0(char *StringOfCharacters);
void clearBuffer0();

void USART_init1(int BUADRATE);
void USART_Transmit1( unsigned char data);
void Serial_Print1(char *StringOfCharacters);
void clearBuffer1();

//EOT characters.
void LF0();
void CR0();

//EOT characters.
void LF1();
void CR1();

// function to initialize UART0
void USART_init0(int Desired_Baudrate)
{
    //Only set baud rate once.  If baud is changed serial data is corrupted.
    #ifndef UBBR
    //Set the baud rate dynamically, based on current microcontroller
    //speed and the desired baud rate given by the user.
    #define UBBR ((F_CPU)/(Desired_Baudrate*16UL)-1)
    #endif

    //Set baud rate.
    UBRR1H = (unsigned char)(UBBR>>8);
    UBRR1L = (unsigned char)UBBR;

    //Enables the RX interrupt.
    //NOTE: The RX data buffer must be clear or this will continue
    //to generate interrupts. Pg 157.
    UCSR1B |= (1<<RXCIE1);

    //Enable receiver and transmitter
    UCSR1B |= (1<<RXEN1)|(1<<TXEN1);

    //Set frame format: 8data, 1 stop bit
    UCSR1C |= (1<<UCSZ00)|(1<<UCSZ01);   // 8bit data format

    //Enables global interrupts.
    sei();
}

// Function to initialize UART1
void USART_init1(int Desired_Baudrate)
{
    //Only set baud rate once.  If baud is changed serial data is corrupted.
    #ifndef UBBR
        //Set the baud rate dynamically, based on current microcontroller
        //speed and the desired baud rate given by the user.
        #define UBBR ((F_CPU)/(Desired_Baudrate*16UL)-1)
    #endif

    //Set baud rate.
    UBRR0H = (unsigned char)(UBBR>>8);
    UBRR0L = (unsigned char)UBBR;

    //Enables the RX interrupt.
    //NOTE: The RX data buffer must be clear or this will continue
    //to generate interrupts. Pg 157.
    UCSR0B |= (1<<RXCIE0);

    //Enable receiver and transmitter
    UCSR0B |= (1<<RXEN0)|(1<<TXEN0);

    //Set frame format: 8data, 1 stop bit
    UCSR0C |= (1<<UCSZ00)|(1<<UCSZ01);   // 8bit data format

    //Enables global interrupts.
    sei();
}

//USART0
void USART_Transmit0( unsigned char data )
{
    //We have to disable RX interrupts.  If we have
    //an interrupt firing at the same time we are
    //trying to transmit we'll lose some data.
    UCSR0B ^= ((1<<RXEN0)|(1<<RXCIE0));

    //Wait for empty transmit buffer
    while ( !( UCSR0A & (1<<UDRE0)) );

    //Put data into buffer, sends the data
    UDR0 = data;

    //Re-enable RX interrupts.
    UCSR0B ^= ((1<<RXEN0)|(1<<RXCIE0));

}

//USART1
void USART_Transmit1( unsigned char data )
{

    //We have to disable RX interrupts.  If we have
    //an interrupt firing at the same time we are
    //trying to transmit we'll lose some data.
    UCSR1B ^= ((1<<RXEN1)|(1<<RXCIE1));

    //Wait for empty transmit buffer
    while ( !( UCSR1A & (1<<UDRE1)) );

    //Put data into buffer, sends the data
    UDR1 = data;

    //Re-enable RX interrupts.
    UCSR1B ^= ((1<<RXEN1)|(1<<RXCIE1));

}

//This functions uses a character pointer (the "*" before the StringOfCharacters
//makes this a pointer) to retrieve a letter from a temporary character array (string)
//we made by passing the function "ALABTU!"

//USART0
void Serial_Print0(char *StringOfCharacters){
    UCSR0B ^= ((1<<RXEN0)|(1<<RXCIE0));

    //Let's do this until we see a zero instead of a letter.
    while(*StringOfCharacters > 0){

        //This function actually sends each character, one by one.
        //After a character is sent, we increment the pointer (++).
        USART_Transmit0(*StringOfCharacters++);
    }
    //Re-enable RX interrupts.
    UCSR0B ^= ((1<<RXEN0)|(1<<RXCIE0));
}

//USART1
void Serial_Print1(char *StringOfCharacters){
    UCSR1B ^= ((1<<RXEN1)|(1<<RXCIE1));

    //Let's do this until we see a zero instead of a letter.
    while(*StringOfCharacters > 0){

        //This function actually sends each character, one by one.
        //After a character is sent, we increment the pointer (++).
        USART_Transmit1(*StringOfCharacters++);
    }
    //Re-enable RX interrupts.
    UCSR1B ^= ((1<<RXEN1)|(1<<RXCIE1));
}

//USART0
void clearBuffer0(){
    //Ugh.  A very inefficient way to clear the buffer. :P
    ReceivedDataIndex0=0;
    for (unsigned int i = 0; i < 64;)
    {
        //We set the buffer to NULL, not 0.
        ReceivedData0[i] = 0x00;
        i++;
    }
}

//USART1
void clearBuffer1(){
    //Ugh.  A very inefficient way to clear the buffer. :P
    ReceivedDataIndex1=0;
    for (unsigned int i = 0; i < 64;)
    {
        //We set the buffer to NULL, not 0.
        ReceivedData1[i] = 0x00;
        i++;
    }
}

void LF0(){USART_Transmit0(0x0A);}  //Function for sending line-feed character.
void CR0(){USART_Transmit0(0x0D);}  //Function for sending carriage-return character.

void LF1(){USART_Transmit1(0x0A);}  //Function for sending line-feed character.
void CR1(){USART_Transmit1(0x0D);}  //Function for sending carriage-return character.

ISR(USART0_RX_vect){
    //RX0 interrupt

    //Show we have received a character.
    rxFlag0 = 1;

    //Load the character into the poor man's buffer.
    //The buffer works based on a end-of-transmission character (EOTC)
    //sent a the end of a string.  The buffer stops at 63 instead of 64
    //to always give room for this EOTC.  In our case, "."
    if (ReceivedDataIndex0 < 63){
        //Actually pull the character from the RX register.
        ReceivedData0[ReceivedDataIndex0] = UDR0;
        //Increment RX buffer index.
        ReceivedDataIndex0++;
    }
    else {
        //If the buffer is greater than 63, reset the buffer.
        ReceivedDataIndex0=0;
        clearBuffer0();
    }
}

ISR(USART1_RX_vect){
    //RX1 interrupt
    PORTA ^= (1 << PINA6);
    //Show we have received a character.
    rxFlag1 = 1;

    if (ReceivedDataIndex1 < 63){
        //Actually pull the character from the RX register.
        ReceivedData1[ReceivedDataIndex1] = UDR1;
        //Increment RX buffer index.
        ReceivedDataIndex1++;
    }
    else {
        //If the buffer is greater than 63, reset the buffer.
        ReceivedDataIndex1=0;
        clearBuffer1();
    }
}

#endif
Really, it is all the functions moved over to a header file (.h). One thing I'll point out, the #ifndef makes sure the header file is not included twice, but I was getting an error with it for awhile, come to find out, you cannot start #define name for #ifndef with a number, e.g.,
- #ifndef 1634_UART -- This will not work.
- #ifndef UART_1634 -- Works great!
Eh. Devil's in the details.
Ok, here is a program that utilizes the library.
// UART Example on the ATtiny1634 using UART0.
// C. Thomas Brittain
// letsmakerobots.com
#define F_CPU 8000000UL     //AVR clock frequency in Hz, used by util/delay.h
#include <avr/io.h>         //Holds Pin and Port defines.
#include <util/delay.h>     //Needed for delay.
#include <avr/sleep.h>      //Needed for sleep mode.
#include "1634_UART.h"

// Main
int main()
{
    //Setup received data LED.
    DDRA |= (1 << PINA6);

    //Light LED on PA6 to show the chip has reboot.
    PORTA ^= (1 << PINA6);
    _delay_ms(500);
    PORTA ^= (1 << PINA6);

    //Initialize the serial connection and pass it a desired baud rate.
    USART_init0(19200);
    USART_init1(19200);

    //Set Sleep
    set_sleep_mode(SLEEP_MODE_IDLE);

    //Forever loop.
    while(1){
        //ReceivedData = "ASDASDAS";
        sleep_mode();

        //USART0
        if (ReceivedData0[(ReceivedDataIndex0)-1]==0x2E){
            //Function to print the RX buffer
            Serial_Print1(ReceivedData0);
            //Let's signal the end of a string.
            LF1();CR1(); //Ending characters.
            //After we used the data from buffer, clear it.
            clearBuffer0();
            //Reset the RX flag.
            rxFlag0 = 0;
        }

        //USART1
        if (ReceivedData1[(ReceivedDataIndex1)-1]==0x2E){
            //Function to print the RX buffer
            Serial_Print0(ReceivedData1);
            //Let's signal the end of a string.
            LF0();CR0(); //Ending characters.
            //After we used the data from buffer, clear it.
            clearBuffer1();
            //Reset the RX flag.
            rxFlag1 = 0;
        }


    }
}
This program is the same as above, but using the library. It simply takes data receiving from one UART and send its out the other.
Alright, that's enough UART for awhile. I might update this when I run into bugs, which I will, I am a hack. So, use this code at your own risk of frustration.
Stuff I'd no energy to finish.
- Implement a circular-buffer (if I get smart enough to do it, that is).
- At least making the buffer size user definable. :)