
Originally posted on www.letsmakerobots.com
UPDATE: I discovered the link I had was referring (which is the true stock image) is unuseable unless update and upgrade are run. Sadly, you can't do that with a 2gb image. Regardless, I've switched the image to the updated (as of writing this) Angstrom image. Please double check and make sure you've got the latest image:
http://beagleboard.org/latest-images
Replace the paths in steps 8 & 10 (but I'll try to keep it up to date). Again, it is unfortunate but you need a 4gb or greater microSD to use these instructions.
**MAIN: **
As I stated, I killed my stock Angstrom on the Beaglebone Black (B^3).
I pieced together how to restore it.
You'll need your B^3, microSD card, and Ethernet connection.
(WiFi dongle can replace the Ethernet, if you got it working before I did. And if you did, where's the walkthrough :P?)
1. Download Angstrom
This fellow provides several B^3 distros, one of them being the stock Angstrom.
2. Download and install 7-Zip.
3. Download Image Writer (Win32diskimager).
http://sourceforge.net/projectss/win32diskimager/
If you are using Linux, you might try:
https://help.ubuntu.com/community/Installation/FromImgFiles
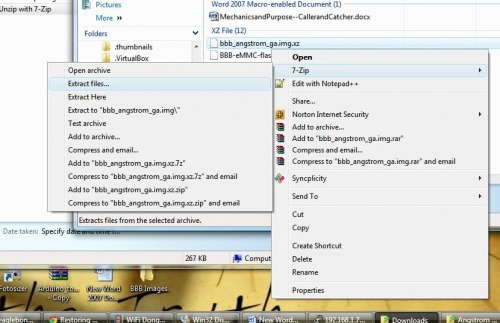
4. Unzip the bbb_angstrom_ga.img.xz file
**
 **
**
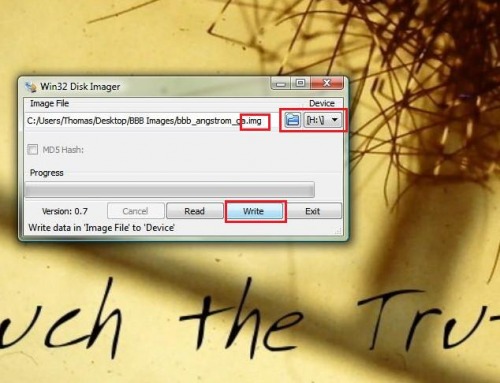
5. Use Win32diskwriter to write stock Angstrom to your microSD
- Open Win32diskwriter, hit the Blue Folder icon.
- Select your Angstrom bbb_angstrom_ga.img file.
- Make sure your microSD is your PC, and it is selected (usually listed as H:).
- Hit Write.
6. Remove the microSD from your PC, put it into the Beaglebone Black, and boot from it.
See video
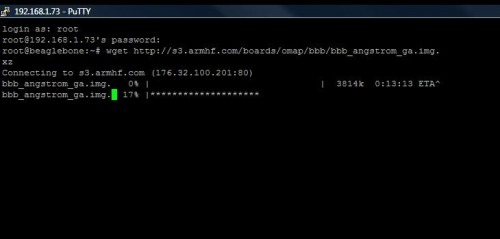
7. Use PuTTY (or your favorite SSH program) to access the Beaglebone Black.
8. Download the stock distro.
This is so we can put the image on the eMMC, note you must have the Beaglebone Black connected to the internet for this step.
Type:
wget https://s3.amazonaws.com/angstrom/demo/beaglebone/Angstrom-Cloud9-IDE-GNOME-eglibc-ipk-v2012.12-beaglebone-2013.04.13.img.xz
**
 **
**
9. Write the Angstrom Stock img to your Beaglebone Black eMMC.
This next step is going to write the image file to your Beagle's eMMC.
Two notes, it is going to take awhile, if you are curious if it is still installing, use the LED activity lights to guide you. When the PuTTY window gives you back to the command prompt and the LEDs are slowed, you're good to go to the next step. Oh, second note. Try not to power down the Beagle during this step.
Type:
xz -cd Angstrom-Cloud9-IDE-GNOME-eglibc-ipk-v2012.12-beaglebone-2013.04.13.img.xz > /dev/mmcblk1
10. Shutdown the Beaglebone Black
Type:
shutdown
11. Remove the microSD and power back on the Beagle. It should now boot like you bought it (unless, of course, I screwed up. Feel free to yell at me and I'll fix these instructions).
If you followed this process you'll see these instructions can be used to write any image file to the eMMC. Let me know if you get a different distro working (consistenly).
Now, I'm going to turn to getting Arch Linux going. Unless, someone else has it working... JerZ? :)
Hope you're all well.