This is a continuation of my Robot Metallurgy 101 -- AVR Lesson Journal
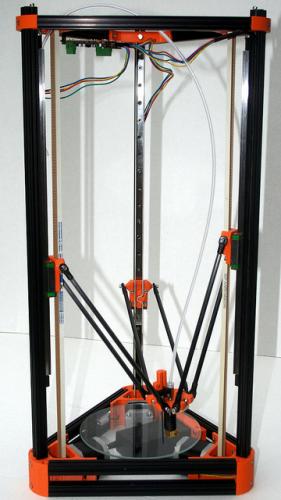
This is the second part of my Kossel Mini build log
When I made my mind up to build a 3D Printer I knew I was in for a ride. I knew I was going to spend an insane amount of time calibrating the damned thing. Well, my overestimation was nowhere near the truth. I've spent literally days calibrating this damned machine. Mind you, a lot of it was because I refused to "RTFM." But the other part was because there doesn't to seem to be a manual on calibrating the Kossel Mini. Therefore, I'm going to attempt to present what I've learned for delta printer posterity.
Note, this guide will focus on the "holes" other sources of documentation have, more specifically, holes in:
Let's start with getting the firmware and software.
I mentioned in the physical build of my printer, I bought most of my stuff as a kit from builda3dprinter.eu. I've been pleased with the kit. Most of my frustration with the physical build was me not understanding how the pieces work together (for instance, the auto-probe). Anyway, Ardon Camp from B3DP has provided some starting firmware for his kits, which is listed on his " Initial set-up " page
As of now, I switched Proterface out with Repetier and KISSlicer with Slic3r.
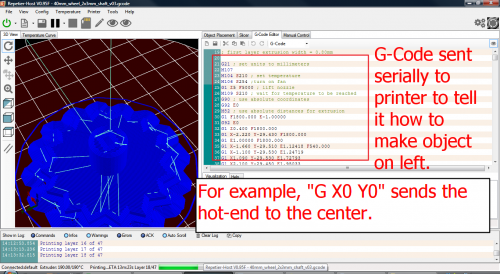
We should have firmware (Marlin) and a host (Repetier or Pronterface). What now?
Well, hind-sight is 20/20, so here are my suggestions.
1. Get familiar with G-Code
Most 3D printer firmware operates on a standard set of instructions called G-Code, which are sent to the printer via serial connection. There is a code for everything, turning the heater on, going to an end-stop, writting settings to the EEPROM. My recommendation, before you start moving any part of your printer, read through all the G-Codes. This will give you an idea how your software talks to the printer.
2. Check, re-check End-Stops connection before testing motors
Now that we've read up on G-Code, we know the code to check and see if the End-stops are triggered is M119. Check this a few times before you attempt moving anything electronically. If everything is connected correctly it should look like this,
No Buttons Pressed:
- Y_MAX: Open
- X_MAX: Open
- Z_Min: Triggered
- Z_Max: Open
All Buttons Pressed:
- Y_MAX: Triggered
- X_MAX: Triggered
- Z_Min: Open
- Z_Max: Triggered
It is important to have these trigger correctly, otherwise, your hot-end will go crashing into something. For example, if one the end-stops isn't triggering then the connected carriage will continue trying to pull past the end-stop, which will result in the your belt-link coming apart.
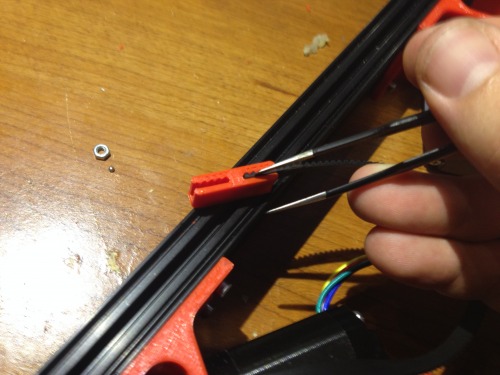
Expect for your links to come apart a few times as you make adjustments.
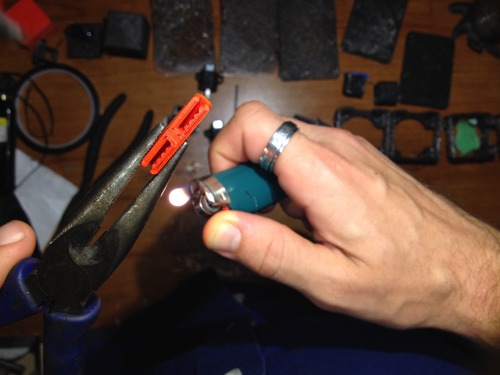
Being forthright and humble, I made so many mistakes calibrating my Kossel that my links began to stretch out and were unable to hold the belt properly.
I was able to bend them back into place by clamping them with pliers while heating the bottom side with a lighter.
3. Fans
The Kossel Mini has a small 40x40mm fan that blows directly on the hot-end, all the time .
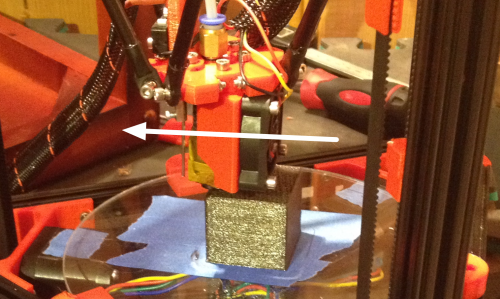
This is required because the hot-end holder is actually a printed part, meaning it is plastic, therefore, if the hot-end exterior isn't constantly cooled, it will melt the holder and come crashing down on your print plate in a neat heap of defeat.
The fan should operate on 12V. You have several options.You can tie the fan into the PSU itself, which would cause the fan to be on everytime the printer is on. Or, you can tie the fan into the Ramps board.
I chose the Ramps. Don't ask me, probably because I intuitively find a way to do something through hardest means possible.
Anyway, here is how I have all my fans, (1) on the hotend, (2) cooling my extruder stepper, (3) an 80mm cooling the print bed.
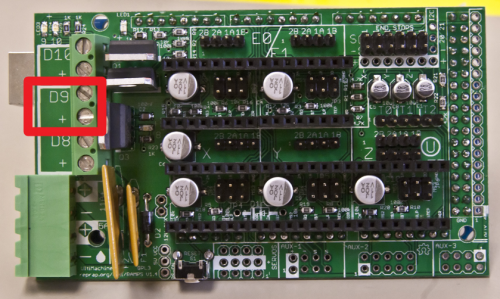 I then connected all these fans to D9.
I'd like to take a sidetrail a moment. Power terminals D8, D9, D10 are simply high-power N-Channel MOSFETs controlled by PWM from the Arduino Mega's D8, D9, and D10 pins. If you'd like the exact specs, here's the datasheet .
Ok. Now we have a few things to set in firmware to get the fans to act correctly. First, make sure you are using the option under Configuration.h
- #define MOTHERBOARD 33
This sets the three power channels on the Ramps to function as the following:
- D10 = Extruder Heater (hot-end)
- D9 = Fans
- D8 = Heated Bed
Now that is setup, then everything should work hunky-dorky, right? Well, kinda.
I was having two problems. First, the fan didn't come on automatically, I had to send the G-Code command "M106 SXXX" to get it to turn on, the XXX being a number between 0-255 to set the PWM of the fan (also, the command M107 used to be to turn it off, but now we just send "M106 S0").
Second problem, my fan didn't like to kick on with PWM. Sometimes it did, sometimes it didn't. Often, I'd start a print only to find my hot-end melting the effector plastic. Sigh.
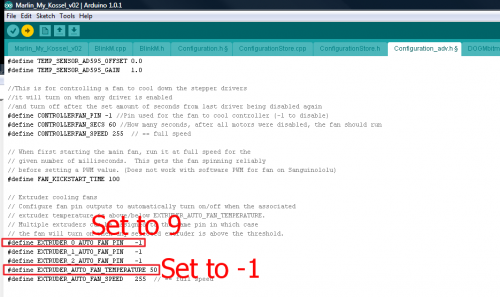
Now, some people who know Marlin better than me will probably point out the option under the Configuration_adv.h,
- #define FAN_KICKSTART_TIME 100
The number is the number of milliseconds to drive the fan at full speed before switching to a temperature based PWM. Now, I tried tweaking this number a bit, but I found my fan would still lock up during times it would slow. Eh. That is one reason I write this, if others have solutions, please add them in comments. :)
 What I ended up doing was finding the option to have my D9 channel to run at full power all the time.
Under the Configuration_adv.h file I found the options to define the extruder fan's behavior. First, I setup the D9 channel as our fan channel by setting
- #define EXTRUDER_0_AUTO_FAN_PIN 9
Then, I changed the kick-on temperature to -1, meaning the hot-end would need to be below freezing for the fan to turn off. So, a hackish always on switch.
4. Physical Print Calibration
"But I bought a Kossel 'cause it's got an Auto-_Probe!" Ya, I'm humble enough to state those words did run through my mind. Yet, I've learned, the auto-probe is like many things in electronics, nice to have, but does not replace the ability or the understanding behind it. I'll go as far as stating, the auto-probe _is meant to keep your physical calibration on track, even after heavy use, rather than compensate for poor calibration_._
Alright, to calibration.
I couldn't find any Kossel Mini specific guides on how to calibrate the machine, but I found a lot of scattered information in the
After going through many posts I pieced together my own method for calibration. But the standard blog on the issue is:
Before we begin calibration, let's define and agree on what we will be calibrating.

(Image shamelessly, and maybe illegally? Copied from Blokmer's Kossel Build guide)
Ok, here we go:
Step #1 -- Calibrate ZMax
This takes care. Go to Configuration.h and set,
- #define MANUAL_Z_HOME_POS 270
This is going to tell your printer you have a build volume larger than you do, but we do this so the firmware wont stop us as we try to move the hot-end as close to the bed as possible. Now, perform the paper-test.
For the sake of brevity, I'm going to define the paper-test once, then simply refer to it as the paper-test.
The idea is eventually you want about a paper's width space between the hot-end and the printer bed, when the printer is told to go to Z0. The paper-test consists of putting a piece of paper on the print bed, then lower your hot-end manually, 10mm steps at first, but as you get closer, 0.1mm steps. At the point the hot-end is putting just enough pressure to create a little drag on the paper, you stop going down. This is the paper-test.
Ok. You lower the hot-end carefully until it passes the paper-test. Then, send the G-Code for getting the Z position.
- M114
The printer will respond with the current value for the X, Y, Z, and E (extruder). You only want the Z-value you right now. Take the Z-value and subtract it from the 270, this will be your new MANUAL_Z_HOME_POS. That is,
- MANUAL_Z_HOME_POS = 270 - Z_Value obtained by paper-test.
If my explanation sucks, refer to Blokmer H07
Step #2 -- Calibrate Physical Center
Now, there is a way to set the center of your build plate in your Marlin firmware, but it is better only to tweak it there after you have the physical part set pretty damn close to center. This is what I did.
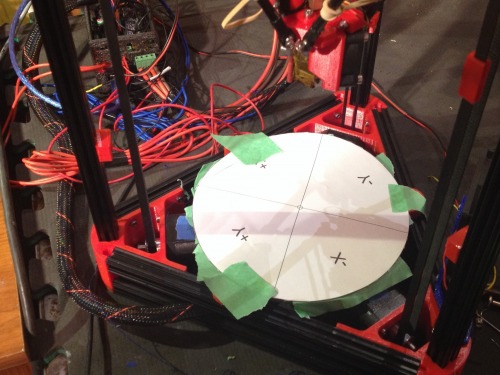 I used Eagle Cad to make a 170mm diameter circle, with exact center marked (provided below). Then, I printed it to scale on a piece of paper. I cut this paper out and centered it on my build plate, then taped it down.
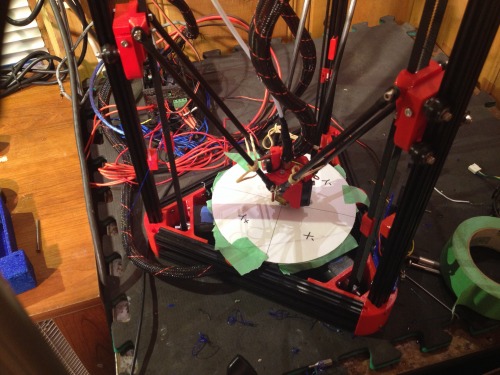
Next, I lowered my hotend until it was near to center.
Using the controls, I attempted to center the hot-end above the circle the best I could. It helps to change your angle several times before each move. Once it is center we are going to take a measurement, but something important to know before we do. The stepper motors will timeout from their held position, going into an idle position. Be careful not to let them timeout on the next two steps, since you'll lose a little time by needing to start over. To keep them engaged, simply micro step one direction, then right back.
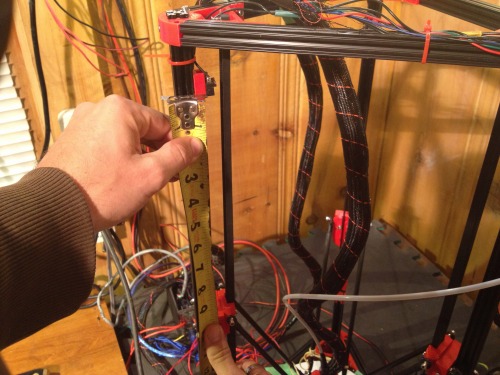 Ok, measure from the top of one of the carriages to the bottom of the plastic on an end-stop, basically, where the end-stop button would be if it was pressed. Also, the end-stop doesn't matter since our goal is to get them all the same.
Alright, at this part you need a saw that will give you a square cut. I used a speed-square and a circular saw. Also, smaller board, like a piece of trim board. Cut a piece of wood the same length as you measured.
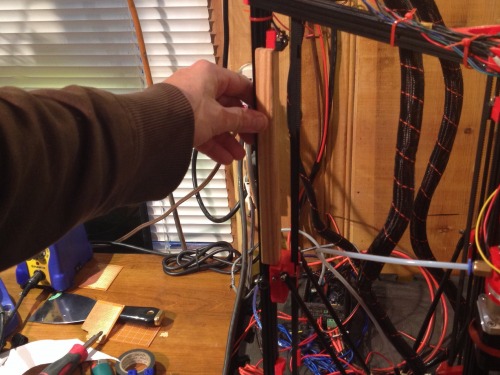 Take the piece of wood to the printer. Lower the hot-end to Z0. Then, re-center using the target-template. Now, take the cut wood and put it between each end-stop and the top of its respective carriage, being careful not to let the motors go idle. If the end-stop is too high, lower it until it is flush against the wood. If the wood will not fit, raise the end-stop until it does, making sure it is flush. In this manner you are assuring each arm is equidistant from the print bed, while maintaining the hot-end centeredness.
After this is complete, you must repeat Step 1. This sets centeredness and Z-Offset.
Now, test this by sending the G-Code:
- G X0 Y0 Z15
If all worked, the hot-end will magically find its way to the center of the print bed, while staying 15mm above the surface. If that goes well, microstep the hot-end back down to the surface to assure we maintained the correct Z-Offset (aka, print volume).
Step #3 -- Flat Print Surface
Even after all this, we still aren't done. There is another variable to calibrate on the Kossel, the flatness of the plate.
We have already calibrated the Kossel's print volume height. This means if we send the command G X0 Y0 Z0 then the hotend-should come to rest at the center of the print bed, about .1mm above the surface. But, delta printers have an additional variable of flatness. Consider the two following images:
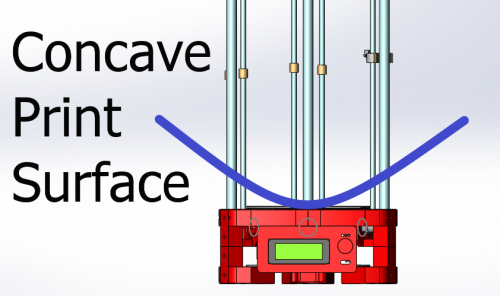
 In this image the blue line is the print surface according to the Marlin firmware.
Do you see how this could create a problem? The center Z offset may be correct, but as the hot-end moves towards the edges, it gradually rises until the hot-end is resting 2-10mm away from the print surface.
Let's look at the other, possibly more damaging, scenario.
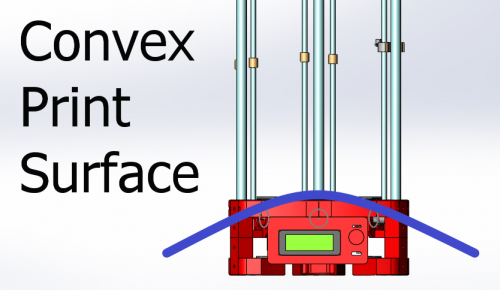
If the print bed, according to firmware, is convex, then the hot-end might be correct when at center, but as you get to the edges, the machine tries burying your hot-end into the glass plate.
This is why Johann's auto-probe was such a nifty addition to the Kossel build. But let's not get ahead of ourselves, physical calibration first.
Well, that's sort of a lie. To correct for flatness we are going to adjust the firmware. The flatness of a Kossel is reliant on the variable DELTA_RADIUS and it is the sum of several variables. So, to adjust DELTA_RADIUS we focus in on either increasing or decreasing one of the variables. I picked DELTA_SMOOTH_ROD_OFFSET at random.
Ok, the adjustment is pretty straight forward, but requres tinkering to get it right. But before we make an adjustment we need to know what direction to go. We can determine this by visually comparing difference between the distance between the hotend and the print surface when the hotend is at the center, and the distance between the hotend and the print surface when near one of the towers. Let's go back to pictures.
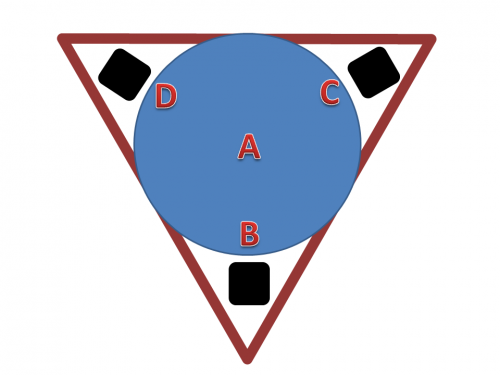
This image is to give you an idea what points we want to compare for flatness. For instance, if Kossel passes the paper-test at point A, then it should at points B, C, and D.
But if the Kossel passes the paper-test at point A, and is too high at B, C, and D then you have a concave print surface.
Likewise, if the Kossel passes the paper-test at point A, and is too low at B, C, and D then you have a convex print surface.
- B Height > A Height = Concave
- B Height < A Height = Convex
One more bit, you maybe asking how to find the spots B, C, and D. Well, I used the following calculations
- Xb = (Build Radius) * COS * (Angle of B tower)
- Yb = (Build Radius) * SIN * (Angle of B Tower)
Also, know your towers should be at angles: 90, 210, 330
If you have the same build radius as me, 170, then your points should be.
- Y70, X0
- Y-35, X-60
- Y-35, X60.62
But remember, we are really looking that all four points pass the paper-test.
Let's move on to how to make the adjustment. I will not go into the math explaining how adjusting DELTA_RADIUS affects flatness, mainly because I don't understand it. But secondly, because we don't need to understand it to adjust it. Just know the following,
- Increasing DELTA_SMOOTH_ROD_OFFSET lowers the hotend.
- Decreasing DELTA_SMOOTH_ROD_OFFSET raises the hotend.
Really, it is changing the firmware's idea of flatness.
Now, make the adjust from the visual information you collected by comparing point A to point B, C, and D. Then, comparing them again, adjust again. Compare, adjust. Ad infinitium.
Please, don't think your done. Making these last adjustments means you really need to go back and start from Step #1 and work through them a second time, since any adjustment throws the previous adjustments off alittle. So, it is true, adjustment is an infinite process of error reduction and perfection will never be achieved. Be happy with pretty damn close :)
6. Auto-Probe
Physical calibration is done, now let's examine what makes us Kossel users, our respective auto-probes.
The auto-probe is meant to keep Kossel Mini printing flat. That is, it is meant to adjust for slight inconsistencies in the print bed or minor mechanical disproportions.
Alright, as the rest of this article, I don't plan to re-hash stuff that has already been covered. Such as setting up the auto-probe. Just refer back to Blokmer , or B3DP . But here are a few things I feel they missed:
#1 -- G28 CANCELS G29 DATA
This I feel is the most important omission from the calibration guides . G28 is the G-Code to home the tower end-stops, just know whenever you do this, it will cancel the readings you took from the auto-probe. And beware, Slic3r adds a G28 command before every print.
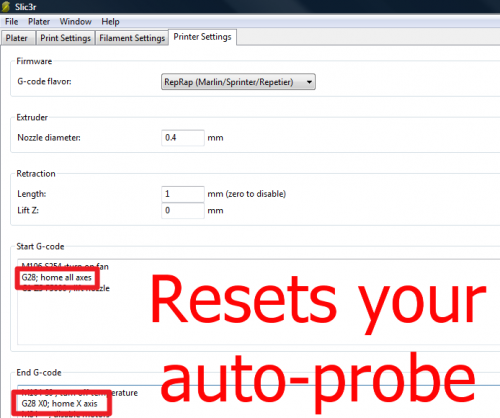 To remove this from Slic3r,
- Go to "Printer Settings"
- Under "Start G-Code" delete "G28; home all axes" line.
- Under "End G-Code" delete "G28 X0; home X-axis" and replace it with, "G1 X0 Y0 Z220 F5000"
Step number three is just a suggestion, but you do want your hotend to back away from the print when done, so you don't catch anything on fire. You just don't want to reset your auto-probe data.
And yes, I spent 20 hours or so adjusting my auto-level and scratching my head everytime my print didn't adjust respectively. (If it wasn't for Hoff70 , I'd still be scratching my head).
I'm not smart, just obessive.
#2 Finding the X, Y, Z Offset of the Z-probe from Extruder.
The Z-probe doesn't sit directly over the tip of the hot-end, so we have to adjust for this offset. To find this number, I did the following.
- Place and center the paper-template .
- Send the command: G X0 Y0 Z10
- Put the auto-probe in its active position (as if to take readings).
- Using Repetier or Pronterface, move the effector from the hotend being centered, until the tip of the Z-probe is centered.
- Then lower the effector until the Z-probe passes the paper-test.
- After, send G-Code: M114 . The output is our auto-probe offset.
Take your readings and put them into the three defines in Marlin
- #define X_PROBE_OFFSET_FROM_EXTRUDER
- #define Y_PROBE_OFFSET_FROM_EXTRUDER
- #define Z_PROBE_OFFSET_FROM_EXTRUDER
As for directionality, I found if my X or Y numbers were negative, I was telling the firmware my auto-probe was offset into the -X or -Y regions . Of course, the Z-probe offset is always negative, or you'd be in trouble.
#3 -- Visualizing Auto-Probe readings
This is another important piece I feel guides leave out. What does the auto-probe data mean?
Don't ask me, that'd take math. I'd much rather look at pictures. So, how do we turn the data into a picture? Well, there are several methods, but really, any program that will turn a set of points into a plane.
One of the guys from the Delta Google Group wrote this Python script for MATLAB.
Buuut , I don't have MATLAB and I'm not currently tied to a university, so I had to think of another way. Well, my profession is mental health and I use Excel for a lot of statistical analysis (hey, SPSS costs money, too). Anyway, here are the steps I took to visualize the data in Excel.
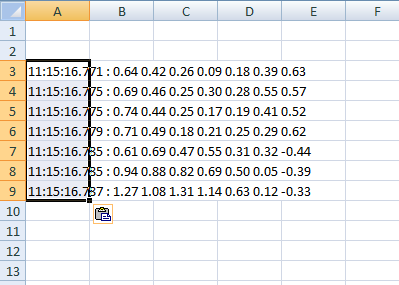
1. Run Auto-Probe. Once auto-probe is done, it'll send back a set of points. Copy them.
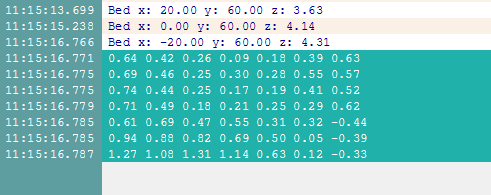
2. Paste the points into Excel. It'll complain about formatting, press OK.
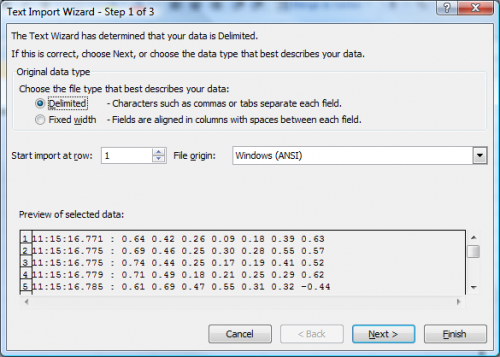
3. If you click on the formating options and select "Text Import Wizard." You can then select a "Space Delimited" pasting option. Basically, this will cause Excel to translate th
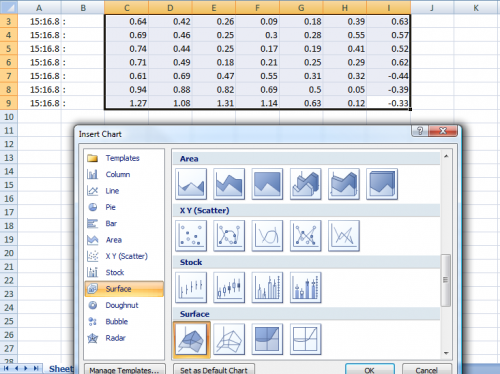
4. Once you have your data in Excel correctly, let's make a graph. Select your data set then go to the graph type "Surface."
5. There's the graph.
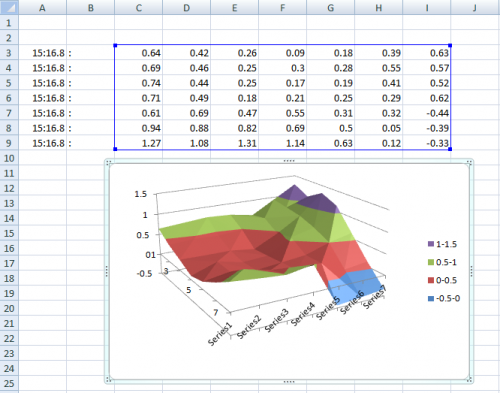
6. There are several things you can do with this data, but only if you have a point of orientation. That is, what area on the graph represent the area on the print surface. To find the auto-probe data orientation, I built a lump on my print surface near one of the towers, like this:
Be careful, if your Z-probe doesn't retract far enough, it'll knock your lump into the belt.
You can adjust how far your Z-probe retracts between probing in the Marlin firmware. Under Configuration.h adjust,
- #define Z_RAISE_BETWEEN_PROBING
If all goes well, when you run your auto-probe data you'll get a nice lump on the graphed surface. This will allow you to make intelligent decisions regarding adjustment.
-
One last bit I'd like to point out. None of this is going to help if your auto-probe is not mechanically reliable . But how do you tell if it is? Well, until someone corrects me, I did the following.
-
Ran the auto-probe about twenty times.
- After each, I took the mean of the data.
- Then, after I had about twenty means, I ran the standard deviation on those means.
- This number is a fair indicator of how reliable your auto-probe is mechanically. That is, are the readings it is giving you reliable. The smaller the number, the more reliable.
Of course, I'm not great with math and I'm pure hack, so someone with more understanding of the logic let me know if that is incorrect.
And with that I'll close by saying: I'm a hack. I wrote this article not to point out everything I know, but rather, what I've learned. If anyone finds incorrect information, please comment; I'll make changes quickly. The last thing I'd like to do is steer someone wrong.