
This article is part of a series.
View all 6 parts
- Part 1 – Setting up a Raspberry Pi NAS
- Part 2 – Setup Production Postgres Raspberry Pi 5 (Distro-Agnostic)
- Part 3 – Securely Expose Your Raspberry Pi 5 with Cloudflare Tunnel
- Part 4 – Nginx Reverse Proxy on Raspberry Pi (Ubuntu Server)
- Part 5 – This Article
- Part 6 – Switch from Cloudflare Origin Certificates to Let’s Encrypt on Raspberry Pi with Cloudflare Tunnel
This guide walks through setting up a secure HTTPS connection between your local Raspberry Pi reverse proxy and Cloudflare using a Cloudflare Origin Certificate . This enables Full SSL mode , improving security end-to-end.
0. Prerequisites
-
Cloudflare account with a configured domain (e.g.
<your-host-name>.com) - Cloudflared tunnel already running on your gateway device
-
Nginx reverse proxy running on a separate Raspberry Pi (e.g.
192.168.1.102) - Cloudflare SSL/TLS mode set to Full (not Flexible)
1. The Architecture
The plan is to have several pieces of infrastructure.
-
Cloudflare - directs traffic from my domain down a tunnel into a Pi on my local network. This Pi is called
two. -
Raspberry Pi
two(.102) - is running the Cloudflare tunnel and Nginx reverse proxy. Both are using SSL. -
Raspberry Pi
four(.104) - is running FastAPI server. It is accessible from thetwovia the reverse proxy.
---
config:
---
flowchart TD
    browser["Browser"]

    subgraph Cloudflare
        cf["Cloudflare"]
        cf_tls["TLS Termination
(* .lolzlab.com)"]
        tunnel["Cloudflared Tunnel"]
    end

    subgraph Reverse_Proxy_Pi ["Reverse Proxy Pi"]
        proxy_stack["nginx + cloudflared"]
    end

    subgraph FastAPI_Pi ["FastAPI Pi"]
        fastapi_app["Uvicorn App"]
    end

    browser -->|"HTTPS / TLS"| cf
    cf --> cf_tls --> tunnel
    tunnel --> proxy_stack
    proxy_stack -->|"HTTP over LAN"| fastapi_app
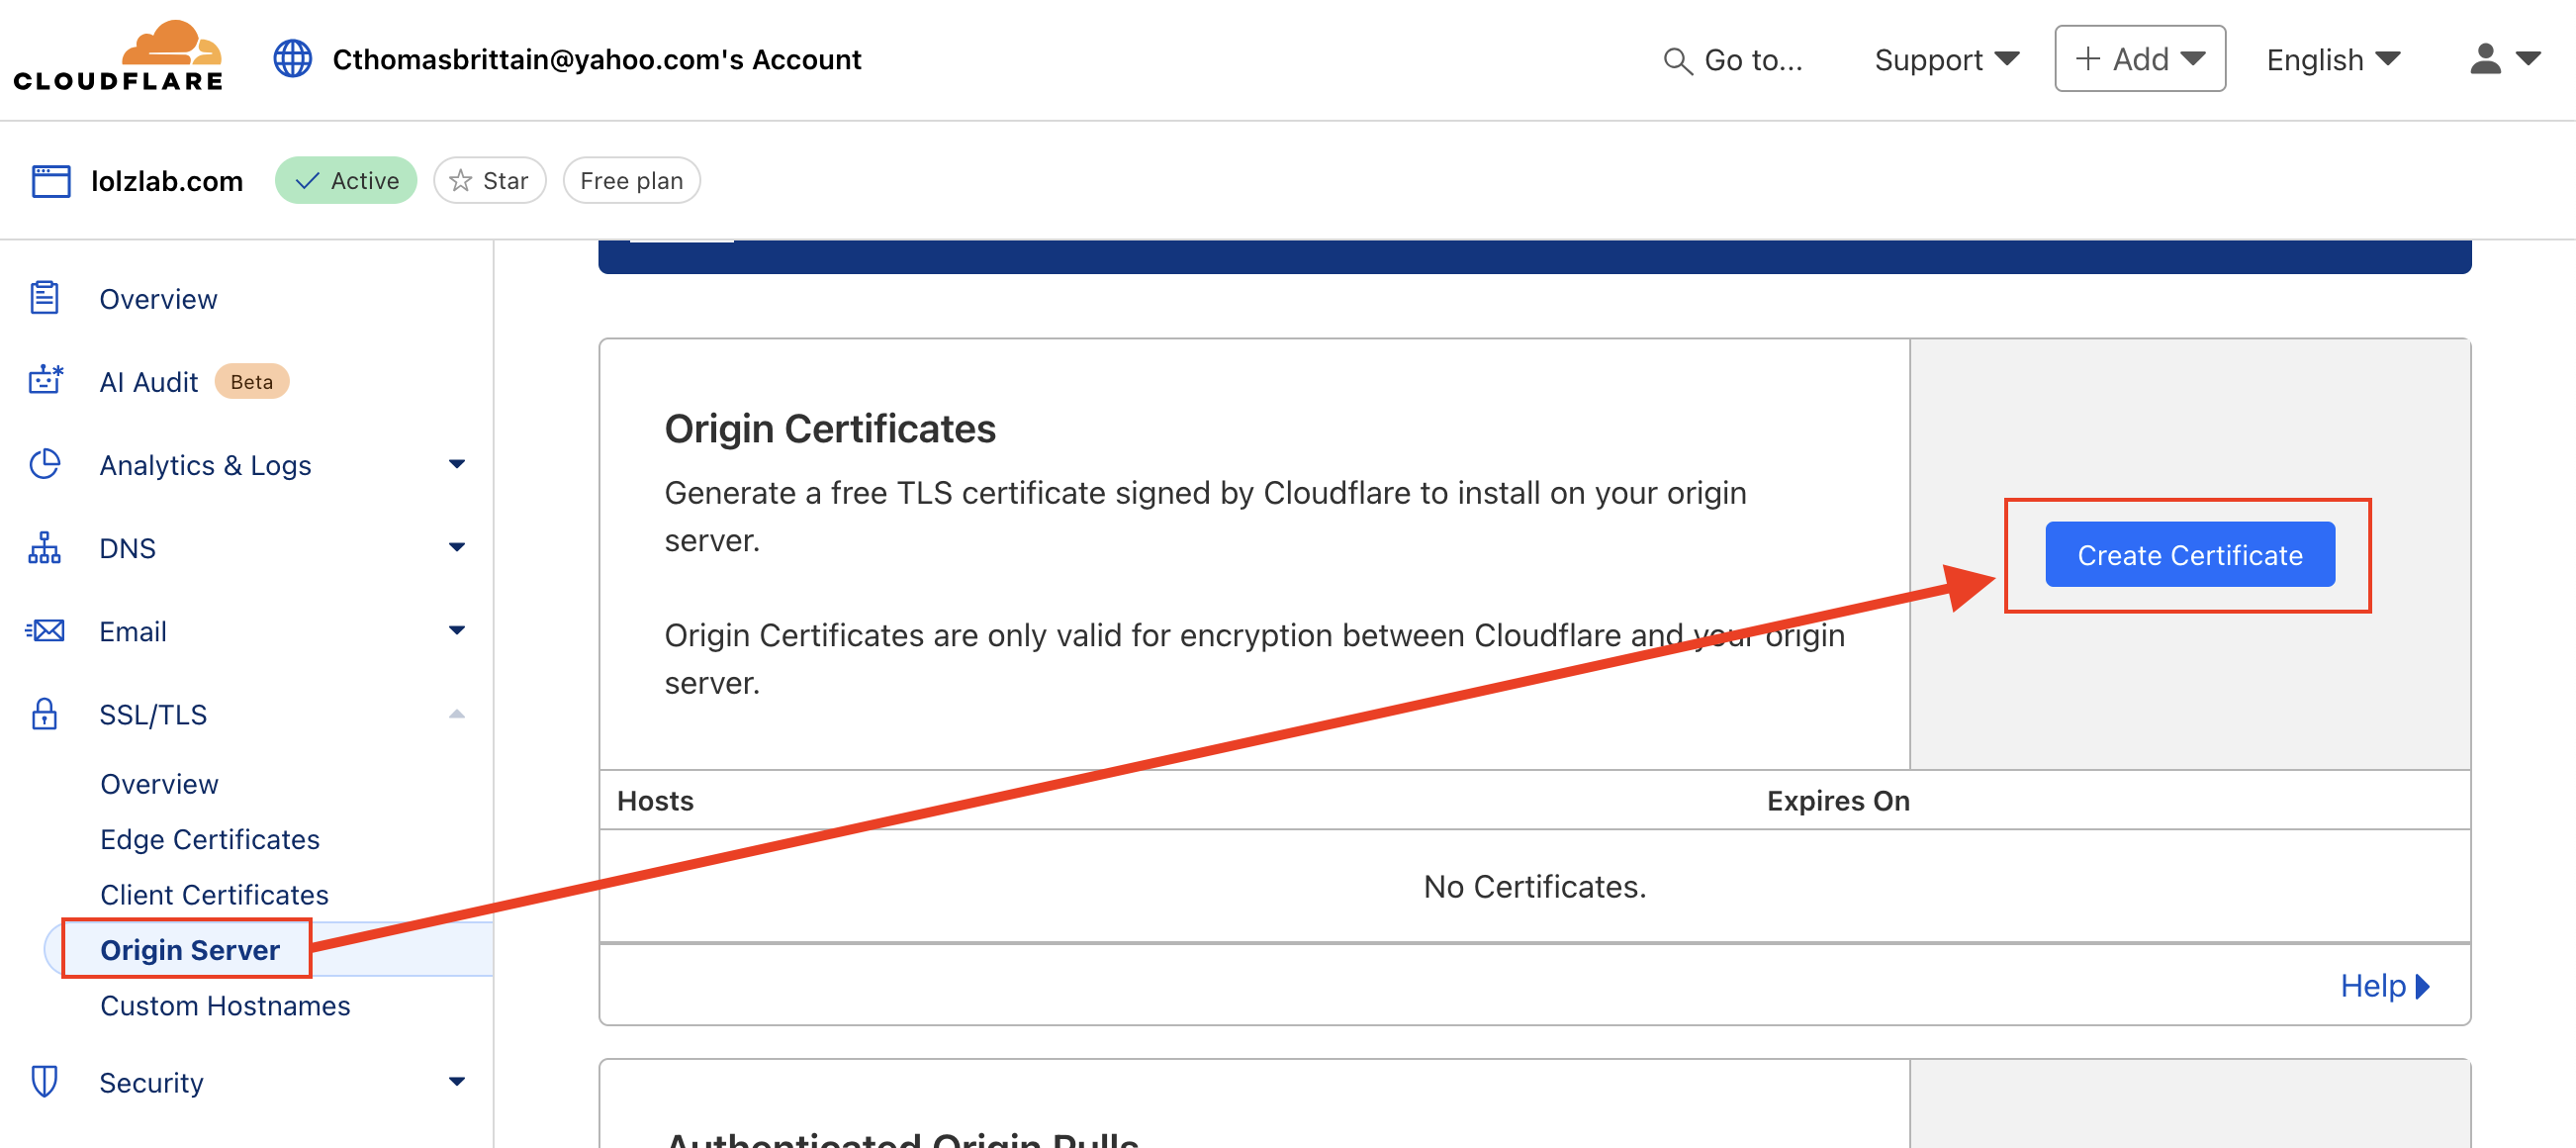
2. Generate a Cloudflare Origin Certificate
Cloudflare Dashboard →
SSL/TLS
→
Origin Server
tab
-
Click "Create Certificate"
-
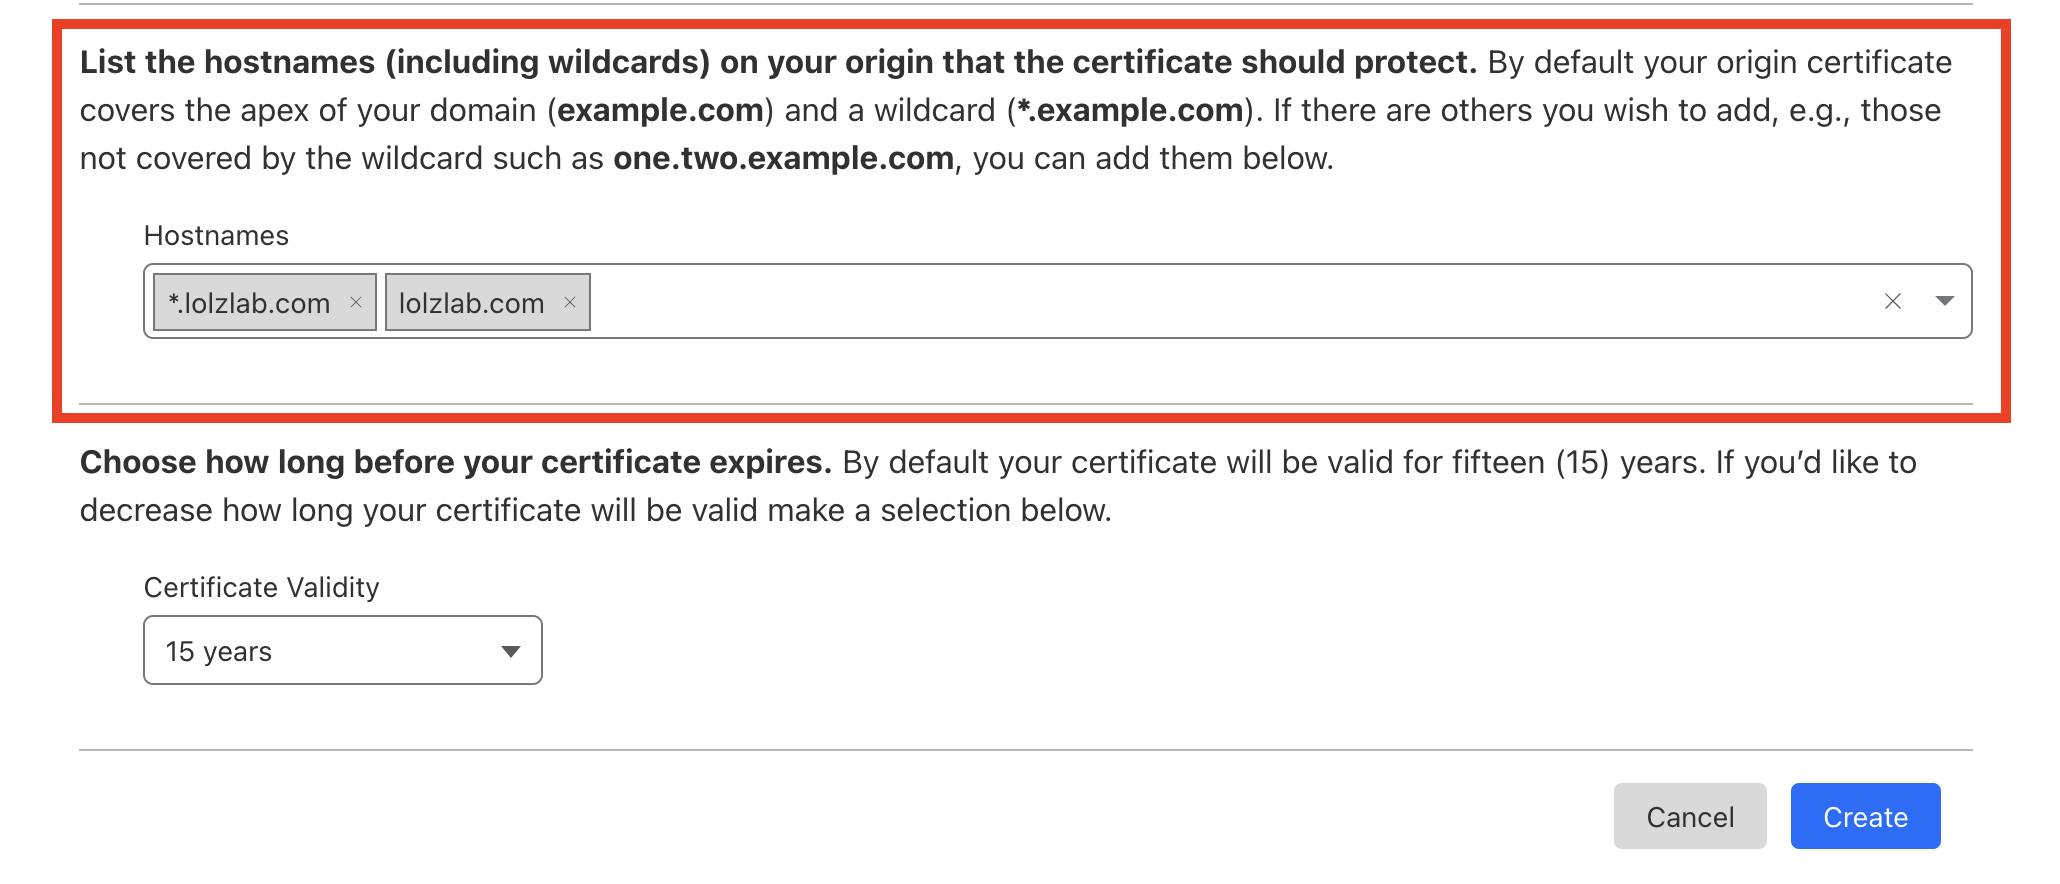
Choose:
- Private key type: RSA
-
Hostname(s):
<your-api-name>.<your-host-name>.com(add more if needed) - Expiration: 15 years (or your preference)
- Click Create
You’ll get:
- A certificate (PEM) block
- A private key (PEM) block
Leave the browser open for the next step.
3. 📝 Save Certificate Files on Your Pi
SSH into your Nginx Pi (
192.168.1.102
for me):
I'll replace
<your-api-name>.<your-host-name>
with
self-sensored.api.lolzlab.com
:
sudo mkdir -p /etc/nginx/ssl/<your-api-name>.<your-host-name>.com
sudo nano /etc/nginx/ssl/<your-api-name>.<your-host-name>.com/cert.pem
Paste the certificate , then:
sudo nano /etc/nginx/ssl/<your-api-name>.<your-host-name>.com/key.pem
Paste the private key .

Set secure permissions:
sudo chmod 600 /etc/nginx/ssl/<your-api-name>.<your-host-name>.com/*
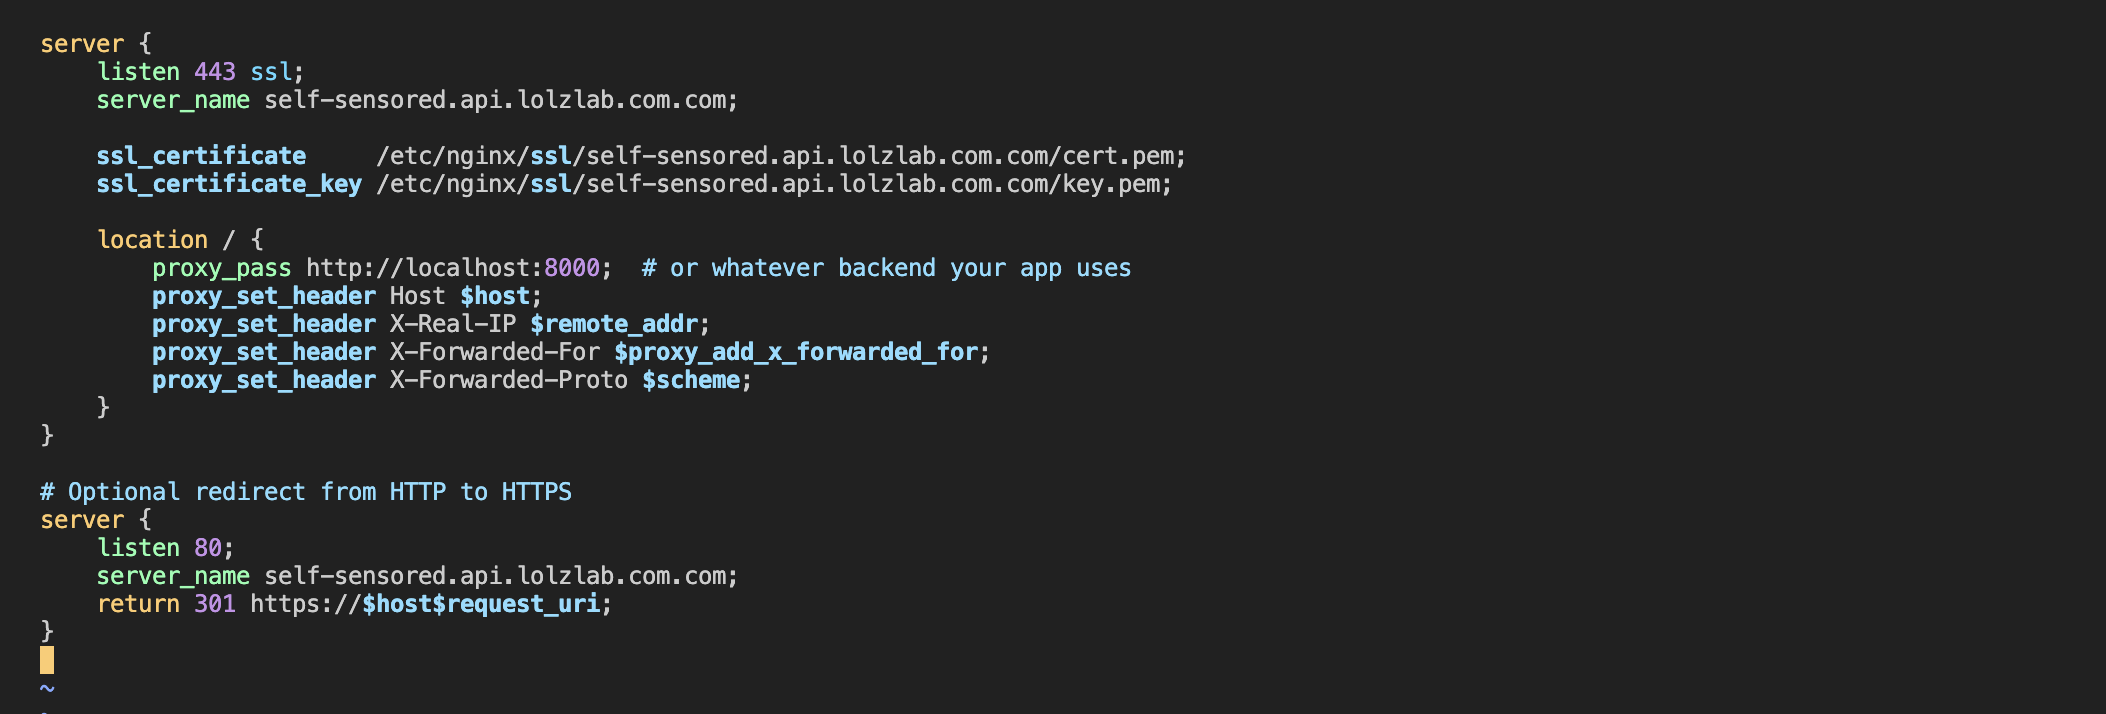
4. 🛠️ Update Nginx for HTTPS Reverse Proxy
Edit
/etc/nginx/sites-available/reverse-proxy.conf
:
server {
    listen 443 ssl;
    server_name <your-api-name>.<your-host-name>.com;

    ssl_certificate     /etc/nginx/ssl/<your-api-name>.<your-host-name>.com/cert.pem;
    ssl_certificate_key /etc/nginx/ssl/<your-api-name>.<your-host-name>.com/key.pem;

    location / {
        proxy_pass http://localhost:8000;  # or whatever backend your app uses
        proxy_set_header Host $host;
        proxy_set_header X-Real-IP $remote_addr;
        proxy_set_header X-Forwarded-For $proxy_add_x_forwarded_for;
        proxy_set_header X-Forwarded-Proto $scheme;
    }
}

# Optional redirect from HTTP to HTTPS
server {
    listen 80;
    server_name <your-api-name>.<your-host-name>.com;
    return 301 https://$host$request_uri;
}
5. 🔄 Restart Nginx
sudo nginx -t  # check config
sudo systemctl restart nginx
Confirm port 443 is listening:
sudo ss -tuln | grep :443
6. Update Cloudflared Tunnel to Use HTTPS (Optional)
Now that your Nginx reverse proxy is serving traffic over HTTPS with valid Cloudflare Origin Certificates, you can securely forward requests from Cloudflare to your Pi using end-to-end encryption.
To do this, modify your cloudflared configuration file (
/etc/cloudflared/config.yml
) to route HTTPS traffic per hostname.
# /etc/cloudflared/config.yml

tunnel: lolz_at_home
credentials-file: /home/ladvien/.cloudflared/7503668c-xxxx-xxxx-xxxx-xxxxxxxxxx.json

ingress:
  # Other entries
  # ...

  - hostname: <your-api-name>.<your-host-name>.com
    service: https://localhost:443

    # Allows TLS to pass through for E2E encryption.
    originRequest:
      noTLSVerify: true

  - service: http_status:404
Why noTLSVerify:
true
?
Since you're using a Cloudflare Origin Certificate, which is not trusted by default system CA bundles, setting noTLSVerify: true tells Cloudflared to accept this certificate without validation errors. This is safe as long as:
- The connection is over localhost or a trusted LAN
- You control both Nginx and the certificate
After saving apply the changes:
sudo systemctl restart cloudflared
Your tunnel will now forward traffic securely from Cloudflare to Nginx using HTTPS.
7. Test the Setup
Check externally:
curl https://<your-api-name>.<your-host-name>.com --resolve <your-api-name>.<your-host-name>.com:443:<your-public-ip>
Or just visit it in a browser. You should no longer get
SSL_ERROR_NO_CYPHER_OVERLAP
.
Bonus: Enforce Full (Strict) Mode
Once HTTPS is working on your origin Pi, you can enable Full (Strict) mode in Cloudflare, which requires valid certificates and blocks MITM attacks:
Cloudflare →
SSL/TLS
→ Mode → Full (Strict)
📦 Summary
By installing a Cloudflare Origin Certificate and updating Nginx, you’ve ensured that all traffic — even between Cloudflare and your Pi — is encrypted. This setup:
- Improves security
- Enables Cloudflare Full (Strict) mode
- Keeps your Pi headless and protected