Originally posted on www.letsmakerobots.com
Part of my C journal -- Writing an LPC1114 bootloader
 Setting Up the GCC Compiler
I setup a C environment as basic I could. There may be easier ways to go about this, but I wanted to use GCC to compile.
To setup the environment:
1. I downloaded and setup MinGW32 .
2. I then downloaded FTD2XX libraries . This included the ftd2xx.h file and ftd2xx.lib .
3. I then stole the test code from Hack-a-Day's article on bitbanging with the FTDI .
4. I modified the code as they suggested by including, in this order, the Windows compatibility files:
#include <stdio.h>
#include <stdarg.h>
#include <stdlib.h>
#include <windows.h>
#include <windef.h>
#include <winnt.h>
#include <winbase.h>
#include <string.h>
#include <math.h>
#include <stdbool.h>
#include <stdint.h>
#include "ftd2xx.h"
#include <sys/time.h>
I used this line to build it:
$ gcc -o main main.c -L./ -lftd2xx
You must have both the ftd2xx.h and ftd2xx.lib in the same directory as you attempt to build.
As for editing, I've really grown to love Sublime Text 2 .
If you have issues , make sure directory containing your files is in your PATH environment variable (I go over how to add the directory to your environment variables in this post ).
D2XX -- FTDI Support
The FTDI chips are highly controversial chips in the embedded world. I will not begin the debate on their efficacy. I chose this particular serializer since I felt most roboticist would have at least one, making software released using the chips reach a greater range of people on the spectrum of hobbyist to professional.
Also, the supporting tools went well with one of the design goals for this project: Simplicity. I wanted to keep the code as near to machine code as I could easily write. Bdk6 described C to me as, "A high-level assembly language."
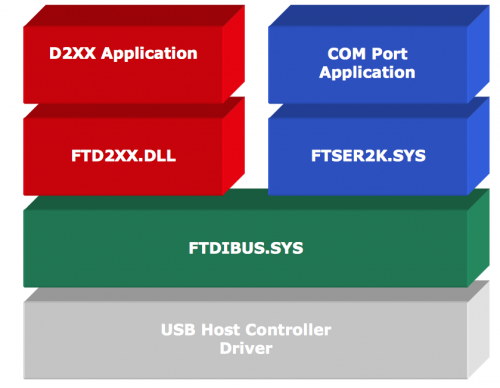
There are two basic interfaces for the FTDI chips
- Virtual COM port.
- FTD2XX.DLL
I will be using the DLL. This is what the " -L./ -lftd2xx" part of our compile command is referring. It is including the ftd2xx library found in working directory.
The D2XX library is pretty nifty. It provides a collections of C++ functions to interact with the FTDI chip, and thereby, anything speaking UART.
A full list of the commands and C code examples may be found in the,
One last caveat regarding the reason I selected using the D2XX libraries instead of using the chip as a virtual COM port. I wanted as much control over the metal of the chip is possible. Originally, I had set out to write a downloader that'd use the already existing Sparkfun FTDI breakout , meant to program the Arduino Pro Mini and LilyPad, as no-need-to-modify programmer for my LPC1114 board. To accomplish this, I needed bit level control over all of the pins of the FTDI chip, which the D2XX has, but the COM port does not. Therefore, it was the deciding factor for using the D2XX library. Plus, I didn't know the difference when I started, so that whole explanation was baloney . But, even if I realized it post-fact, it was the reason I didn't switch to COM port.

Setup Menu
I found the easiest way to work with the D2XX is to setup a menu.
YOUR_CODE.C
I'm writing this article as if someone were importing my FTDI_HELPER module to use in their code. A few important notes: First, the variables we will use are actually declared in YOUR_CODE.C. They are global variables. We then redeclare them as extern variables in the FTDI_HELPER.H. This tells the compiler it's going to be using several global variables, but they were actually declared in the YOUR_CODE.C. This allows the FTDI_HELPER module to setup the FTDI device, but your code will be able to act on all the major variables, such as the RxBuffer, ftHandle, etc.
YOUR_CODE.C

FT_DEVICE_LIST_INFO_NODE *devInfo;
bool FTDI_open_flag;


uint8_t RawRxBuffer[2048];


FT_STATUS ftSvtatus;
DWORD EventDWord;
DWORD TxBytes;
DWORD BytesWritten;
DWORD RxBytes;
DWORD BytesReceived;
- 3: A pointer variable which will store all the connected device information.
- 4: A flag set whenever we actually connect to an FTDI device. This allows your program to detect the connection.
- 7: An RX buffer. It will fill automatically when we receive data. You may adjust the size if needed; I think the FTDI chip only sends 20 bytes at time, but I was lazy.
- 10: Variable to store boolean flag for whether an D2XX command was successful.
- 12: Used to store bytes to be sent.
- 13: BytesWritten is used to store how many bytes were actually written by the FT_Write command.
- 14: RxBytes stores how many bytes are waiting to be read.
- 15: BytesReceived is used by FT_Read to store how many bytes have been read out of the RX buffer.
FTDI_HELPER.H
FTDI_HELPER.H

#ifndef FTDI_HELPER
#define FTDI_HELPER

#include <stdio.h>
#include <stdarg.h>
#include <stdlib.h>
#include <windows.h>
#include <windef.h>
#include <winnt.h>
#include <winbase.h>
#include <string.h>
#include <math.h>
#include <stdbool.h>
#include <stdint.h>
#include "ftd2xx.h"
#include <sys/time.h>

extern uint8_t ParsedRxBuffer[2048];
extern uint8_t RawRxBuffer[2048];

extern FT_HANDLE handle;
extern FT_Status ftStatus;
extern DWORD EventDWord;
extern DWORD TxBytes;
extern DWORD BytesWritten;
extern DWORD RxBytes;
extern DWORD BytesReceived;

int connected_device_num;

// Lists FTDI commands.
void ftdi_menu();

void quick_connect();

// Lists FTDI devices connected.
bool get_device_list();
bool connect_device(int * local_baud_rate);
bool close_device(int * local_baud_rate);
bool reset_device(int * local_baud_rate);
bool set_baud_rate(int * local_baud_rate);
bool set_baud_rate_auto(int * local_baud_rate);

#endif /* FTDI_helper.h */
Again, the extern variables are to let the compiler know we will be using the variables of the same name found in YOUR_CODE.C.
Main Menu
FTDI_HELPER.C

void ftdi_menu()
{
    int baud_rate = 0;
    char char_choice[3];
    int int_choice = 0;

    bool got_list = false;
    bool connected_flag = false;
    bool close_device_flag = false;
    bool set_baud_flag = false;

    // FTDI Menu
    do
    {
        system("cls");
        printf("FTDI Menu: ");
        if (connected_flag == true)
        {
            printf("       Connected: %lu, N, 1     \n\n", baud_rate);
        }
        else
        {
            printf("       Not Connected:               \n\n");
        }
        printf("1. Quick Connect\n");
        printf("2. Device List\n");
        if (got_list == true) // Only display option if devices list.
        {
        printf("3. Connect Device\n");
        }
        if (connected_flag == true) // Only give display if connected.
        {
        printf("4. Close Device\n");
        }
        if (connected_flag == true) // Only give display if connected.
        {
        printf("5. Change baud-rate\n");
        }

        printf("9. Main Menu\n");

        // If connected, display the connected device info.
        if (connected_flag == true)
        {
            printf("\n");
            printf("Connected Device: %d:\n", connected_device_num);
            printf("    Flags:         0x%02X\n",devInfo[connected_device_num].Flags);
            printf("    Type:          0x%02X\n",devInfo[connected_device_num].Type);
            printf("    ID:            0x%02X\n",devInfo[connected_device_num].ID);
            printf("    Local ID:      0x%02X\n",devInfo[connected_device_num].LocId);
            printf("    Serial Number: %s\n",devInfo[connected_device_num].SerialNumber);
            printf("    Description:   %s\n",devInfo[connected_device_num].Description);
            printf("    ftHandle =     0x%02X\n",devInfo[connected_device_num].ftHandle);
        }

        // Get user choice.
        scanf("%s", char_choice);

        // Convert string to int for switch statement.
        int_choice = atoi(char_choice);

        switch (int_choice)
        {
            case 1:
                quick_connect();
                baud_rate = 115200;
                connected_flag = true;
            case 2:
                got_list = get_device_list();
                break;
            case 3:
                if (got_list == true) // Only display option if devices listed.
                {
                    connected_flag = connect_device(&baud_rate);
                }
                break;
            case 4:
                if (connected_flag == true) // Only give display if connected.
                {
                    close_device_flag = close_device();
                    if(close_device_flag == true){connected_flag = false;}
                    close_device_flag = false;
                }
                break;
            case 5:
                if (connected_flag == true) // Only give display if connected.
                {
                    set_baud_flag = set_baud_rate(&baud_rate);
                    // set_baud_flag is not used, yet.

}
                break;
            case 9:
                main_menu();
                break;
            default:printf("""Bad choice. Hot glue!""");
                break;
        }
    }while(int_choice !=99);
}
I found the easiest way to setup a FTDI device in C is using a menu. I've provided five options: (1) Quick Connect, (2) Device List, (3) Connect Device, (4) Close Device, (5) and Set Baud Rate. Several options require running the other options first. For example, before "Connect Device" is displayed you must run "Device List." Let's walk through the code,
- 5-7: Variables for the scanf and switch-statement deriving the menu.
- 9-12: Boolean flags for controlling the flow of the menu.
- 15: We want a menu which is persistent, therefore, we use the do-while loop.
- 19-22: Let's display the connection information, but only if we have a device connected.
- 27-42: We print the rest of the menu. Some items only print if boolean flags are set to true.
- 44-56: Prints out the device details, if connected.
- 58-64: Gets a users input, converts it to an int, store it, then selects a switch-case based upon input.
- 67: The quick_connect() function creates an FTDI connection based upon default attributes.
- 68: Sets the local baud_rate variable to the quick_connect() baud rate.
- 71: We get run the get_list() function, which lists all FTDI devices currently connected to the USB ports.
- 74: We check to see if get_list() has already been run, before we allow the user to connect to a device.
- 76: Connect_device() takes a pointer to the holding the value of the baud-rate the user has selected. It then attempts to connect to the device. If successful, the function returns true.
- 80: Only allow a device to be closed, if one is connected.
- 82: Close_device() attempts to shut-down the currently connected FTDI device. If it is successful, it returns true.
- 83-84: If the close_device() function was a success, the connected_flag is set to false, to show there is no device connected. Then, the close_device flag is reset to false to prepare for the next close_device() call.
- 90: The set_baud() takes a pointer to a value for the desired baud rate. The function attempts to set the baud rate and returns true if successful.
Quick Connect
This function is meant for the lazy user. He or she does not want to select the device, or the baud rate, they'll simply take whatever your program gives you. In my case, I wrote my quick connect to open device '0' and set the baud rate to 115,200.
FTDI_HELPER.C

void quick_connect()
{
    int local_baud_rate = 115200;
    // Create the device information list
    ftStatus = FT_CreateDeviceInfoList(&numDevs);
    // get the device information list
    ftStatus = FT_GetDeviceInfoList(devInfo,&numDevs);
    // Open user's selection.
    // Allocate storage for list based on numDevs.
    devInfo =
    (FT_DEVICE_LIST_INFO_NODE*)malloc(sizeof(FT_DEVICE_LIST_INFO_NODE)*numDevs);
    FT_Open(0, &devInfo[0].ftHandle);
    FT_SetBaudRate(devInfo[0].ftHandle, local_baud_rate);
}
- 5: Place the baud rate into a variable to be set.
- 7: We create a list of devices, placing them in our global InfoList variable.
- 9: We get the device info on the created device list.
- 12-13: We allocate enough space for info on each device enumerated.
- 14: Opens the device at '0' in the device list.
- 15: Sets the baud rate to 115,200.
Device List
The get_device_list() function is for the more cautious user. First, a list of FTDI devices is generated. After, enough space is allocated in an array for each device's info. Lastly, the device details gathered are placed in this list. If the process of generating and storing the device details was successful the function returns true.
FTDI_HELPER.C

bool get_device_list()
{
    // Create the device information list.
    ftStatus = FT_CreateDeviceInfoList(&numDevs);

    if (ftStatus == FT_OK) {
        printf("Number of devices is %d\n",numDevs);
    }
    else {
        printf("Failed to get FTDI device list.\n");
    }

    if (numDevs > 0) {

        // Allocate storage for list based on numDevs.
        devInfo =
        (FT_DEVICE_LIST_INFO_NODE*)malloc(sizeof(FT_DEVICE_LIST_INFO_NODE)*numDevs);

        // Get the device information list.
        ftStatus = FT_GetDeviceInfoList(devInfo,&numDevs);
        if (ftStatus == FT_OK) {
                printf("Got Devices\n");
            }
        else
            {
                printf("Failed to get device list.\n");
                Sleep(3000);
            }
            // Set flag if we got at least on device.
            return true;
        }
    return false;
}
- 6: Creates a device list.
- 8-13: If the attempt to create a device list fails, we tell the user. Otherwise, we list the number of FTDI devices currently connected.
- 15: If at least one device was detected, we proceed with listing the devices.
- 18-19: We allocate enough memory space to store the device info of each connected device.
- 22: We read each device, get the info, and put the info in the list respectively.
- 23-30: If we got the device info, we tell the user, "We got devices." Otherwise, we tell the user we failed. Failed, failed, failed!
- 32: Since we gathered some device info, the function returns true.
- 34: If no device info was gathered, the function returns false.
Connect Device from List
Once the get_device_list() function is run, then we are free to connect to one of the listed devices. The connect_device() function takes a pointer to the desired baud-rate value for the connection. This function requires the user enter a number 0-8, which is correlated to the devices gathered from the get_device_list() function. The connect_device() function then connects to the respective FTDI device at the baud-rate passed to it.
FTDI_HELPER.C

bool connect_device(int * local_baud_rate)
{

    char char_choice[3];
    int int_choice = 0;

    bool connected_flag = false;

    system("cls");
    printf("Which device # (0-8)?\n\n");
    printf("9. Return\n");

    printf("\n\nConnected FTDI:");
    for (int i = 0; i < numDevs && i < 8; i++) {
        printf("\nDevice: %d:\n",i);
        printf("    Flags:         0x%02X\n",devInfo[i].Flags);
        printf("    Type:          0x%02X\n",devInfo[i].Type);
        printf("    ID:            0x%02X\n",devInfo[i].ID);
        printf("    Local ID:      0x%02X\n",devInfo[i].LocId);
        printf("    Serial Number: %s\n",devInfo[i].SerialNumber);
        printf("    Description:   %s\n",devInfo[i].Description);
        printf("    ftHandle =     0x%02X\n",devInfo[i].ftHandle);
    }

    scanf("%s", char_choice);
    int_choice = atoi(char_choice);

    // Limit list to 9 devices.  Really, who has more connected at once?
    if (int_choice == 9)
    {
        return false;
    }
    else if (int_choice > -1 && int_choice < 9 && int_choice <= numDevs)
    {
        // Open user's selection.
        FT_Open(int_choice, &devInfo[int_choice].ftHandle);

        // Set default baud rate.
        *local_baud_rate = 115200;

        FT_SetBaudRate(devInfo[connected_device_num].ftHandle, *local_baud_rate);

        if (FT_status != FT_OK)
        {
            printf("Could not open FTDI device #%i.\n", int_choice);
            Sleep(3000);
        }
        else
        {
            connected_device_num = int_choice;
            return true;
        }
    }
    else
    {
        return false;
    }
    return false;
}
- 6-28: User and device information displayed. Then, the user input is requested. The user must enter 0-8 for the selection to be valid.
- 31: If the user selects option '9', we return false, since no device was connected.
- 35: Else if the user selects a 0-8 then the function will attempt to the respective device in the list we generated in earlier functions.
- 38: Here we actually open the device corresponding to the user's selection.
- 41: We load the default baud-rate into the baud-rate variable.
- 43: We set the baud-rate to 115,200. This is the default speed.
Close Device
FTDI_HELPER.C

bool close_device()
{
    FT_Close(devInfo[connected_device_num].ftHandle);

    if (FT_status != FT_OK)
    {
        printf("Could not close FTDI device.\n");
        Sleep(3000);
        return false;
    }
    else
    {
        return true;
    }
    return false;
}
Reset Device
The reset function is pretty straightfoward. It simply resets the connected FTDI device. The baud-rate apparently has to be set again after reset.
FTDI_HELPER.C

bool reset_device(int * local_baud_rate)
{
    FT_ResetPort(devInfo[connected_device_num].ftHandle);
    Sleep(50);
    FT_SetBaudRate(devInfo[connected_device_num].ftHandle, *local_baud_rate);
    Sleep(50);

    if (FT_status != FT_OK)
    {
        printf("Could not reset FTDI device.\n");
        Sleep(3000);
        return false;
    }
    else
    {
        // Device reset a success.
        return true;
    }
    return false; // Just in case.
}
- 5: Connected FTDI device is reset.
- 7: The baud-rate is reapplied.
Set Baud
The set_baud() funciton sets the connected device to whatever value the user selects.
FTDI_HELPER.C

bool set_baud_rate(int * local_baud_rate)
{

    char char_choice[3];
    int int_choice = 0;

    system("cls");
    printf("Set baud: \n");
    printf("1. 9600\n");
    printf("2. 19200\n");
    printf("3. 38400\n");
    printf("4. 57600\n");
    printf("5. 115200\n");
    printf("6. 230400\n");
    printf("9. Exit\n");

    scanf("%s", char_choice);
    int_choice = atoi(char_choice);

    switch (int_choice)
    {
        case 1:
            *local_baud_rate = 9600;
            break;
        case 2:
            *local_baud_rate = 19200;
            break;
        case 3:
            *local_baud_rate = 38400;
            break;
        case 4:
            *local_baud_rate = 57600;
            break;
        case 5:
            *local_baud_rate = 115200;
            break;
        case 6:
            *local_baud_rate = 230400;
            break;
        case 9:
            return false;
            break;
        default:printf("""Bad choice. Hot glue!""");
            break;
    }

    FT_SetBaudRate(devInfo[connected_device_num].ftHandle, *local_baud_rate);
    if (FT_OK != FT_OK)
     {
        printf("Unable to change baud-rate\n");
        Sleep(3000);
        return false;
     }
     else
     {
        return true;
     }
     return false;
}
- 6-47: The menu. Each selection corresponds a predefined baud-rate value.
- 49: The connected device's baud-rate is changed to the user's selected value.
- 58: If the baud-rate was changed successfully, the funciton returns true. Otherwise, it returns false.
Auto Set Baud Rate
The set_baud_rate_auto() is meant to be used to programmatically change the baud-rate, rather than have the use define the baud-rate. The command call is the same.
FTDI_HELPER.C

bool set_baud_rate_auto(int * local_baud_rate)
{
    FT_SetBaudRate(devInfo[connected_device_num].ftHandle, *local_baud_rate);

    if (FT_OK != FT_OK)
     {
        printf("Unable to change baud-rate\n");
        Sleep(3000);
        return false;
     }
     else
     {
        return true;
     }
     return false;
}
We are finally passed the setup functions, we get to the functions we are really interested. This is the rx(). It is called when you want to get user from the RX buffer. There are two buffers, by the way. There is the buffer on the FTDI, which holds 20 characters (I believe). But then, there is the buffer on your PC, which is largely limited to the amount of memory you computer has.
RX Function
The We are finally passed the setup functions! Now, for the functions we are really interested in. This is the rx(). It is called when you want to user from the RX buffer. There are two RX buffers, by the way. There is the buffer on the FTDI, which holds 20 characters (I believe).
But, then there is the buffer on your PC, which is largely limited to the amount of memory your computer has. And remember, this is C. If you set your PC's RxBuffer to be limited to 256 characters and you get character 257, it's not going to complain. Rather, you will simply have a buffer overrun and hell trying to debug it.
Once the D2XX function FT_Read has been called, the PC buffer is cleared. Therefore, getting the data you want comes down to calling rx() at the appropriate time.
Most of our variables declared to support this module are used in the rx() and tx() functions.
- RxBytes holds how many bytes are waiting to be read.
- RawRXBuffer is the actual computer RX buffer. Again, we set this buffer for 2048 characters, but if you receive character number 2049 it will not complain. You will simply have a buffer overrun. Cue sinister music.
- BytesReceived is how many bytes have been received to be read.
FTDI_HELPER.C

bool rx(bool print_or_not)
{
    // We need to get the status to see if we have characters in buffer.
    FT_GetStatus(devInfo[connected_device_num].ftHandle, &RxBytes, &TxBytes, &EventDWord);
    // We turn the buffer into a string; this is for easy parsing.
    RawRxBuffer[RxBytes+1] = '\0';
    // We only want to read the FTDI if there are bytes to read.
    if (RxBytes > 0) {
        // Read the bytes.  They are stored in the RawRxBuffer, BytesReceived is how many bytes we got
        // instead of how many bytes we should get.
        FT_status = FT_Read(devInfo[connected_device_num].ftHandle,RawRxBuffer,RxBytes,&BytesReceived);
        if (FT_status == FT_OK) {
            if(print_or_not)
            {
                printf("%s\n", RawRxBuffer);
            }
            // Put code here to copy string out of function.
            return true;
        }
        else {
            printf("RX FAILED \n");
            return false;
        }
    }
    return false;
}
- 3: The rx() function has a print to screen option. Meaning, if we get data and call the rx() function by passing it a true, then it will print the data received to the screen.
- 6: We get the status of the devices. This will tell us how many bytes are waiting to be read (RxBytes).
- 8: At is a simple way to convert our received data into a string, for easy parsing.
- 10: If we actually got some bytes, lets do something with them.
- 13: Actually loads the received data into our RawRxBuffer. It also gets how many bytes have been read since the last FT_GetStatus call.
- 15: If we got some bytes and we wanted to print, well, then let's print them.
- 19: This is an important spot . Here is where you want to put code to copy the data from the RawRxBuffer, to a more permanent home.
- 20: If we got some data, then return true.
- 27: If we didn't get any data, return false.
You'd call the rx() function like so,
rx(true);
This would print out whatever data is in the rx buffer to the screen.
TX Function
We saved the best function for last: tx().
This function takes two primary variables. A pointer to a character array and an integer indicating how many characters are found in the data array. Also, it wants a boolean value representing whether you want the function to echo the data sent to the screen.
In the heart of a function is a loop, which writes a character at a time to the FTDI device. The loop continues until the count is equal to the integer past to the function indicating how many characters are found in the array. Then, if all characters have been written, then it returns true. Otherwise, it returns false.
FTDI_HELPER.C

bool tx(char data[], int tx_data_size, bool print_or_not)
{
    uint8_t FTWrite_Check;
    int char_tx_count = 0;

    while(char_tx_count != tx_data_size)
    {
        //This should print just data (ie, no Start Code, Byte Count, Address, Record type, or Checksum).
        FTWrite_Check = FT_Write(devInfo[connected_device_num].ftHandle, &data[char_tx_count], (DWORD)sizeof(data[char_tx_count]), &BytesWritten);
        if (FTWrite_Check != FT_OK)
        {
            printf("Bad write!\n");
        }
        if(print_or_not)
        {
            printf("%C", data[char_tx_count]);
        }
        char_tx_count++;
    }

    if (char_tx_count == tx_data_size)
    {
        return true;
    }
    return false;
}
- 11: Actually writes the data to the FTDI device.
You can call this function from your code like so,
char data[] = "ALABTU!"

tx(data, sizeof(data), true);
This will cause the FTDI to write "ALABTU!" It will also be displayed on the screen.