This article is part of a series.
View all 2 parts
- Part 1 – This Article
- Part 2 – How to Send Data between PC and Arduino using Bluetooth LE
This article will show you how to program the Arduino Nano BLE 33 devices to use Bluetooth LE.
Introduction
Bluetooth Low Energy and I go way back. I was one of the first using the HM-10 module back in the day. Recently, my mentor introduced me to the Arduino Nano 33 BLE Sense . Great little board-- packed with sensors!
Shortly after firing it up, I got excited. I've been wanting to start creating my own smartwatch for a long time (as long the Apple watch has sucked really). And it looks like I wasn't the only one:
This one board had many of the sensors I wanted, all in one little package. The board is a researcher's nocturnal emission.
Of course, my excitement was tamed when I realized there weren't tutorials on how to use the Bluetooth LE portion. So, after a bit of hacking I figured I'd share what I've learned.
Blue on Everything
This article will be part of a series. Here, we will be building a Bluetooth LE peripheral from the Nano 33, but it's hard to debug without having a central device to find and connect to the peripheral.
The next article in this series will show how to use use Python to connect to Bluetooth LE peripherals (above gif). This should allow one to connect to the Nano 33 from a PC. In short, stick with me. I've more Bluetooth LE content coming.
How to Install the Arduino Nano 33 BLE Board
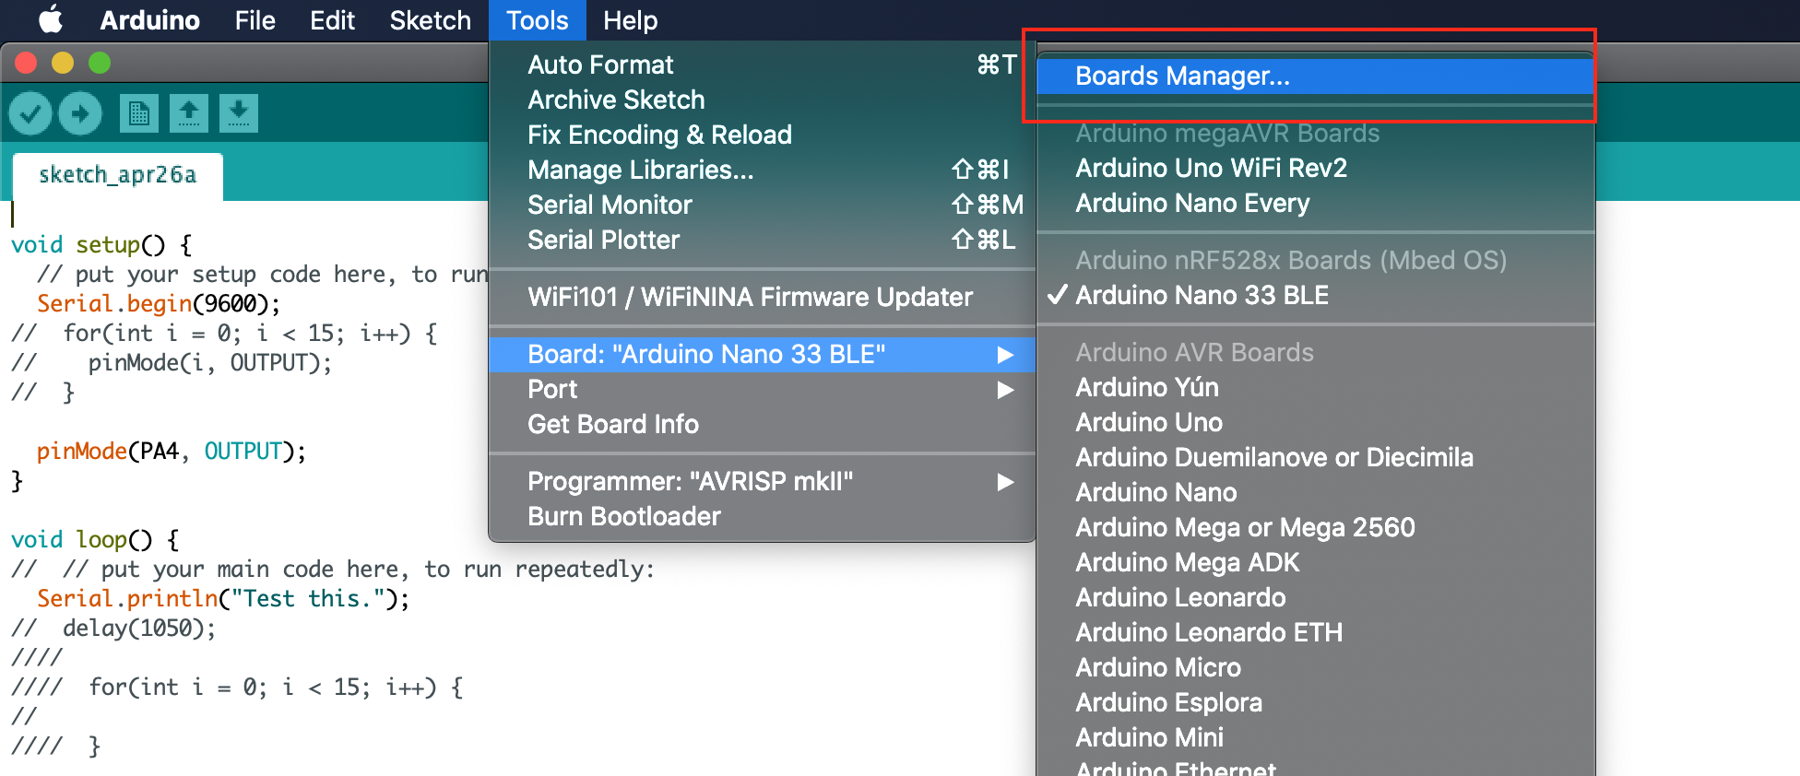
After getting your Arduino Nano 33 BLE board there's a little setup to do. First, open up the Arduino IDE and navigate to the "Boards Manager."

Search for
Nano 33 BLE
and install the board
Arduino nRF528xBoards (MBed OS)
.

Your Arduino should be ready work with the Nano 33 boards, except BLE. For that, we need another library.
How to Install the ArduinoBLE Library
There are are a few different Arduino libraries for Bluetooth LE--usually, respective to the hardware. Unfortunate, as this means we would need a different library to work with the Bluetooth LE on a ESP32, for example. Oh well. Back to the problem at hand.
The official library for working with the Arduino boards equipped with BLE is:
It works pretty well, though, the documentation is a bit spotty.
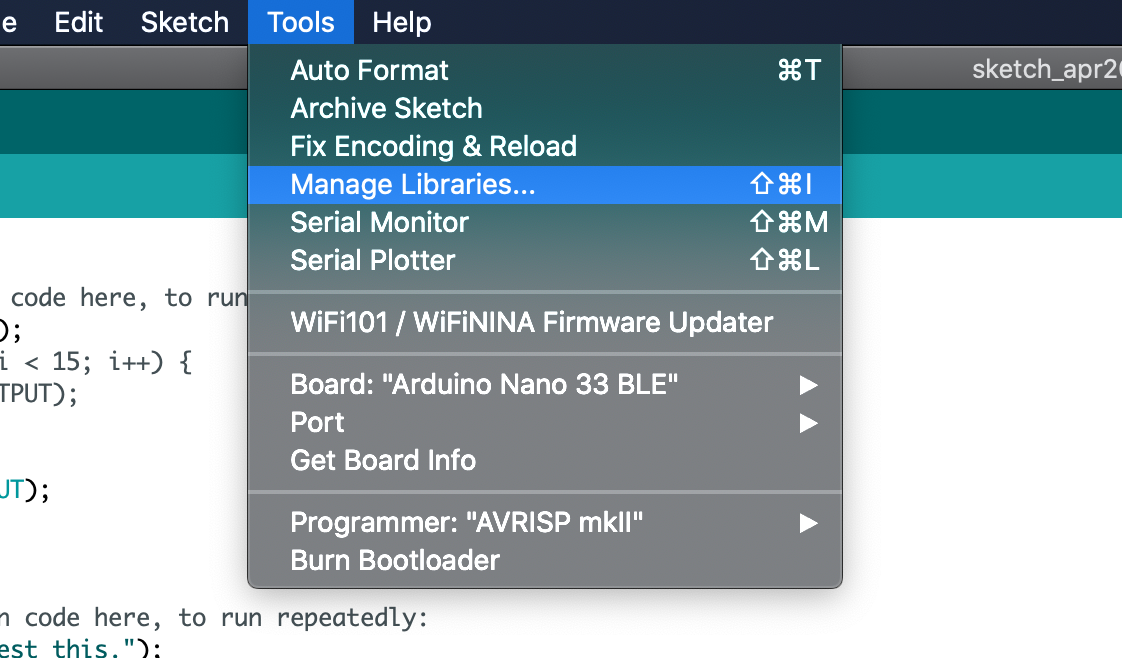
To get started you'll need to fire up the Arduino IDE and go to
Tools
then
Manager Libraries...

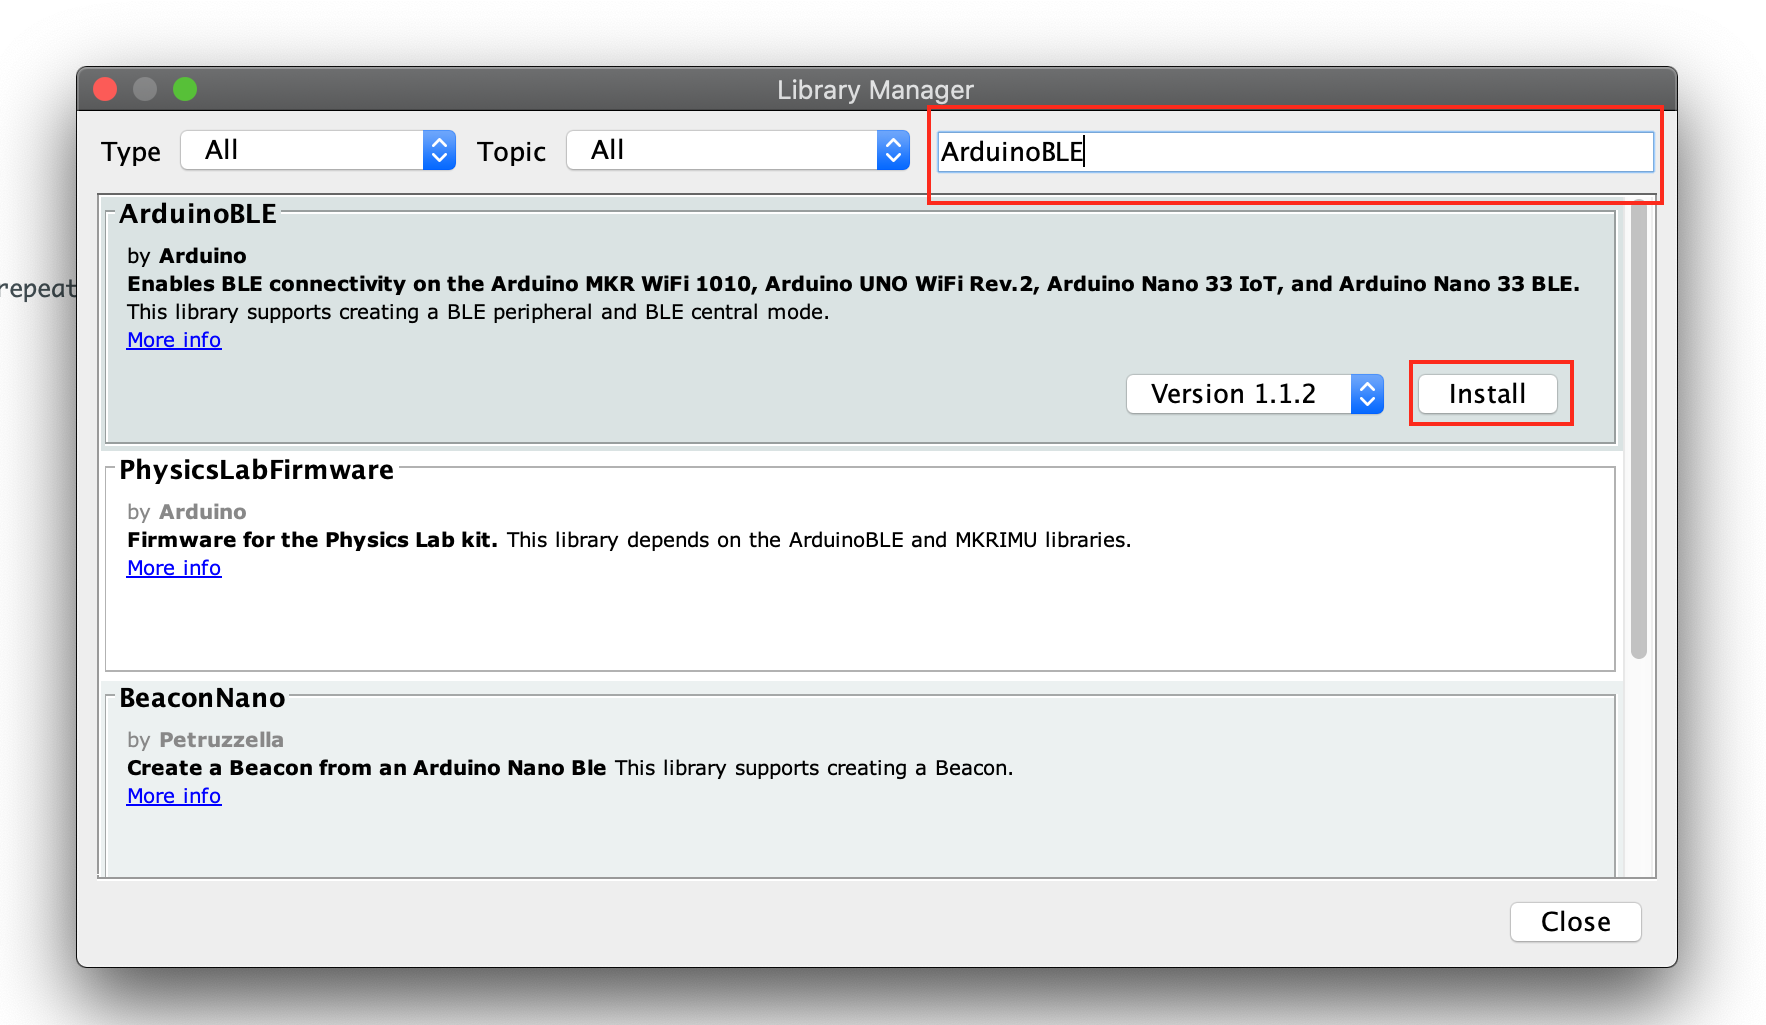
In the search box that comes up type
ArduinoBLE
and then select
Install
next to the library:

That's pretty much it, we can now include the library at the top of our sketch:
#include <ArduinoBLE.h>
And access the full API in our code.
Project Description
If you are eager, feel free to skip this information and jump to the code.
Before moving on, if the following terms are confusing:
- Peripheral
- Central
- Master
- Slave
- Server
- Client
You might check out EmbeddedFM's explanation:
I'll be focusing on getting the Arduino 33 BLE Sense to act as a peripheral BLE device. As a peripheral, it'll advertise itself as having services, one for reading, the other for writing.
UART versus Bluetooth LE
Usually when I'm working with a Bluetooth LE (BLE) device I want it to send and receive data. And that'll be the focus of this article.
I've seen this send-n-receive'ing data from BLE referred to as "UART emulation." I think that's fair, UART is a classic communication protocol for a reason. I've like the comparison as a mental framework for our BLE code.
We will have a
rx
property to get data from a remote device and a
tx
property where we can send data. Throughout the Arduino program you'll see my naming scheme using this analog. That stated, there are clear differences between BLE communication and UART. BLE is arguably more complex and versatile.
Data from the Arduino Microphone
To demonstrate sending and receiving data we need to data to send. We are going to grab information from the microphone on the Arduino Sense and send it to remote connected device. I'll not cover the microphone code here, as I don't understand it well enough to explain. However, here's a couple reads:
- Pulse-Density Modulation (data type output)
- Arduino Pulse-Density Modulation Library docs
Code
Time to code. Below is what I hacked together, with annotations from the "gotchas" I ran into.
One last caveat, I used
Jithin
's code as a base of my project:
Although, I'm not sure any of the original code is left. Cite your sources.
And if you'd rather look at the full code, it can be found at:
Initialization
We load in the BLE and the PDM libraries to access the APIs to work with the microphone and the radio hardware.
#include <ArduinoBLE.h>
#include <PDM.h>
Service and Characteristics
Let's create the service. First, we create the name displayed in the advertizing packet, making it easy for a user to identify our Arduino.
We also create a
Service
called
microphoneService
, passing it the full Universally Unique ID (UUID) as a string. When setting the UUID there are two options. A 16-bit or a 128-bit version. If you use one of the standard Bluetooth LE Services the 16-bit version is good. However, if you are looking to create a custom service, you will need to explore creating a full 128-bit UUID.
Here, I'm using the full UUIDs but with a standard service and characteristic, as it makes it easier to connect other hardware to our prototype, as the full UUID is known.
If you want to understand UUID's more fully, I highly recommend Nordic's article:
Anyway, we are going to use the following UUIDs:
*
Microphone
Service =
0x1800
--
Generic Access
*
rx
Characteristic =
0x2A3D
--
String
*
tx
Characteristic =
0x2A58
--
Analog
You may notice reading the Bluetooth specifications, there are two mandatory characteristics we should be implementing for
Generic Access
:
For simplicity, I'll leave these up to the reader. But they must be implemented for a proper
Generic Access
service.
Right, back to the code.
Here we define the name of the device as it should show to remote devices. Then, the service and two characteristics, one for sending, the other, receiving.
// Device name
const char* nameOfPeripheral = "Microphone";
const char* uuidOfService = "0000181a-0000-1000-8000-00805f9b34fb";
const char* uuidOfRxChar = "00002A3D-0000-1000-8000-00805f9b34fb";
const char* uuidOfTxChar = "00002A58-0000-1000-8000-00805f9b34fb";
Now, we actually instantiate the
BLEService
object called
microphoneService
.
// BLE Service
BLEService microphoneService(uuidOfService);
The characteristic responsible for receiving data,
rxCharacteristic
, has a couple of parameters which tell the Nano 33 how the characteristic should act.
// Setup the incoming data characteristic (RX).
const int RX_BUFFER_SIZE = 256;
bool RX_BUFFER_FIXED_LENGTH = false;
RX_BUFFER_SIZE
will be how much space is reserved for the
rx
buffer. And
RX_BUFFER_FIXED_LENGTH
will be, well, honestly, I'm not sure. Let me take a second and try to explain my ignorance.
When looking for the correct way to use the ArduinoBLE library, I referred to the documentation:
There are several different ways to initialize a characteristic, as a single value (e.g.,
BLEByteCharacteristic
,
BLEFloatCharacteristic
, etc.) or as buffer. I decided on the buffer for the
rxCharacteristic
. And that's where it got problematic.
Here's what the documentation states regarding initializing a
BLECharacteristic
with a buffer.
BLECharacteristic(uuid, properties, value, valueSize)
BLECharacteristic(uuid, properties, stringValue)
...
uuid: 16-bit or 128-bit UUID in string format
properties: mask of the properties (BLEBroadcast, BLERead, etc)
valueSize: (maximum) size of characteristic value
stringValue: value as a string
Cool, makes sense. Unfortunately, I never got a
BLECharacteristic
to work initializing it with those arguments. I finally dug into the
actual
BLECharacteristic
source and discovered their are two ways to initialize a
BLECharacteristic
:
BLECharacteristic(new BLELocalCharacteristic(uuid, properties, valueSize, fixedLength))
BLECharacteristic(new BLELocalCharacteristic(uuid, properties, value))
I hate misinformation. Ok, that tale aside, back to our code.
Let's actually declare the
rx
and
tx
characteristics. Notice, we are using a buffered characteristic for our
rx
and a single
byte
value characteristic for our
tx
. This may not be optimal, but it's what worked.
// RX / TX Characteristics
BLECharacteristic rxChar(uuidOfRxChar, BLEWriteWithoutResponse | BLEWrite, RX_BUFFER_SIZE, RX_BUFFER_FIXED_LENGTH);
BLEByteCharacteristic txChar(uuidOfTxChar, BLERead | BLENotify | BLEBroadcast);
The second argument is where you define how the characteristic should behave. Each property should be separated by the
|
as they are constants which are being
OR
ed together into a single value (masking).
Here is a list of available properties:
-
BLEBroadcast-- will cause the characteristic to be advertized -
BLERead-- allows remote devices to read the characteristic value -
BLEWriteWithoutResponse-- allows remote devices to write to the device without expecting an acknowledgement -
BLEWrite-- allows remote devices to write, while expecting an acknowledgement the write was successful -
BLENotify-- allows a remote device to be notified anytime the characteristic's value is update -
BLEIndicate-- the same as BLENotify, but we expect a response from the remote device indicating it read the value
Microphone
There are two global variables which keep track of the microphone data. The first is a small buffer called
sampleBuffer
, it will hold up to 256 values from the mic.
The
volatile int samplesRead
is the variable which will hold the immediate value from the mic sensor. It is used in the interrupt routine vector (ISR) function. The
volatile
keyword tells the Arduino's C++ compiler the value in the variable may change at any time and it should check the value when referenced, rather than relying on a cached value in the processor (
more on volatiles
).
// Buffer to read samples into, each sample is 16-bits
short sampleBuffer[256];

// Number of samples read
volatile int samplesRead;
Setup()
We initialize the
Serial
port, used for debugging.
void setup() {

  // Start serial.
  Serial.begin(9600);

  // Ensure serial port is ready.
  while (!Serial);
To see when the BLE actually is connected, we set the pins connected to the built-in RGB LEDs as
OUTPUT
.
  // Prepare LED pins.
  pinMode(LED_BUILTIN, OUTPUT);
  pinMode(LEDR, OUTPUT);
  pinMode(LEDG, OUTPUT);
Note, there is a bug in the source code where the
LEDR
and the
LEDG
are backwards
. You can fix this by searching your computer for
ARDUINO_NANO33BLE
folder and editing the file
pins_arduino.h
inside.
Change the following:
#define LEDR        (22u)
#define LEDG        (23u)
#define LEDB        (24u)
To
#define LEDR        (23u)
#define LEDG        (22u)
#define LEDB        (24u)
And save. That should fix the mappings.
The
onPDMdata()
is an
ISR
which fires every time the microphone gets new data. And
startPDM()
starts the microphone integrated circuit.
  // Configure the data receive callback
  PDM.onReceive(onPDMdata);

  // Start PDM
  startPDM();
Now Bluetooth LE is setup, we ensure the Bluetooth LE hardware has been powered-on within the Nano 33. We set the device name and begin advertizing the service. Then, add the
rx
and
tx
characteristics to the
microphoneService
. Lastly, add the
microphoneService
to the
BLE
object.
  // Start BLE.
  startBLE();

  // Create BLE service and characteristics.
  BLE.setLocalName(nameOfPeripheral);
  BLE.setAdvertisedService(microphoneService);
  microphoneService.addCharacteristic(rxChar);
  microphoneService.addCharacteristic(txChar);
  BLE.addService(microphoneService);
Now the Bluetooth LE hardware is turned on, we add callbacks which will fire when the device connects or disconnects. Those callbacks are great places to add notifications, setup, and teardown.
We also add a callback which will fire every time the Bluetooth LE hardware has a characteristic written. This allows us to handle data as it streams in.
  // Bluetooth LE connection handlers.
  BLE.setEventHandler(BLEConnected, onBLEConnected);
  BLE.setEventHandler(BLEDisconnected, onBLEDisconnected);

  // Event driven reads.
  rxChar.setEventHandler(BLEWritten, onRxCharValueUpdate);
Lastly, we command the Bluetooth LE hardware to begin advertizing its services and characteristics to the world. Well, at least +/-30ft of the world.
  // Let's tell devices about us.
  BLE.advertise();
Before beginning the main loop, I like spiting out all of the hardware information we setup. This makes it easy to add it into whatever other applications we are developing., which will connect to the newly initialized peripheral.
  // Print out full UUID and MAC address.
  Serial.println("Peripheral advertising info: ");
  Serial.print("Name: ");
  Serial.println(nameOfPeripheral);
  Serial.print("MAC: ");
  Serial.println(BLE.address());
  Serial.print("Service UUID: ");
  Serial.println(microphoneService.uuid());
  Serial.print("rxCharacteristic UUID: ");
  Serial.println(uuidOfRxChar);
  Serial.print("txCharacteristics UUID: ");
  Serial.println(uuidOfTxChar);


  Serial.println("Bluetooth device active, waiting for connections...");
}
Loop()
The main loop grabs a reference to the
central
property from the
BLE
object. It checks if
central
exists and then it checks if
central
is connected. If it is, it calls the
connectedLight()
which will cause the green LED to come on, letting us know the hardware has made a connection.
Then, it checks if there are data in the
sampleBuffer
array, if so, it writes them to the
txChar
. After it has written all data, it resets the
samplesRead
variable to
0
.
Lastly, if the device is not connected or not initialized, the loop turns on the disconnected light by calling
disconnectedLight()
.
void loop()
{
  BLEDevice central = BLE.central();

  if (central)
  {
    // Only send data if we are connected to a central device.
    while (central.connected()) {
      connectedLight();

      // Send the microphone values to the central device.
      if (samplesRead) {
        // print samples to the serial monitor or plotter
        for (int i = 0; i < samplesRead; i++) {
          txChar.writeValue(sampleBuffer[i]);
        }
        // Clear the read count
        samplesRead = 0;
      }
    }
    disconnectedLight();
  } else {
    disconnectedLight();
  }
}
Some may have noticed there is probably an issue with how I'm pulling the data from the
sampleBuffer
, as I've just noticed it myself writing this article, it may have a condition where the microphone's
ISR
is called in the middle of writing the buffer to the
txChar
. If I've need to fix this, I'll update this article.
Ok, hard part's over, let's move on to the helper methods.
Helper Methods
startBLE()
The
startBLE()
function initializes the Bluetooth LE hardware by calling the
begin()
. If it is unable to start the hardware, it will state so via the serial port, and then stick forever.
/*
 *  BLUETOOTH
 */
void startBLE() {
  if (!BLE.begin())
  {
    Serial.println("starting BLE failed!");
    while (1);
  }
}
onRxCharValueUpdate()
This method is called when new data is received from a connected device. It grabs the data from the
rxChar
by calling
readValue
and providing a buffer for the data and how many bytes are available in the buffer. The
readValue
method returns how many bytes were read. We then loop over each of the bytes in our
tmp
buffer, cast them to
char
, and print them to the serial terminal. This is pretty helpful when debugging.
Before ending, we also print out how many bytes were read, just in case we've received data which can't be converted to
ASCII
. Again, helpful for debugging.
void onRxCharValueUpdate(BLEDevice central, BLECharacteristic characteristic) {
  // central wrote new value to characteristic, update LED
  Serial.print("Characteristic event, read: ");
  byte tmp[256];
  int dataLength = rxChar.readValue(tmp, 256);

  for(int i = 0; i < dataLength; i++) {
    Serial.print((char)tmp[i]);
  }
  Serial.println();
  Serial.print("Value length = ");
  Serial.println(rxChar.valueLength());
}
LED Indicators
Not much to see here. These functions are called when our device connects or disconnects, respectively.
void onBLEConnected(BLEDevice central) {
  Serial.print("Connected event, central: ");
  Serial.println(central.address());
  connectedLight();
}

void onBLEDisconnected(BLEDevice central) {
  Serial.print("Disconnected event, central: ");
  Serial.println(central.address());
  disconnectedLight();
}

/*
 * LEDS
 */
void connectedLight() {
  digitalWrite(LEDR, LOW);
  digitalWrite(LEDG, HIGH);
}


void disconnectedLight() {
  digitalWrite(LEDR, HIGH);
  digitalWrite(LEDG, LOW);
}
Microphone
I stole this code from Arduino provided example. I think it initializes the
PDM
hardware (microphone) with a
16khz
sample rate.
/*
 *  MICROPHONE
 */
void startPDM() {
  // initialize PDM with:
  // - one channel (mono mode)
  // - a 16 kHz sample rate
  if (!PDM.begin(1, 16000)) {
    Serial.println("Failed to start PDM!");
    while (1);
  }
}
Lastly, the
onPDMData
callback is fired whenever their are data available to be read. It checks how many bytes their are available by calling
available()
and reads that number of bytes into the buffer. Lastly, given the data are
int16
, it divides the number of bytes by
2
as this is the number of samples read.
void onPDMdata() {
  // query the number of bytes available
  int bytesAvailable = PDM.available();

  // read into the sample buffer
  int bytesRead = PDM.read(sampleBuffer, bytesAvailable);

  // 16-bit, 2 bytes per sample
  samplesRead = bytesRead / 2;
}
Final Thoughts
Bluetooth LE is powerful--but tough to get right. To be clear, not saying I've gotten it right here, but I'm hoping I'm closer. If you find any issues please leave me a comment or send me an email and I'll get them corrected as quick as I'm able.
